Blackmagic Design’s DaVinci Resolve is one of the pre-eminent color correction applications – all the more amazing that it’s so accessible to any user. Even the free Lite version does nearly everything you’d want from any color grading software. If you have an understanding of how to use a 3-way color correction filter and you comprehend procedural nodes as a method of stacking corrections, then it’s easy to get proficient with Resolve, given a bit of serious seat time. The following tips are designed to help you get a little more comfortable with the nuances of Resolve. (Click on the images below for enhanced views.)
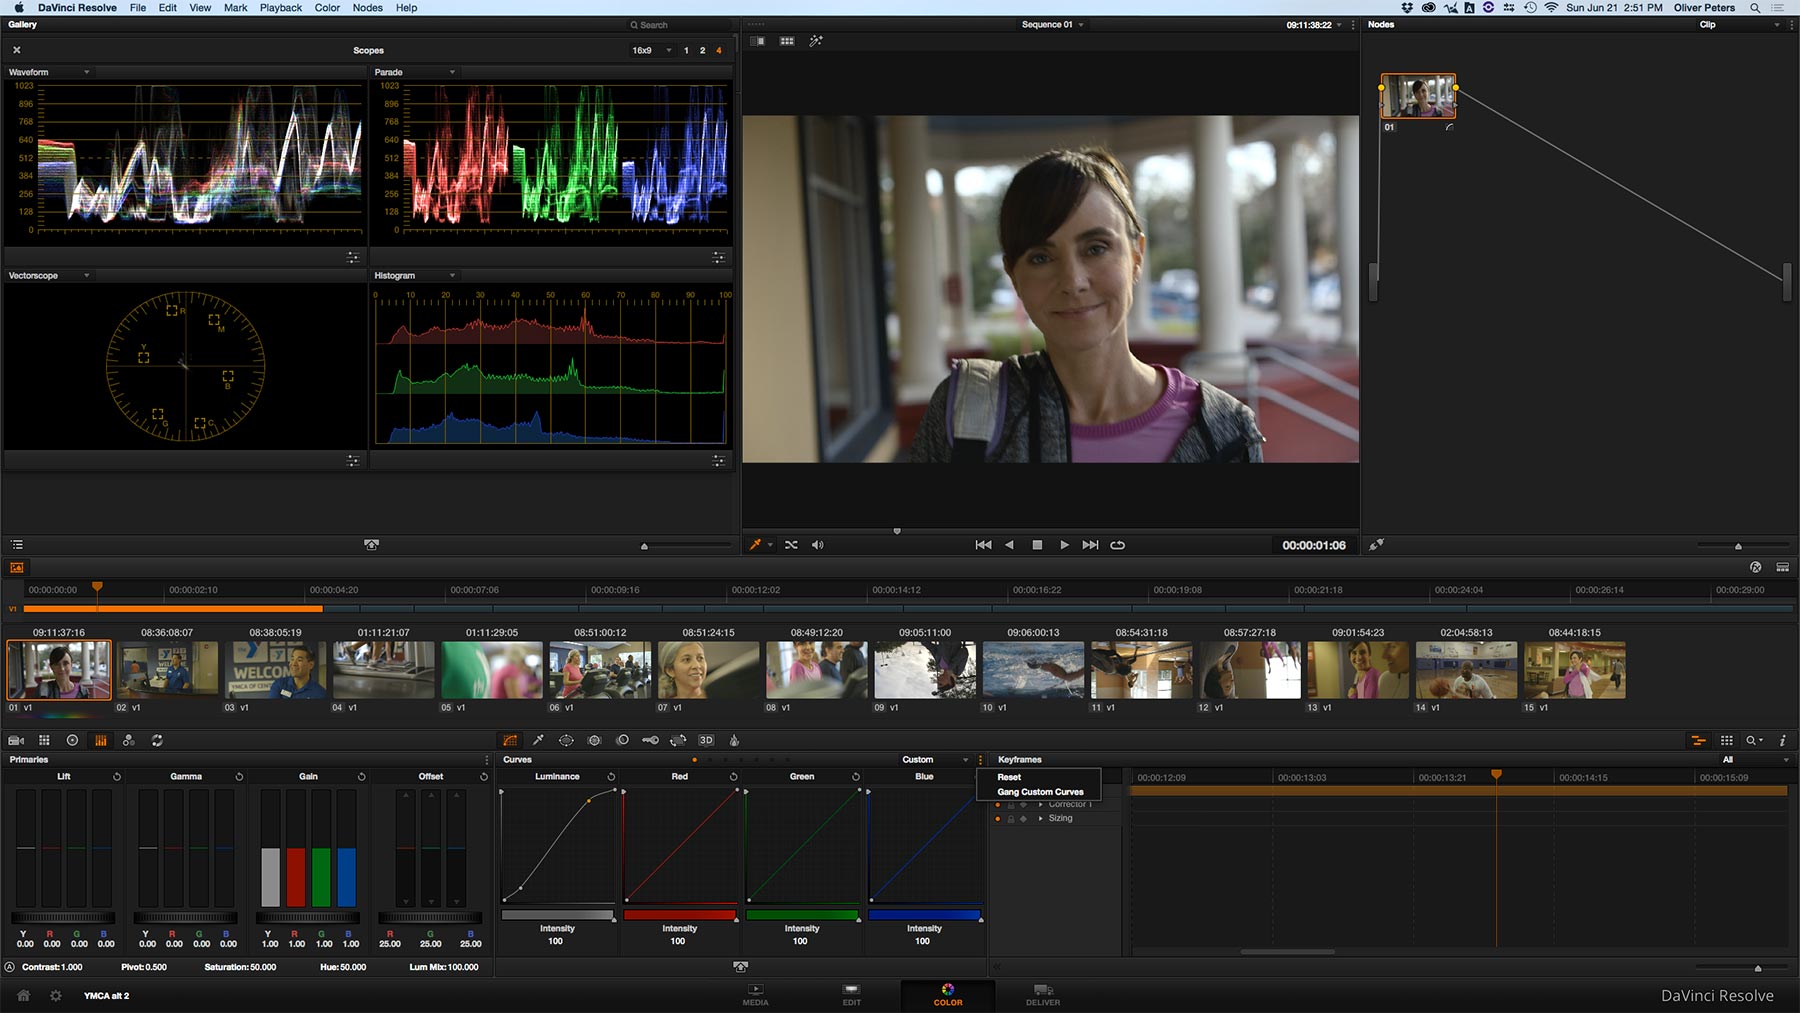
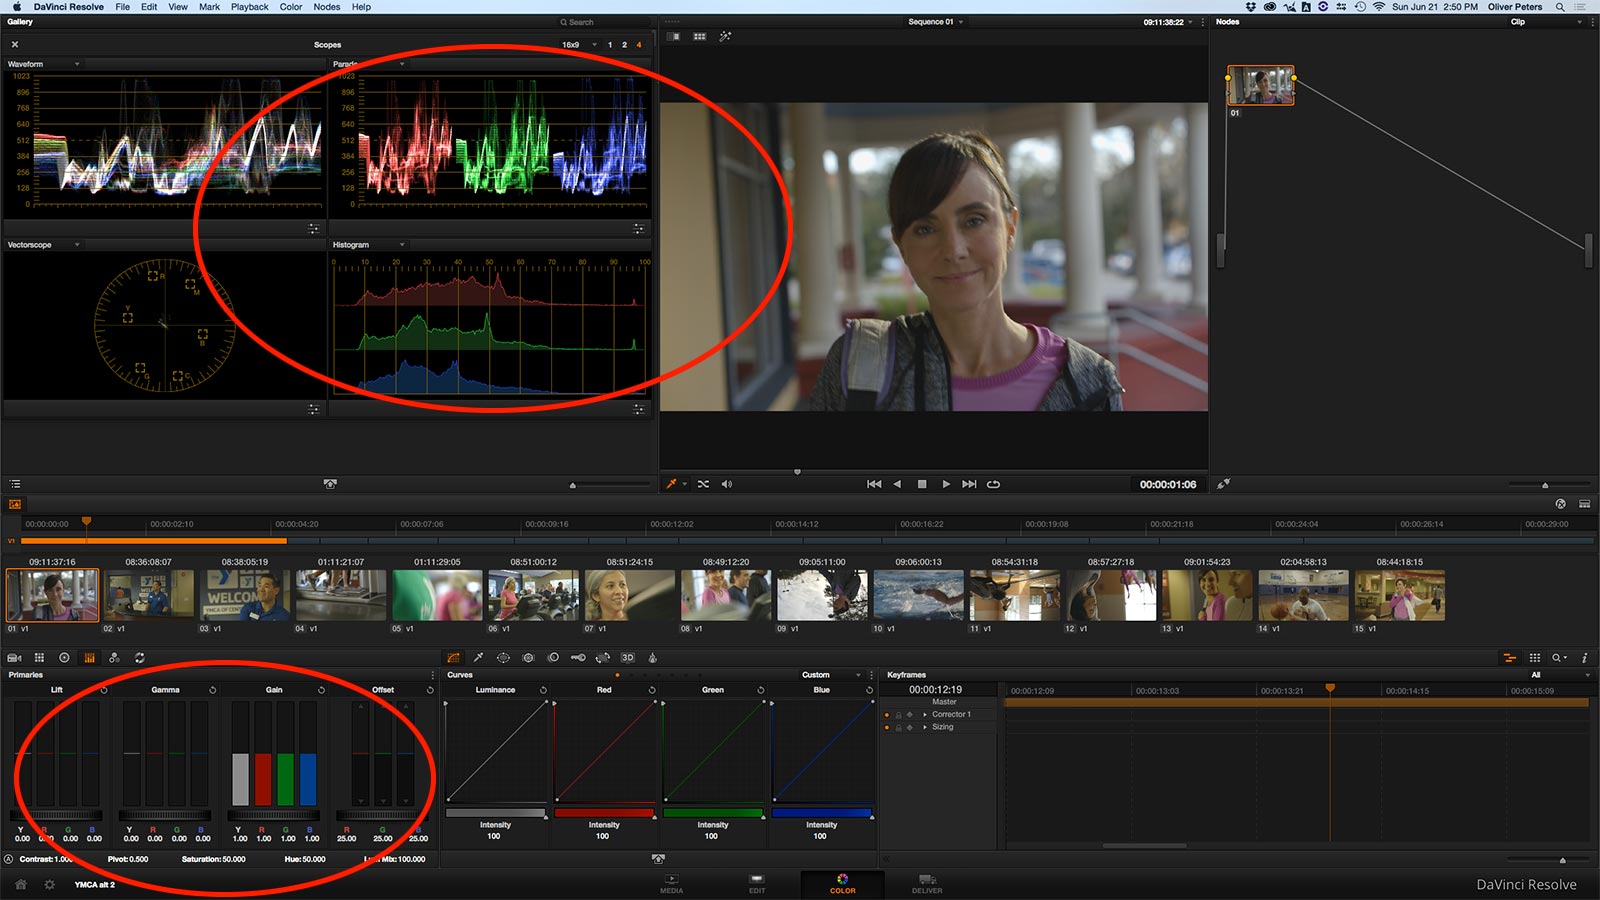 Primary sliders. Resolve gives you two ways to adjust primary color correction – color wheels and sliders. Most people gravitate to the wheels control panel, but the sliders panel is often faster and more precise. Adjustments made in either control will show up in the other. If you adjust color balance using the sliders, while monitoring the RGB parade display and/or the histogram on the video scopes, then it’s very easy to dial in perfect black and white balance for a shot. If the blue shadow portion looks too high on the RGB parade display, it means that the shadows of the image will look bluish. Simply move the blue lift slider lower to push the shadows closer to a true black. An added benefit of this panel is that the controls react to a wheeled mouse. This is great if you don’t have access to a control surface. Hover the mouse over the slider that you want to adjust and twirl the mouse wheel up or down to make your correction.
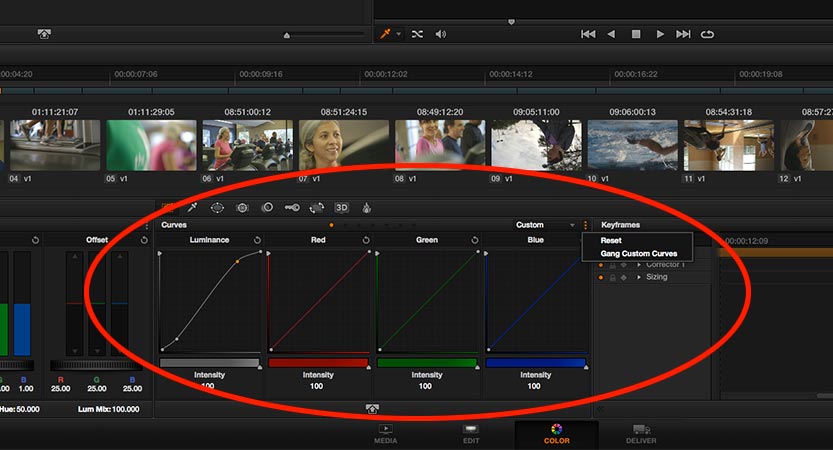 Gang/ungang curves. Given the propensity of cameras to record with log gamma profiles, you often find the need to apply an s-shaped luma curve during color correction. This shifts the low and high ranges of the image to expand the signal back to full levels, while retaining a “filmic” quality to that image. In the custom curves panel you’ll encounter a typical layout of four curves for luma and RGB. The default is for these to be ganged together. Adjust one and they all change. However, this means you are jacking around chroma levels when you might simply want to alter luma. Therefore, make sure to disable ganging before you start. Then adjust the luma curve. Only adjust the R, G or B curves if it’s beneficial to your look.
 Hue/sat curves. If you toggle the curves pulldown menu, you’ll notice a number of other options, like hue vs. hue, hue vs. sat, and so on. These curve options let you grab a specific color and adjust its hue, saturation or brightness, without changing the tone of the entire image. When you sample a color, you end up with three points along the curve – the pin for the selected color and a range boundary pin on either side of that color. These boundary points determine the envelope of your selection. In other words, how broad of a range of hues that you want to affect for the selected color. Think of it as a comparable function to an audio EQ.
It is possible to select multiple points along the curve. Let’s say you want to lower the saturation of both bright yellows and bright blues within the frame. Choose the hue vs. sat curve and select points for both yellow and blue. Pulling these points down will lower the saturation of each of these colors using a single panel.
The hue vs. hue curve is beneficial for skin tones. A film that I’m currently grading features a Korean lead actress. Her skin tones normally skew towards yellow or green in many shots. The Caucasian and African American actors in the same shots appear with “normal” skin tones. By selecting the color that matches her flesh tones on the curve, I am able to shift the hues towards a value that is more in keeping with pleasing flesh tone colors. When used in combination with a mask, it’s possible to isolate this correction to just her part of the frame, so as not to affect the coloration of the other actors within the same shot.
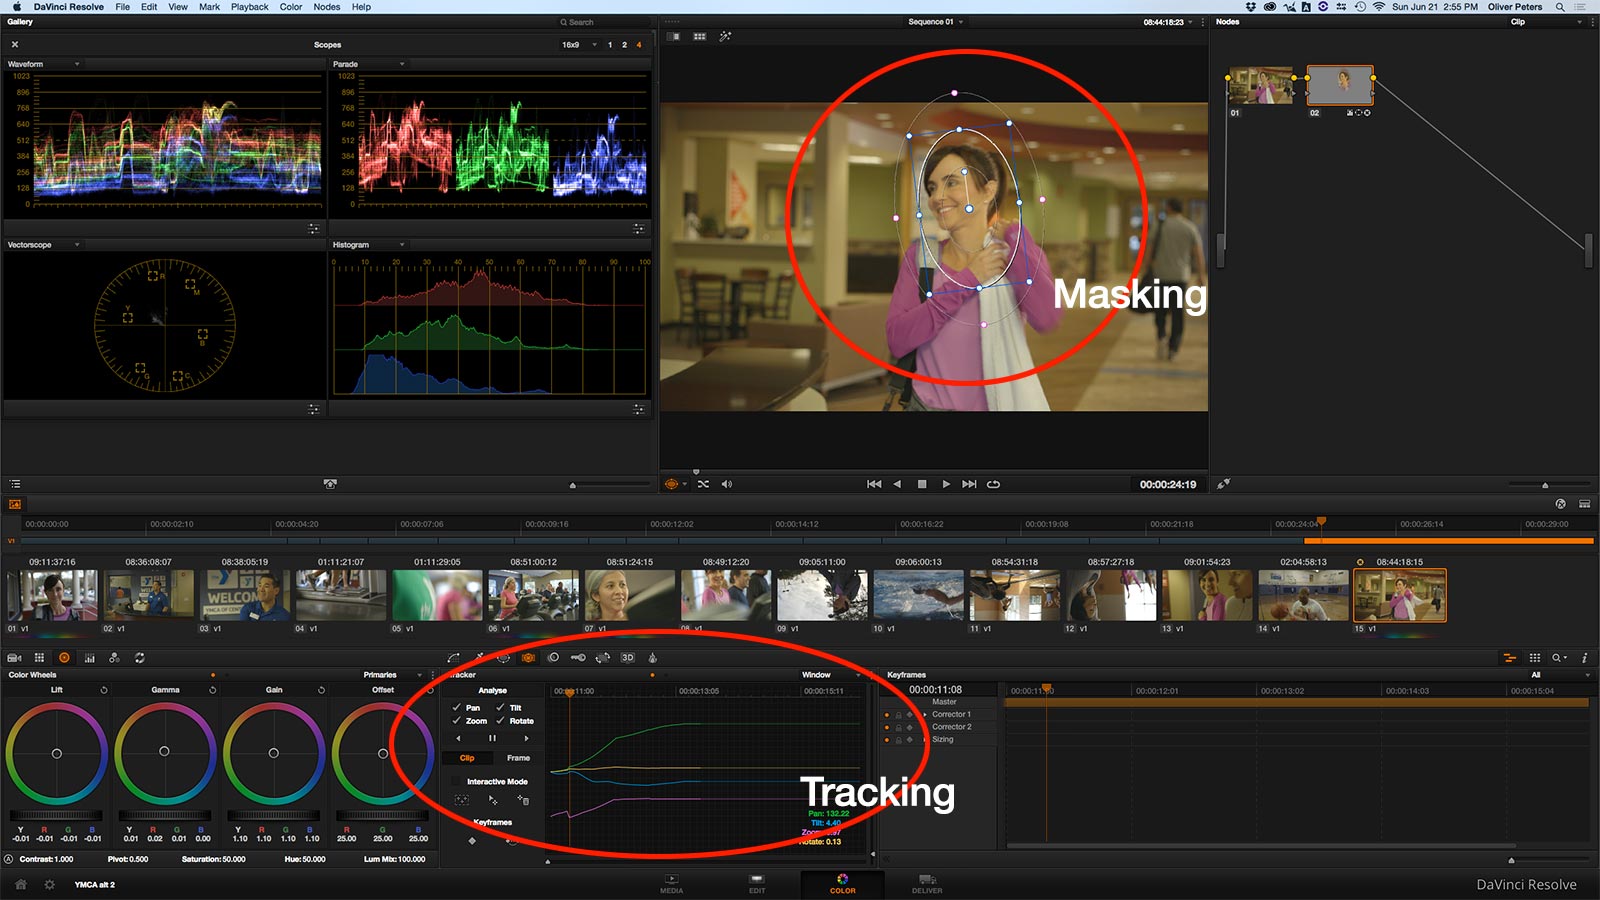 Tracking/stabilization. Most folks know that Resolve has one of the best and fastest trackers of any application. Add an oval mask to someone’s face, so that you can brighten up just that isolated area. However, as the person moves within the shot, you have to adjust the mask to follow their face. This is where Resolve’s cloud-point tracker is a lifesaver. It’s fast and most of the time stays locked to the subject. The tracking window also enables stabilization. Use the pulldown menu to toggle from tracking to stabilization. This is a two-step process – first analyze and then stabilize. You can dial in an amount of smoothness, if you want to retain some of the camera drift for a more natural appearance to the shot.
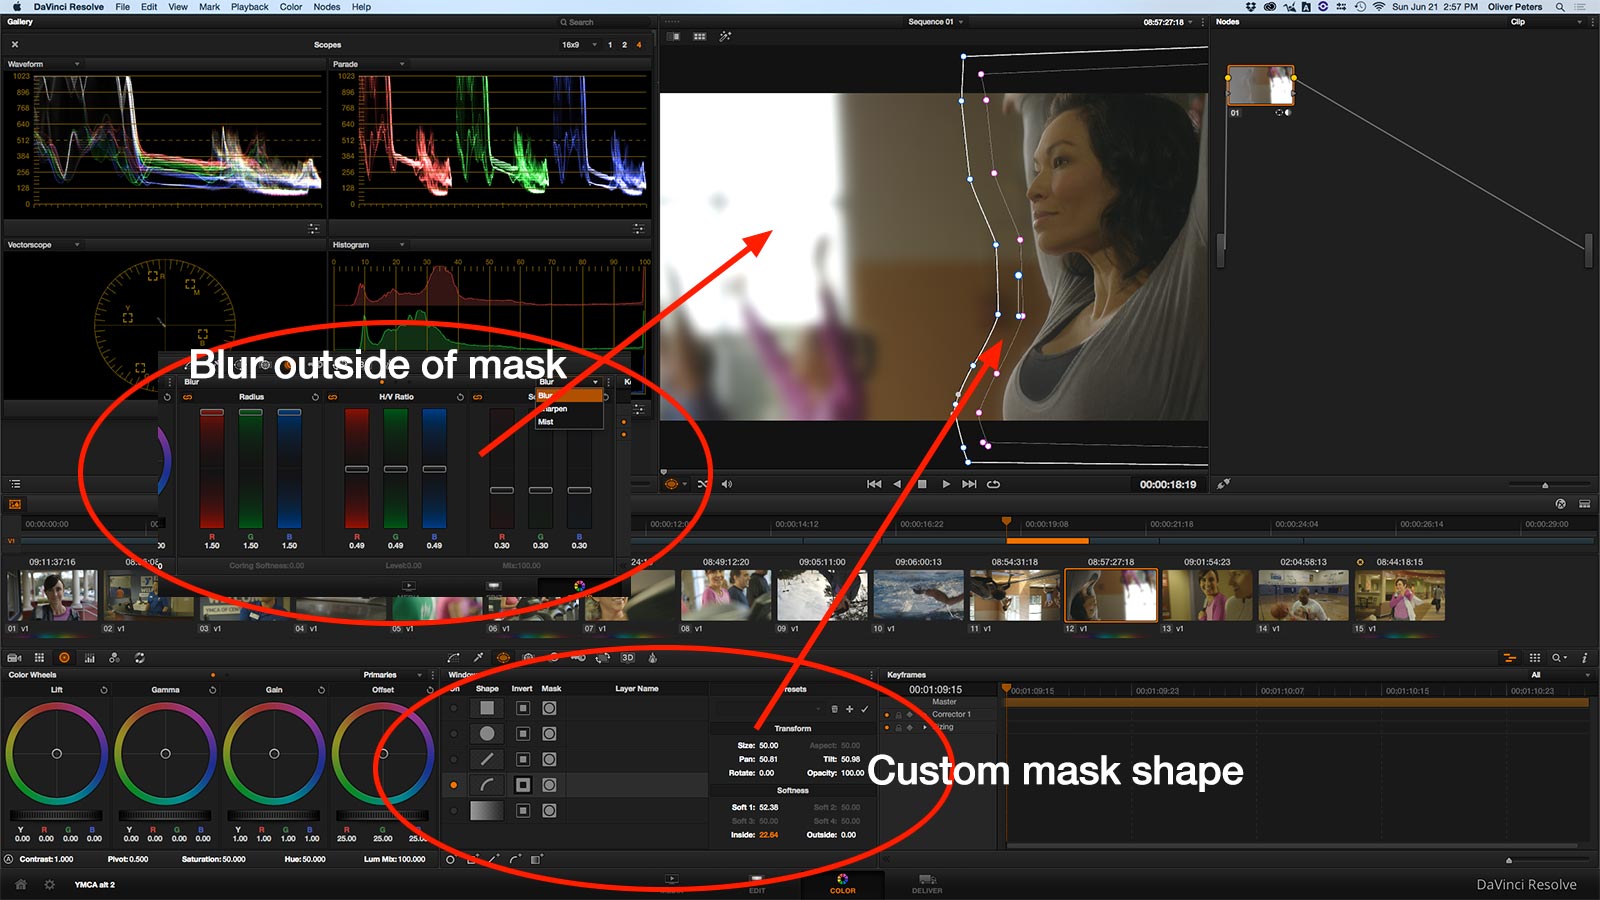 Blurs/masks/tracking. Resolve (including the free version) enables blurring of the image. This can be used in conjunction with a mask and with tracking, if you need to blur and track an object, like logos that need to be obscured in non-scripted TV shows. Using a blur with a vignette mask lets you create a dreamy effect. This is all possible without resorting to third-party filters or plug-ins.
 Scene detection/slicing. There are three ways to get a show into Resolve: a) edit from scratch in Resolve; b) roundtrip from another NLE using FCPXML, XML, AAF or an EDL; or 3) export a flattened media file of your timeline from another NLE and import that master file into Resolve. This process is similar to when masters were output to tape, which in turn were graded in a DaVinci “tape-to-tape” color correction session. Resolve has the ability to analyze the file and determine edit points with reasonable accuracy. It will break up the files into individual master clips within your media pool. Unfortunately, these are viewed in the timeline as individual media clips with boundaries, thus making trimming difficult.
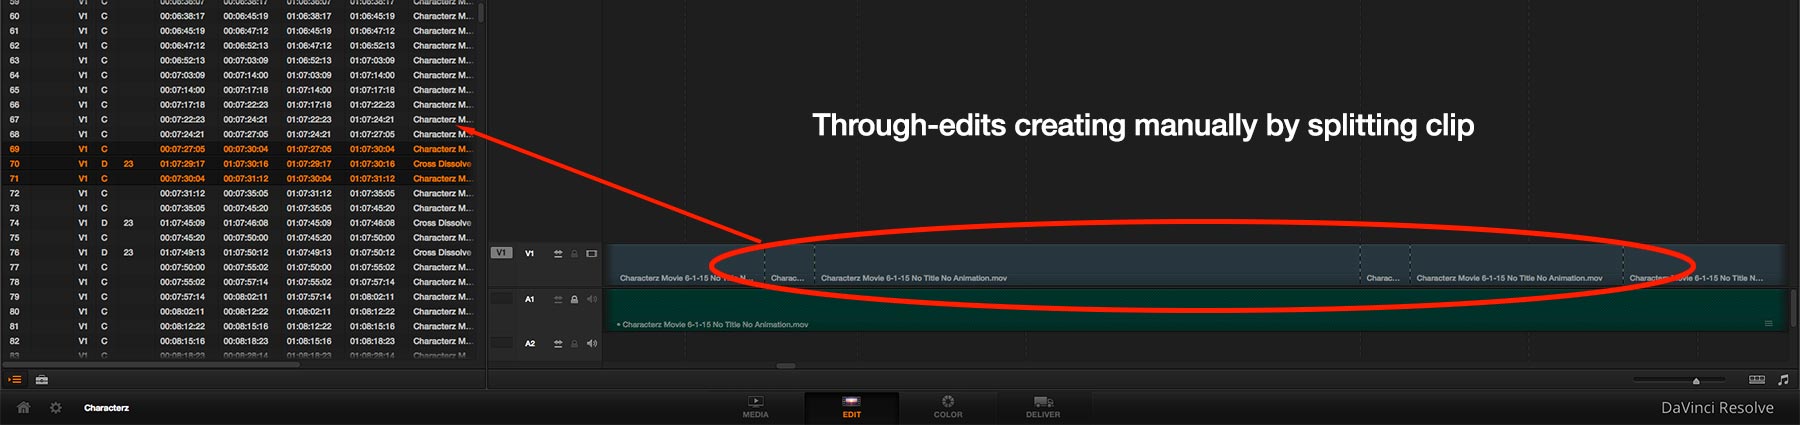
My preference is to place the clip onto a new timeline and then manually add splices at all edit points and dissolves. Since Resolve includes editing capabilities, you can trim, alter or add points in case of error or missed edits. This can be aided by importing a matching, blank XML or EDL and placing it onto a higher track, which then lets you quickly identify all edit points that you’ll need to create.
 Add dissolves. In the example above, how do you handle video dissolves that exist in the master file? The solution (in the Resolve timeline) is to add an edit point at the midpoint of the dissolve that’s embedded within the media file. Next, add a new dissolve equal to the length of the existing dissolve in the video. This way, color correction for one shot will naturally dissolve to the color correction of the second shot. In effect, you aren’t dissolving video sources – only color correction values. This technique may also be used within a single shot if you have correction changes inside that shot. Although in the second case, adding correction keyframes in the Color page is normally a better solution. This might be the case if you are trying to counteract level changes within the shot, such as an in-camera iris change.
 Node strategy. Resolve allows you to store complex grades for shots – which will include as many nodes as required to build the look – at a single memory register. You can build up each adjustment in multiple nodes to create the look you desire, store it and then apply that grade to other shots in a single step. This is very useful; however, I tend to work a bit differently when going through a scene in a dramatic project.
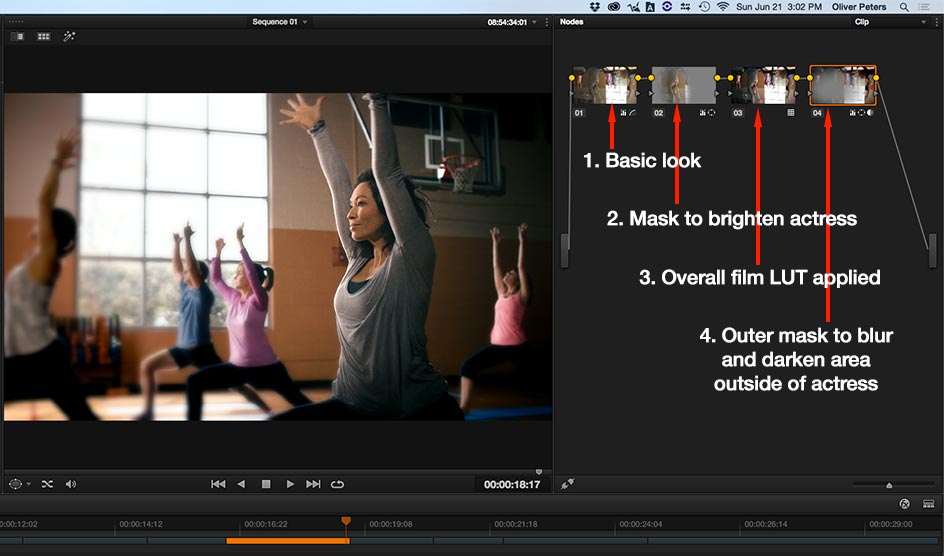
I generally go through the scene in multiple “passes”. For instance, I’ll quickly go through each shot with a single node to properly balance the color and make the shots reasonably consistent with each other. Next, I’ll go back through and add a second node (no adjustment yet) for each shot. Once that’s done, I’ll go back to the head of the scene and in that second node make the correction to establish a look. I can now use a standard copy command (cmd-C on the Mac) to store those values for that single node. When I go to the next shot, the second node is already selected, so then I simply paste (cmd-V on the Mac) those values. Let’s say the scene is a two-person dialogue scene using two singles. Angle A is a slightly different color than Angle B. Set the second node adjustment for Angle A, copy, and then paste to each Angle A shot (leapfrogging the Angle B shots). Then repeat for the Angle B shots.
Lastly, I might want to add a vignette. Go back through the scene and add a third, blank node for each shot. Create the vignette in node three of the first shot, then copy and paste into each of the others. I can still adjust the darkness, softness and position of the vignette at each shot, as needed. It’s a bit of an assembly line process, but I find it’s a quick way to go through a scene and build up adjustments without getting fixated on a single shot. At any point, I can review the whole scene and get a better feel for the result of my corrections in the context of the entire scene.
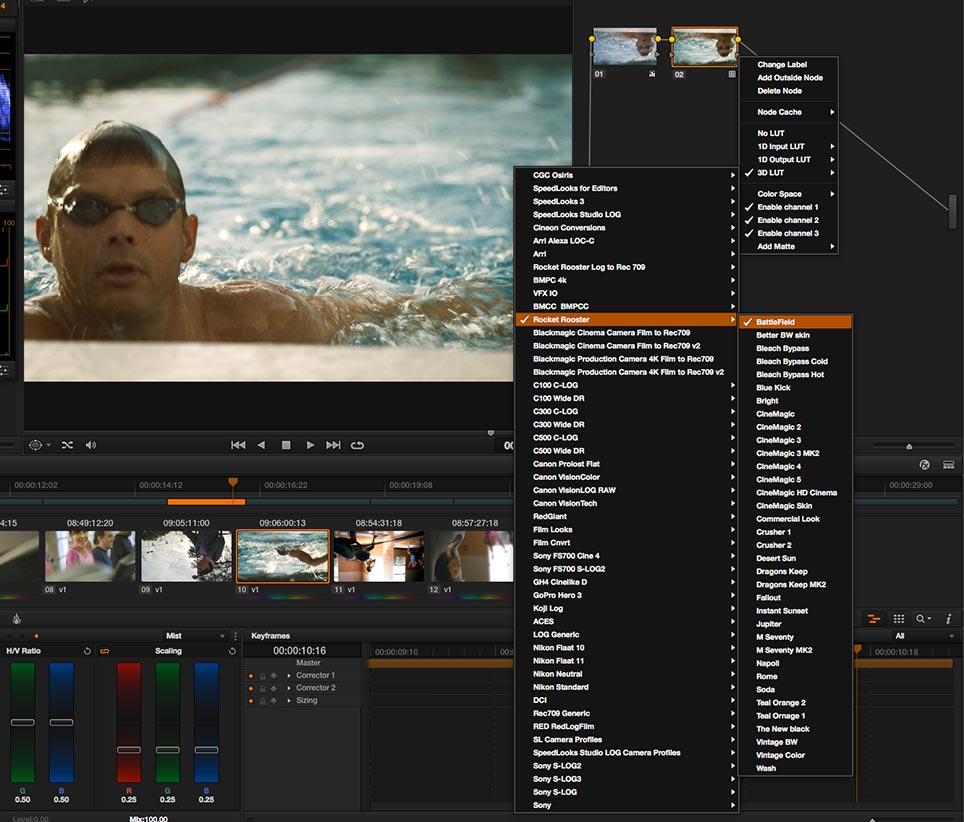 LUTs. Resolve enables the application of technical and creative LUTs (color look-up tables). While I find their use limited and should be applied selectively, it’s possible to add your own to the palette. Any .cube LUT file – whether you found it, bought it, or created your own – can be added to Resolve’s library of LUTs. On the Mac, the Resolve LUT folder is found in Library/Application Support/Blackmagic Design/DaVinci Resolve/LUT.
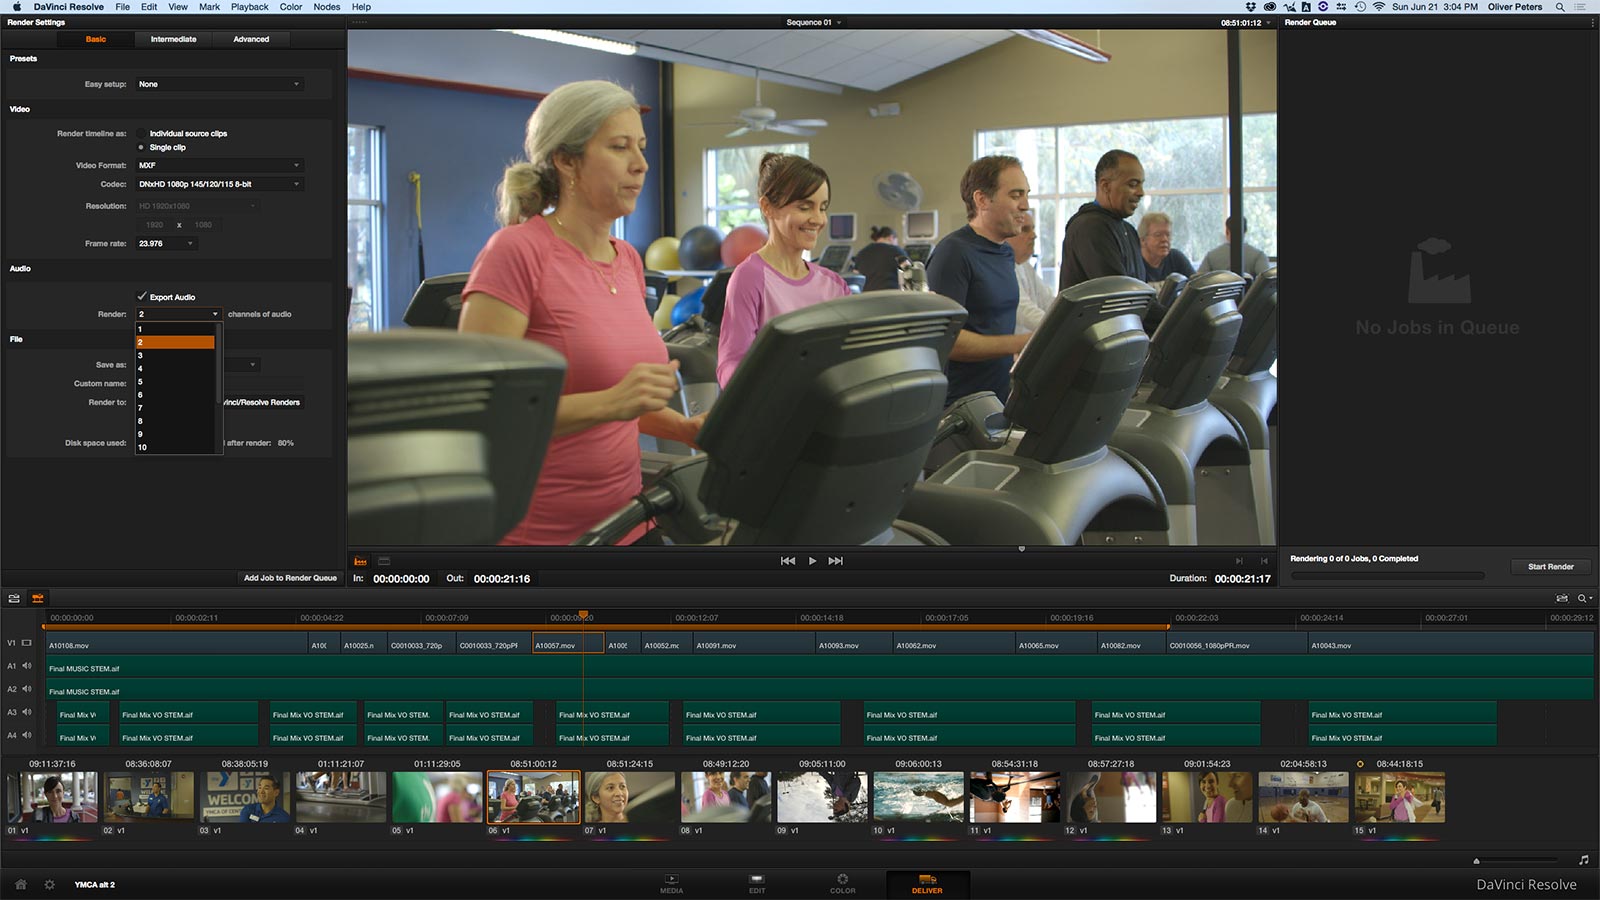 Export with audio. You can export a single finished timeline or individual clips using the Deliver page. At the time of this post, Resolve 12 has yet to be released, but hopefully the audio export issues I’ve encountered have been completely fixed. In my experience using Resolve 11 with RED camera files, it has not been possible to accurately export a complete timeline and have the audio stay in sync. I haven’t found this to be the case with other camera formats, though. So if you are exporting a single master file, expect the potential need to bring the picture into another application or NLE, in order to marry it with your final mix. Resolve 11 and earlier are not really geared for audio – something which Resolve 12 promises to fix. I’ll have a review of Resolve 12 at some point in the future.
Hopefully these tips will give you a deeper dive into Resolve. For serious training, here are some resources to check out:
©2015 Oliver Peters
