
OK, I know the title and AI-generated graphic are a bit cheeky, but this is an issue that plagues all video creation applications. But, it’s not actually a “bug” in spite of what people think. One of the most common editing forum questions that you run across is, “Why does my file look washed out in QuickTime?” Macs, PCs, and televisions use different gamma standards. Not only do the displays differ, but so do the various player applications in how they interpret color space and profiles. Therefore, it is impossible to create a universal file that will look identical across all software and hardware systems.
With the Premiere Pro 2024 update that has been rolled out this week, Adobe is adding color settings to take on the issue. A sizable percentage of video editors use Macs. Editing applications were originally designed around broadcast TV standards, so that what you see in the viewer will look close to what you see on the video output through hardware to a video monitor. We now live in a file-based world, so those exported files are often checked, reviewed by the client, or viewed by the consumer using QuickTime player. (Click on any of these images to see an expanded view.)

Rec 709 TV standards are based on 2.4 gamma, which is darker than QuickTime’s 1.96 gamma. In a simplistic sense, gamma primarily impacts the middle portion of the brightness range of an image – let’s say 20-60 IRE as a ballpark. Therefore, a file that looks right in the NLE viewer window and/or the video display will often look brighter in the midrange when it’s played through QuickTime. A brighter midrange will tend to show more shadow detail, but also look less saturated. In general, these differences are pretty slight, but they become more apparent depending on the lighting and color correction of the content.

Prior to this Adobe Premiere Pro 2024 update, the application used 2.4 gamma for its viewer display. This 2024 update adds new color settings, which can be found in the Settings tab of the Lumetri panel. Even if you aren’t using Lumetri color correction, this is where you’ll find central control of color settings for the whole project. You will want Display Color Management enabled. Then gamma levels can be set per project.
It’s extremely important that you understand these settings before tweaking anything. These settings only change the viewer and not the Lumetri scopes nor any exported file. If you change the setting in one project, it will not stick if you then open another previous project. So, be sure to check with each project you open. Changes for a new project should stick for the next new project.
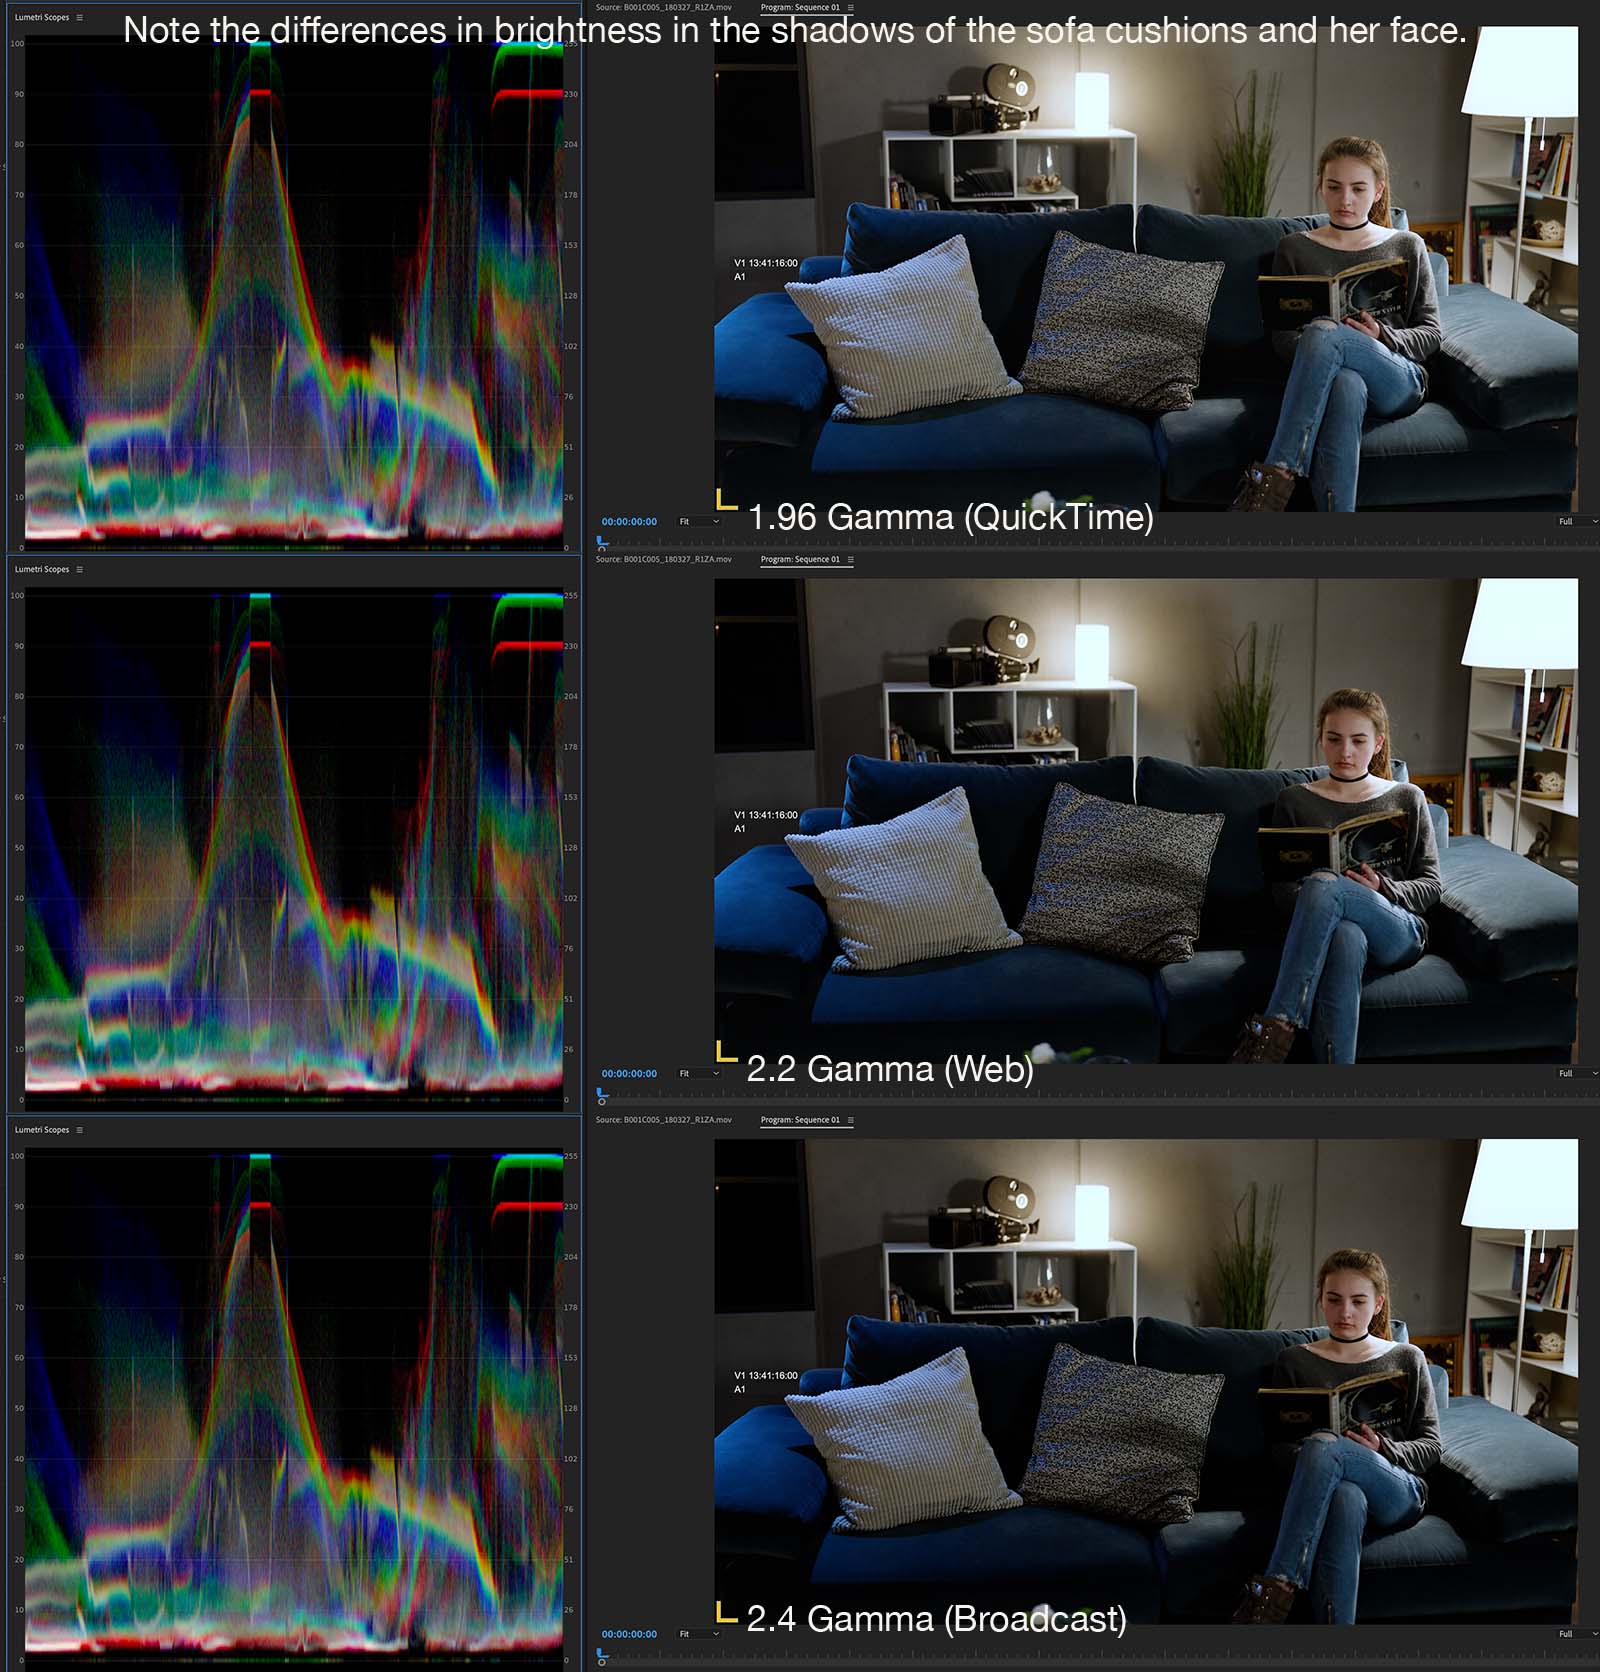
Three viewer gamma levels are supported: Broadcast 2.4, Web 2.2, QuickTime 1.96. Changing these settings alters the appearance of the image in the viewer. Files exported with any of these settings will look identical. Set to 2.4, the viewer appears darker than 1.96, with 2.2 in-between. Let’s say that you are grading with Lumetri based on what you see in the viewer without any external video display. If you are working in 2.4 (same as you would have been prior to this update), then the exported file will look brighter and less saturated in QuickTime, but correct on TV. However, if the viewer is set to 1.96 and you grade according to that image, then the appearance of that exported file will match in QuickTime and a number of other players, but look darker on TV.
If you understand these differences, then you can choose to work in any of these viewer gamma settings and switch according to the target destination of your project. Unfortunately it gets tricky if you need to generate a single file that gets used on multiple platforms. Naturally you have no control over how the end consumer will view this content.

If you choose not to change these settings and stick to the 2.4 gamma default, there are three workarounds to explore – an export LUT, exports via After Effects, and/or a custom adjustment layer. Custom export LUTs are available and can be applied in the export dialogue. The advantage of an After Effects export is that you can set the working project color space to sRGB instead of Rec 709 2.4 gamma. Finally, there’s the adjustment layer method, which I’ve been using up until now.

In this workaround, I edit and grade in 2.4. Then for the exported file, I will add an adjustment layer to the top level of my timeline and apply a “global” Lumetri effect. I will make two Lumetri tweaks. First, I’ll pull down the midpoint of the luma curve just slightly, and then secondly, bump up the saturation 2-4%. This gives me a file that will generally pass muster in QuickTime.
I certainly applaud Adobe for taking a shot at a fix, although there might not really be a fix, since there is no universally accepted display standard. Remember that of all of the variables, a true video display is the only device whose brightness and contrast can be easily adjusted. So if you want to work with the gamma setting of 1.96, then a simple adjustment of the display (which is still correctly calibrated) will give you a result that matches both QuickTime and the Premiere Pro viewer.
So far – and I’m still doing some more testing – the only issue has been with the VLC player. It tends to look darker than QuickTime, as well as other player applications, like Telestream’s Switch. As long as you understand what these new Premiere Pro color settings do and how to work with them, then there is no right or wrong approach.
©2023 Oliver Peters
