As one would expect, IBC 2023 featured new product announcements from a host of manufacturers including Blackmagic Design. They announced hardware product updates along with the new Blackmagic Cinema Camera 6K. This is a DSLR-style package with a full-frame sensor, OLPF, and the ability to record Blackmagic RAW. But if you want to shoot in RAW, you’ll also need to update Resolve to version 18.6, as well as the Blackmagic RAW Player. Sample clips, shot by director/dp John Brawley, are available at Blackmagic’s website.

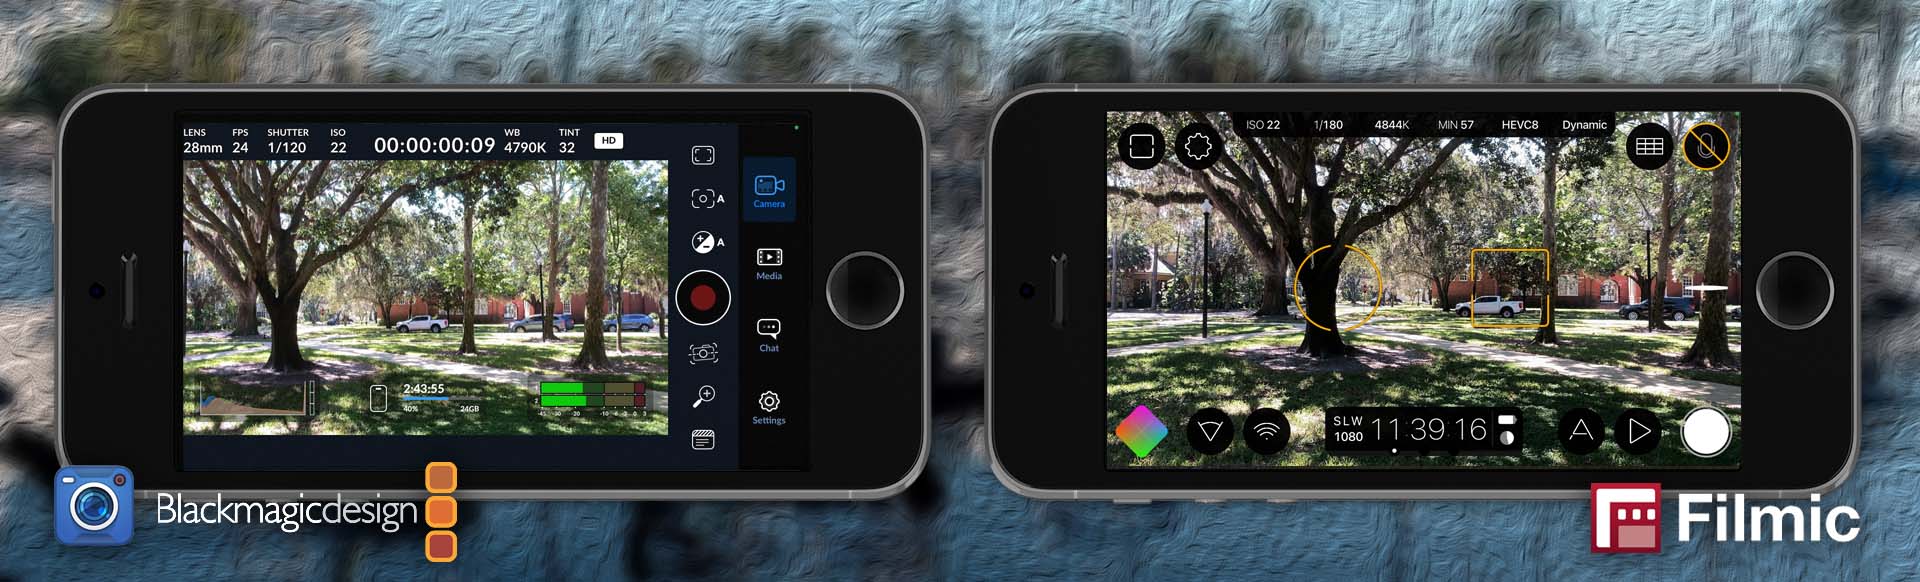
Camera announcements are something we’ve come to expect from the Aussies, but equally intriguing was the immediate availability of the free Blackmagic Camera application for the iPhone (iOS 16.0 or higher). If you’ve done any serious iPhone filming, then you’ve likely been using Filmic Pro. Although there are alternative applications, including the built-in Camera app, Filmic Pro has been the go-to for those serious about using the iPhone in a professional environment.

I’ve done a number of write-ups about Filmic Pro and the related workflow to get the media to post, including camera-to-cloud. I was eager to compare and contrast the two applications. Let’s start with some key points. Blackmagic Camera to date is only marketed as an iPhone application. I don’t know if it will work on an iPad, because mine doesn’t support iOS 16. Filmic Pro is available for both iOS (iPhone and iPad) and Android devices.

Both apps cover the basics well and even offer advanced functions like desqueezing the image from anamorphic lenses. Overall though, Filmic Pro has more features, including the ability to record offspeed (such as 60fps capture for 24fps playback) and to apply various film looks in-camera. You can also turn on the flashlight function of the iPhone and use it as a camera light.
Conversely, Blackmagic Camera includes an in-app chat function between the videographer and the editor using Blackmagic Cloud. Considering that this is Blackmagic Design’s first iPhone camera application, it’s nicely polished right out of the gate. Although there’s no user guide yet, the interface is intuitively designed.
The big different is cost. Blackmagic Camera is free, whereas Filmic Pro, starting with version 7, is now only available through an in-app subscription. If cost is the main driver, then Blackmagic wins; but if you want the most features, then I presume Filmic Pro would get the nod.
Hardware and operating system limitations
Settings and operation for both applications mirror each other closely. That’s because these are really just software “overlays” for the camera sensor within the phone, the lens configuration, and the operating system. I’m not a big iPhone guy and don’t run out to get the latest and greatest, so I’m running a 2020 iPhone SE (2nd generation). Even though both applications can encode to ProRes, my phone is limited to H264 and H265 (HEVC). It has a single 28mm lens, so I don’t have the other lens options that each application could take advantage of.
Another item under control of the operating system is frame rate. Both apps can only capture in whole number frame rates, such as 24.0 instead of 23.976 fps. Captures use a variable frame rate. Essentially this means that the exact duration of each frame will vary slightly and not be a constant. For instance, a 24fps file might show up as 24.6354 and not 24.0000. Neither of these pose huge issues for most NLEs, but it’s one area where mobile recordings differ from professional hardware.

The only exception to variable frame rate files were my offspeed Filmic Pro recordings. The reason is because Filmic Pro does this in two passes. Once the file is captured, it is retimed and written to storage. During retiming, the file is properly corrected to a “solid” (non-variable) frame rate.
The iPhone sensor image is overly sharpened to hide some of the flaws inherent in the design. This is especially noticeable in 1080 versus 4K and at slower frame rates. Fine detail and complex textures, like tree foliage and small blades of grass, will scintillate, particularly during horizontal movement.
Much of this is a result of the lack of an OLPF (optical low pass filter) plus enhanced sharpening in the camera sensor. Some of it can be counteracted in post using various softening effects. Of course, the operator can mitigate this by sticking to close-ups or images that don’t have fine detail, as well as not moving the camera too much. Naturally, such limitations aren’t very realistic. While these present some challenges for the videographer, they are out of the control of third-party application developers.
Similarities

With the caveats that I’ve outlined, let’s talk about how Blackmagic Camera and Filmic Pro offer a similar experience. I recorded my test footage in the best quality available to me on the SE, which was HEVC (H265 on Blackmagic Camera and Filmic Extreme in Filmic Pro). I have both Filmic Pro Legacy (v6.x) and Filmic Pro (v7.x) installed, so I was able to do some test recordings using all three applications. I shot 1080 at 24fps, as well as a few clips with slight slomo. I was able to do this in-camera (30-over-24) with Filmic Pro. For the Blackmagic Camera app, I recorded 1080p/24 plus some 4K clips at 30fps. The latter were conformed (slowed) to 24fps in the edit timeline.
The Blackmagic H265 files are encoded with a very tight bitrate range, so all of those files were encoded at a hair over 12Mbps for 1080p/24 and around 54Mbps for 2160p/60 (4K). The Filmic Extreme H265 setting uses a target rate of 50Mbps for 1080, but with wide minimum and maximum rates. The Filmic Pro files ranged between 20 and 50Mbps for 1080p/24. 2160p/60 (4K) files were around 125Mbps. Regardless of these encoding rates, none of the files displayed any significant compression artifacts.
Naturally, if you shoot handheld with an iPhone, it’s hard for it not to be shaky. Both apps offer the same three levels of stabilization, which are set by the sensor and operating system. Standard mode uses only optical sensor stabilization. Cinematic mode is sensor stabilization enhanced by the operating system. Cinematic Extreme (labeled Cinematic+ in Filmic Pro and Extreme in Blackmagic Camera) applies even more intense software smoothing. These last two settings increasingly add latency to the preview image on your screen. I recommend using Standard and then supplementing that in the NLE with a stabilization plug-in for better control.

Finally, there’s the issue of motion blur. If you shoot at 24fps, it’s because you want it to look more film-like. That look is due in part to motion blur caused by the length that the camera shutter stays open. For 24fps, you’d typically want a 180-degree shutter angle, which is 1/48th of a second. This results in a slight blur within each frame as you pan or a person or vehicle moves across the screen. A smaller fraction, like 1/120th, gives you crisper frames. This causes moving objects to appear to stutter or strobe as they travel across the scene.
The shutter angle/speed that you can set is balanced against ISO/exposure. If you want to maintain a 180-degree (1/48th) value, then the ISO has to be low. Both applications allow you to run in an Auto mode or dial in specific values and lock those settings. Unfortunately, if you are shooting with an iPhone on a sunny day at 24fps and at 1/48th shutter speed, then it’s impossible to get the ISO low enough. The shot will be completely overexposed. To make those settings useful in bright daylight filming, it’s imperative that you invest in accessories, particularly filters. External ND (neutral density) filters lower the amount of light entering the lens.
Differences

Both camera applications can record in 16:9 at 720, 1080, and 4K resolutions. But if you want more, that’s where Filmic Pro shines. You get those, but also 2K, 3K, and down to 540. There are also different ratios, such as 3:2, 4:3, 1:1, 2.39:1, and others. For example, in my previous test, I shot with Filmic Pro set to 3K at 2.39:1 for a 2K DCI edit. To do the same with Blackmagic Camera, I would need to shoot in 4K and set my display crop marks for the right framing. And of course, stick within those marks during filming. That’s rather hard to do in bright sunshine when you can barely see the screen.

The Blackmagic Camera application includes a unique vertical orientation mode. You can lock the aspect to 16:9 horizontal, but still hold the iPhone vertically. The display is repositioned into the upper portion of the screen and the sensor is cropped to record the expected 16:9 horizontal image. However, in my tests this yielded some odd files. Even though the file looked correct, the resolution was identified as 1214 x 2160 instead of 1920 x 1080 and 60fps instead of 24fps. However, this resolution came up as 2160 x 1214 in Final Cut Pro’s inspector. Clearly Blackmagic is manipulating the pixel aspect ratio to achieve this magic. The data rate was also predictably higher at around 36Mbps instead of the 12Mbps rate of the standard 1080 files. While it’s an interesting feature, I wouldn’t recommend it for professional filming.
Both camera apps let you adjust exposure, temp, and tint or run in an Auto mode. Filmic Pro also offers optional Film Looks that are applied during capture. These emulations include options like infrared, black-and-white, and film stocks. My test footage for Filmic Pro v7 was recorded using their Bel Air look, which is inspired by Kodak Vision stock.

Blackmagic Camera only offers the ability to load LUTs to the preview display. I presume this is for two reasons. First, I think the point of this app is to use the iPhone as your B-camera, side-by-side with a Blackmagic Cinema Camera 6K or maybe an Ursa. I’m sure Blackmagic Design would rather have you buy one of their actual cameras instead of only using a free app on your phone. The second reason is that the envisioned workflow has you finishing your edit in DaVinci Resolve. Not only a best-of-class grading tool, but it also includes a few built-in film emulation effects.
Camera-to-cloud
It’s a puzzle to me why manufacturers are jumping on this bandwagon. The camera-to-cloud concept got a boost during covid, but I question its usefulness as a general workflow. Most of the world does not have super-fast internet and wi-fi. When companies I’ve worked with have tried a camera-to-cloud workflow, the results weren’t great. Even the most stalwart advocates see it in general use maybe by 2030. Regardless of my feelings towards the matter, if you do want to utilize a camera-to-cloud solution, then both of these companies have you covered.

Blackmagic Camera lets you upload original and/or proxy media to Blackmagic Cloud. The company sees this as part of an ecosystem focused on Resolve as the hub. Filmic Pro does the same with proxies to Frame.io, if you add the Cinematographer Toolkit option. It requires a Frame.io pro or Adobe Creative Cloud account.
The Blackmagic Cloud has been upgraded to accept media files in addition to collaborating with Resolve project files. It’s still in beta, but the current pricing is free up to 2GB and then ranges from $15/mo. for 500GB to $240/mo. for 8TB and so on. The maximum is 1 Petabyte. However, unlike a Frame.io account, Blackmagic Cloud storage is a closed ecosystem tied to their cameras, Resolve, and their storage devices. You cannot simply log into a Blackmagic Cloud account from a browser and drag-and-drop files.
Conclusion
I shot some test clips with Blackmagic Camera, Filmic Pro Legacy, and Filmic Pro v7 (current version) on my iPhone SE and thew together a short video that I’ve posted on Vimeo. Overall, the best look came out of the 4K files, shot at 30fps, and then scaled and slowed to 1080p/24. I also added some slight softening, stabilization, and minor color correction to many of these clips.

My impression with all of these apps is favorable. Truthfully, I’m not all that wild about smart phone videography. But under the premise that the best camera is the one you have with you, then there’s a compelling argument for using any of the recent smart phones. The new top-of-the-line iPhone 15 models can turn out some stunning imagery and enable such features as ProRes and log recording, along with the ability to use external media storage.
As an editor, I get plenty of poorly shot iPhone footage. Usually shaky, often vertical, and more often than not in DolbyVision (argh). It would make my job easier and the end result better if any of these apps were used instead of the default Camera app. Blackmagic Camera and Filmic Pro are easy to set up with well-designed, simple interfaces. While there are tools in each designed for videographers, even an amateur can get great results.
As I said up top, it comes down to features versus cost. Filmic Pro makes a great application that has been the standard for smart phone videography. But Blackmagic Design has tossed down the gauntlet. Even if you need the bigger feature set of Filmic Pro or have already purchased it, there are still plenty of reasons to also install Blackmagic Camera. The apps don’t conflict with each other and it gives you another option should you need it. If you are using an iPhone as a companion camera alongside another Blackmagic Design camera, then that’s all the more reason to add it to your iPhone.
Addendum: Filmic was acquired by Bending Spoons of Italy in late 2022. Reports trickling out here at the end of 2023 indicate a layoff of the original Filmic team. Bending Spoons is moving towards integrating the Filmic apps into its platform. We’ll have to wait and see how this impacts the future of the Filmic Pro and Firstlight applications.
©2023 Oliver Peters


