Analogue Wayback, Ep. 19

Garage bands before the boy bands

As an editor, I’ve enjoyed the many music-oriented video productions I’ve worked on. In fact one of my first feature films was a concert film highlighting many top Reggae artists. Along the way, I’ve cut numerous jazz concerts for PBS, along with various videos for folks like Jimmy Buffet and the Bob Marley Foundation.

We often think about the projects that “got away” or never happened. For me, one of those was a documentary about the “garage band” acts of central Florida during the 1960s. These were popular local and regional acts with an eye towards stardom, but who never became household names, like Elvis or The Beatles. Central Florida was a hot bed for such acts back then, in the same way as San Francisco, Memphis, or Seattle have been during key moments in rock ‘n roll history.

For much of the early rock ‘n roll era music was a vertically-integrated business. Artist management, booking, recording studios, and marketing/promotion/distribution were all handled by the same company. The money was made in booking performances more so than record sales.

Records were produced, especially 45RPM “singles”, in order to promote the band. Singles were sent for free to radio stations in hopes that they would be placed into regular rotation by the station. That airplay would familiarize listeners/fans with the bands and their music. While purchasing the records was a goal, the bigger aim was name recognition, so that when a band was booked for a local event (dance, concert, youth club appearance, tour date) the local fans would buy tickets and show up to the event. Naturally some artists broke out in a big way, which meant even more money in record sales, as well as touring.

Record labels, studios, recording  studios, and talent booking services – whether the same company or separate entities – enjoyed a very symbiotic relationship. Much of this is chronicled in a mini-doc I cut for the Memphis Rock ‘n Soul Museum. It highlighted studios like Sun, Stax, and Hi and their role in the birth of rock ‘n roll and soul music.

In the central Florida scene, one such company was Bee Jay, started by musician/entrepreneur Eric Schabacker. Bee Jay originally encompassed a booking service and eventually a highly regarded recording studio responsible for many local acts. Many artists passed through those studio doors, but one of the biggest acts to record there was probably Molly Hatchet. I got to know Schabacker when the post facility I was with acquired the Bee Jay Studios facility.

Years later Schabacker approached me with an interesting project – a documentary about the local garage bands on the 60s. Together with a series of interviews with living band members, post for the documentary would also involve the restoration of several proto-music videos. Bee Jay had videotaped promotional videos for 13 of the bands back in the day. While Schabacker handled the recording of the interviews, I tackled the music videos.

The original videos were recorded using a rudimentary black-and-white production system. These were recorded onto half-inch open reel videotape. Unfortunately, the video tubes in the cameras back then didn’t always handle bright outdoor light well and the video switcher did not feature clean vertical interval switching. The result was a series of recordings in which video levels fluctuated and camera cuts often glitched. There were sections in the recordings where the tape machine lost servo lock during recording. The audio was not recorded live. Instead, the bands lip-synced to playback of their song recordings, which was also recorded in sync with the video. These old videos were transferred to DV25 QuickTime files, which formed my starting point.

Step one was to have clean audio. The bands’ tunes had been recorded and mixed at Bee Jay Studios at the time into a 13-song LP that was used for promotion to book those bands. However, at this point over three decades later, the master recordings were no longer available. But Schabacker did have pristine vinyl LPs from those session. These were turned over to local audio legend and renowned master engineer, Bob Katz. In turn, he took those versions and created remastered files for my use.

Now that I had good sound, my task was to take the video – warts and all – and rebuild it in sync with the song tracks, clean up the video, get rid of any damage and glitches, and in general end up with a useable final video for each song. Final Cut Pro (legacy) was the tool of choice at that time. Much of the “restoration” involved the slight slowing or speeding up of shots to resync the files – shot by shot. I also had to repeat and slomo some shots for fit-and-fill, since frames would be lost as glitchy camera cuts and other disturbances were removed. In the end, I rebuilt all 13 into a presentable form.

While that was a labor of love, the down side was that the documentary never came to be. All of these bands had recorded great-sounding covers (such as Solitary Man), but no originals. Unfortunately, it would have been a nightmare and quite costly to clear the music rights for these clips if used in the documentary. A shame, but that’s life in the filmmaking world.

None of these bands made it big, but in subsequent years, bands of another era like *NSYNC and the Backstreet Boys did. And they ushered a new boy band phenomenon, which carries on to this day in the form of K-pop, among other styles.

©2022 Oliver Peters

Avid DS shines for Metric

With all of the Media Composer 5 news, it might be easy to miss Avid’s latest update for the flagship system, Avid DS. Version 10.3.1 (see addendum below), released in mid-July, is a small point release that introduced two huge features – improved stereoscopic 3D control and support for RED Digital Cinema’s new “color science” and the Mysterium-X sensor. The new RED capabilities are showcased in the “All Yours” music video by the band Metric. It’s the official music video for The Twilight Saga: Eclipse, which featured the track under the end credits.

I spoke with Dermot Shane, a Vancouver-based VFX/DI supervisor who specializes in using Avid DS. Shane was working with 10.3.1 (in beta) when he got the call to handle finishing for “All Yours” (directed by Brantley Gutierrez). According to Shane, “The schedule on this was very tight and changes were being made up until the last minute. That’s because the video integrates clips from the movie and there had been a few last minute changes to the cut. In fact, we ended up getting one of these clips FTP’ed to us just in time for the deadline!” The production company for Metric shot the music video scenes using a RED One with the updated Mysterium-X sensor, which offers improved dynamic range. The newest RED software also improves how the camera raw files are converted into color information. These latest RED software updates have been integrated into the RED SDK used in Avid DS 10.3.1.

Shane described the workflow on this project. “The production company had cut the offline edit on [Apple] Final Cut Pro and provided us with an EDL. Avid DS can take this EDL and relink to the original R3D camera files, which gives me direct access to the raw data from the camera files by way of RED’s SDK. It’s an easy matter to scale the images for HD and to alter any of the looks of the images, based on changes that the director might want. Because these changes are made from the camera raw files, color grading is far cleaner than if I only had a flat image to start from. Once this is adjusted, I can cache the media into the DS and everything is real-time. On this project, the caches were working in 10-bit YUV high-def, and the master was rendered directly from the RED MX files. I probably changed the color information on all but three of the 162 clips in the music video.”

The new RED Mysterium-X support came in handy on this project. Shane continued, “The new sensor is much more sensitive and Avid DS 10.3.1 let me take advantage of this. For instance, I could create three versions of a clip all linked to the same R3D file. In each of these versions, I would create a different color setting using the RED source setting controls inside Avid DS.  One clip might be adjusted for the best shadow detail, another for the midrange and a third to preserve the highlights. These would then be composited into a single shot using the standard DS keyers and masks. The final image almost looks like a high dynamic range image. This is something you can’t do through standard grading techniques when the camera image has a ‘baked in’ look. It really shows the advantage of working with camera raw files.”

And what is the best thing about this new Avid DS release? “Stability,” answered Shane. “We worked around the clock for three or four days without a hiccup. That’s hard to sell people on up front, but it really matters when you are in a crunch. On this project, we literally finished about 20 minutes before the deadline. My client really appreciated the integrated environment that DS offers. Their previous projects had gone from Final Cut to a Smoke finish and a Lustre grade. These are very capable Autodesk finishing systems, but Avid DS is a complete finishing solution. You can do editing, effects and color grading all in one workstation. This makes it a lot better for the client, especially when last minute changes are made during the color correction pass.”

Stereo 3D tools have been enhanced in DS 10.3.1. Convergence tools now allow independent adjustment of 3D content for each eye. There is also real-time playback of stereoscopic containers and effects. Although “All Yours” wasn’t a stereo 3D project, I asked Shane about the new 3D tools. He replied, “So far I’ve only had a  chance to do some testing with the new tools. In previous versions, I would have to go out to [The Foundry’s] Nuke and use Ocula for stereo 3D work. Our DS has the Furnace plug-in set, which includes some stereoscopic tools. With Avid DS 10.3.1, I can complete one eye, apply the same grading to the other eye, adjust the convergence and then use one of the Furnace plug-ins to tweak the minor grading differences between the left and right eye views.”

Addendum: This article was originally written prior to the 2010 IBC exhibition in Amsterdam. At that conference, Avid announced the release of Avid DS 10.5, which will be available both as a full-featured software-only version and as a turnkey solution. The software version will be available for under $10K and comes bundled with a copy of Avid Media Composer 5. Some of the features in DS 10.5 – available for the first time in a software version – include full 2K playback and REDRocket accelerator support. In addition, the software has been ported to the Windows 7 64-bit OS, making it one of the most powerful editing/VFX/grading solutions for the PC platform.

Written for Videography and DV magazines (NewBay Media LLC)

©2010 Oliver Peters

PluralEyes- Help for that Syncing Feeling

blg_plural_1

If you’ve ever edited multi-cam shows where the production crew’s attitude seemed to have been, “Sync! We don’t need any stinkin’ sync!” – then this software is for you. Without a doubt, every editor friend I ran into at NAB that happened to pass by Singular Software’s booth raved about this product. “You have GOT to see it,” was the comment I often heard about PluralEyes during that week.


What’s the need?


When you work multi-cam shows, proper sync is essential to line up the camera iso recordings in post. Obviously timecode is ideal, but this only works properly when all cameras were fed from a genlocked master timecode generator. In the case of digital run-and-gun projects (like a low-budget rock concert or reality TV productions), the cameras are running wild and not necessarily synced to each other.


Under the best of circumstances you might be able to get the crew to internally sync the cameras to time-of-day timecode at the beginning of the day or get them to occasionally shoot a large LED timecode display somewhere within a concert venue. In a film-style shoot, they might have started each take with clapsticks. More often than not, this doesn’t go according to plan once in the thick of the production – or the timecode starts out close and drifts out. The latter often happens when a camera gets powered down and back up in the course of the production.


Most modern NLEs have multi-cam editing tools. Typically these let you sync clips by matching timecode or by marking an in-point at some common event and aligning the source clips accordingly. In the film example, the point where the sticks clap shut provide a good mark-in-point. In the absence of either clapsticks or valid timecode, you often find yourself looking for things that become a common reference point. For instance, the same frame in each camera angle, just where the singer touches his nose in a unique way! Obviously this can become incredibly time-consuming and often not very frame-accurate.


blg_plural_5


Enter PluralEyes


PluralEyes is designed for Final Cut Pro editors. It synchronizes clips based on common audio. It’s not a plug-in, but a standalone application that works in tandem with FCP. The software analyzes the waveform of a clip’s audio track and processes sync based on the commonality of the tracks among clips from different camera angles. In order to work, you must have in-camera sound, even if it’s only a scratch track. Picture-only (MOS) recordings still have to be lined up manually or by timecode.


On the other hand, audio-only clips can be synchronized. If you are shooting a concert, the wild audio from the cameras can be synchronized to the clean audio recording fed from the mixer to an audio recorder. PluralEyes won’t adjust for any sync drift, so such audio tracks still need to be properly recorded. In the examples I’ve seen and tested, the camera tracks can be pretty distorted, which means PluralEyes can still perform the analysis with less-than-pristine audio tracks, as long as it can sufficiently interpret the waveform to establish sync.


The bottom line is that PluralEyes gives you a way to quickly and accurately sync cameras without the use of timecode or manual reference marks. This makes it possible to use smaller, prosumer camcorders in multi-cam projects without creating a synchronization nightmare in post. It also lets you use full-blown pro camcorders in situations where establishing common timecode sync is impractical.


blg_plural_2


Working with PluralEyes


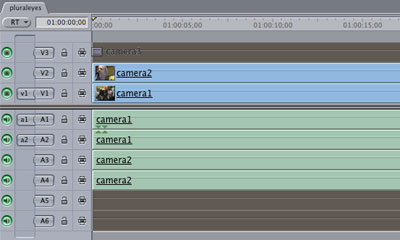
The way PluralEyes works is so simple for the editor, that it takes longer to explain “why” than to explain “how”. You start out by importing or ingesting all the clips into a Final Cut project. PluralEyes can synchronize clips in a sequence or in a bin, but the key is that you have to name the target to be analyzed “pluraleyes”. Either the bin or the sequence (whichever you want synced) has to be named “pluraleyes” and the project must have been saved for PluralEyes to work.


blg_plural_3


The most common approach would be to sync a sequence. To do this, place all your camera clips at the start of the timeline. Make sure there are no in or out marks. Stack the different camera angles (with audio) onto ascending video tracks. Camera 1 goes to V1/A1-2, Camera 2 to V2/A3-4, Camera 3 to V3/A5-6 and continuing up with more cameras. All cameras should be lined up at the head of the sequence and on separate tracks.


blg_plural_4


If you stopped and restarted the camera recordings during the production, then you can place all clips from a single camera onto the same video/audio tracks. I haven’t seen any Singular documentation that addresses this, but I was successful when I did this on a test project. In other words, Cam 1 clips can stay back-to-back on V1, Cam 2 clips on V2 and so on. I also haven’t seen any mention of a limitation as to the number of cameras. My tests included 2-4 cameras, but I’ve seen other internet posts where six cameras were used.


blg_plural_6


Once you’ve created the sequence to be synced and have saved the project, launch the PluralEyes application and select “sync”. The software takes a few minutes to analyze and process the tracks and to create a new synced sequence, as well as multi-clip groups. Singular’s short, downloadable sample project (3 cameras, 1 minute clips) only took several seconds to sync. Another project that I tested, which was a 3-camera, half-hour interview show, took a couple of minutes. These tests were both on a MacBook Pro.


blg_plural_8


Once PluralEyes is done, return to FCP and you will have a new synced sequence and source multi-clip groups. In my interview show test, the studio crew recorded it in segments, so each section was broken into a separate multi-clip group by PluralEyes. In the tests I’ve done so far, syncing has been fast and successful in each case. I have had one editor tell me it didn’t work when he tested it, but I have no idea if he was doing everything correctly. In any case, Singular lets you download a trial version to see for yourself.


blg_plural_7


I will offer one caveat about sync. Since the clips are aligned based on the audio, there is no guarantee that the audio recorded by the camera itself will be in perfect sync with its own video. For instance, if you are recording audio of a concert and the cameras are only picking up the ambient audio from the PA system, it’s quite likely that each camera will be visually out of sync by a frame or two (or more) when synced against a master audio recording from the board feed. This is due to the natural delay inherent in such live venues. Fortunately Final Cut offers some quick functions to adjust clip sync, either for the master clip itself or when trimming clips later during the edit.


Using PluralEyes is a no-brainer for any editor who works with multi-cam projects in Final Cut. There’s also an interesting bundling deal right now with the folks at CoreMelt and they’ve even done a quick tutorial showing how the two projects might be used in conjunction with each other. Check it out.


On another note, Singular is also working with post solutions for the Canon 5D Mark II, which can be found here and here.


© 2009 Oliver Peters

Music Video Fun

blg_mv1

The internet is a great place for discovering new contacts. Music video post lets you extend your creativity. This intersection brought me in contact with G.No, a fellow Final Cut Pro enthusiast. G.No is a French R-n-B artist, whose soulful, Latin hip-hop riffs complement his moniker of “The Latin Bird”. After a few e-mail exchanges, I was off and running to color-grade three of his current music videos – long distance, to boot!

blg_mv2

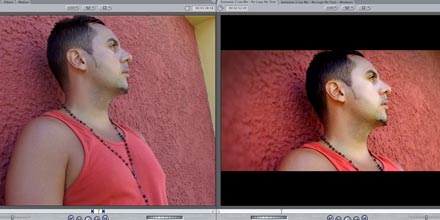
Someone 2 Luv Me Before and After Frames


Two of the videos had already been edited, and the third – up to me. The direction here was to make them look better than they started and to try to make each look different from the others. Like many such videos, the footage was shot with a consumer/prosumer digital camera, so the first objective was to achieve a less video-like – and more film-like – “look”. There’s plenty of inspiration at places like YouTube, so after G.No offered suggestions of other videos that he liked, I had a sense of the direction to take.


blg_mv4

En Mi Vida Before and After Frames


I have written about grading in Final Cut Pro and this was one that fit the bill. Basic color-grading was done with the FCP 3-way and Red Giant Software’s Magic Bullet Colorista plug-ins. Both can give you good results, but Colorista offers an additional exposure control that works a lot like the exposure slider in photo processing applications. Colorista also lets you mask areas of the image and lighten, darken or change the balance inside or outside of the windowed area. You can use several instances of Colorista in order to treat various areas separately within the frame. I also use the Face Light plug-in for the same reason. My main purpose with Face Light is to brighten faces, as the name implies.


blg_mv3

blg_mv8

Someone 2 Luv Me Before and After Frames plus filter pane


Tools like Colorista allow you to shape the lighting of a flatter image, but one other useful tool is a vignette filter. There are variations of this filter available in different packages, but the general purpose is to darken the outer edge of the image. This mimics a distortion that lens manufacturers work hard to eliminate. Used creatively, this further helps to shape the look of a scene. Not all vignette filters work the same, because many use blend modes to darken the image’s edges. Using a “darken” or “multiply” mode rather than “normal” yields different results that change with the brightness of the scene itself.

The last little technique to essentially “re-light” a shot is the subtle use of chromatic glow effects (like FCP bloom or one of Joe’s Filters). Use these to diffuse highlights and cause them to glow. Along these same lines, I will also use selective focus or soft spot effects (Magic Bullet Looks or Joe’s Filters) to blur the outer edges of a scene and keep the center sharp. One benefit of chromatic glows, when used subtly, is to brighten facial highlights. When I shift the midtones in the 3-way to a more reddish complexion, using a chromatic glow effect brings back more highlights and added definition to facial areas. The reason for applying this mix of effects is primarily to draw the eye to the central point of the image, which is typically our singer, in the case of these videos.


blg_mv5

En Mi Vida Before and After Frames


Since the main outlet for these videos is the web, each clip on all three videos was also deinterlaced from the original interlaced PAL format. Nattress deinterlace filters fit that need. This even benefits the videos for use on TV and in DVDs, because it creates a more filmic frame-rate, since all interlaced frames become progressive in appearance. Last but not least, all three videos were polished off with a letterbox mask for the faux-widescreen look. This mask required that most shots had to be repositioned for optimal framing.

The first two videos were filmed (or should I say “taped”) during a trip to Venezuela. Someone 2 Luv Me got a treatment that was richer looking, more saturated and generally softer than it started. Tackling En Mi Vida required a different approach. Much of this video took place in the hotel room, so I opted for a look reminiscent of old, distressed Ektrachrome reversal film from the 1960s. Choosing a different toolset, I did almost all of the color-grading for this video within Magic Bullet Looks. This filter runs inside FCP, but when you modify any parameters, you enter Looks’ own unique user interface. Tools are grouped by steps in the camera, processing and/or post chain. You can get pretty elaborate ganging up a series of complementary processes all within this one filter.


blg_mv9

En Mi Vida frame in Looks interface

In addition, I added some film damage effects for grain, scratches and dirt courtesy of Boris Continuum Complete. Typically, I’ll use these effects for a few shots. You have to be mindful of the fact that when you apply these to a lot of clips, the project size grows exponentially. My original 2MB FCP project ballooned to about 50MB largely through the effects added to this second timeline.

One point worth noting is that it’s OK to do interesting things to the picture in hip-hop music “just because”. Producers and engineers commonly add vinyl record effects like scratches and pops to a digital mix. In these videos random flashes were added to the picture to visually accentuate some of the music beats. In the client’s cut, these were 1-2 frame cuts of white. I changed these white flashes into glow dissolve transitions for a more organic look. This style was continued throughout all three videos.


blg_mv11

Buenas Noches frame with After Effects CS4 cartoon effect

The third video, Buenas Noches, called for a different touch. The storyline was boy meets girl; they enjoy a day in Paris during the Christmas season; and meet again the next evening. Looking for something completely different, I tried the new Adobe After Effects CS4 cartoon filter. I was striving for a look reminiscent of the feature film A Scanner Darkly. It was certainly an interesting look, but not a winner with my client. Taking another swipe at this idea, I tried a similar look using the CHV silk & fog filter, set to the borders mode. Again – an interesting look – but still not right.


blg_mv12

blg_mv13

Buenas Noches frame with CHV silk & fog filter plus filter pane


blg_mv10

Buenas Noches frame in Color interface

blg_mv14

Buenas Noches frame with filter pane in FCP

Once we discarded the effects-driven looks, it was back to attaining a style through grading alone. With that in mind, I decided to use Apple Color on Buenas Noches. The intent was for a somewhat desaturated look. I liked the look I got out of Color, but neither my client nor I were as happy with the result – for this video – as I’d hoped. I have to agree that the element missing in all three attempts was a sense of romance that a day in Paris should evoke.


blg_mv6

blg_mv7

Buenas Noches before and after frames with final effects


blg_mv15

Buenas Noches frame with final effects plus filter pane


Back to the drawing board- using the same approach as in the first video. Back to FCP with a witches’ brew of filters. In this case, the color correction standbys (3-way and Colorista), plus chromatic glow, vignette, Face Light and others. I also made use of FCP’s compound blur, which – when used in a small increment – adds nice diffusion to the image. In addition, I decided to crank up the chroma saturation big time! In the end, both of us were very happy with the results.


blg_mv16

En Mi Vida frame with final look


blg_mv17

En Mi Vida frame with final look


blg_mv18

Someone 2 Luv Me frame with final look


blg_mv19

Buenas Noches frame with CHV silk and fog look


blg_mv201

Buenas Noches frame with After Effects CS4 cartoon look


blg_mv21

Buenas Noches frame with final look


blg_mv22

Buenas Noches frame with final look


blg_mv23

Buenas Noches frame with final look


Color grading music videos is about emotion and style, not about fixing the image. It’s all about the “look” – not the right or wrong. And it’s about having fun getting there.

For more on G.No, check out Gardelino.com as well as his posts on YouTube (or here) and on MySpace.


© 2009 Oliver Peters