Adobe Photoshop and Lightroom are ubiquitous digital photography processing tools that hold a place in nearly every pro and semi-pro photographer’s toolkit. From straight-up image correction and enhancement to wildly creative looks, it’s hard to beat what these tools offer. However, when you get into the stylistic filter options, Photoshop looks a bit stale. You can certainly push the artwork to new levels, but it takes talent and often a lot of work. That’s not in step with today’s mindset, where powerful, yet simple-to-use effects tools are the norm. (Click any image in this post for an enlarged view.)
Enter Optics for Photoshop
Last September Boris FX acquired the award-winning effects developers Digital Film Tools and Silhouette. Optics is a new tool developed since this acquisition, specifically designed for the photography market. It features a plug-in for Photoshop and Lightroom (as well as Bridge), which is paired with its own standalone application. Optics shares design similarities with DFT, but also integrates other BorisFX products, such as 75 of the Sapphire filters – a first for Photoshop users. According to Marco Paolini, Optics product designer for Boris FX (and co-founder of DFT and Silhouette), “Optics is the only Photoshop plug-in that specifically simulates optical camera filters with presets based on real-world diffusion filters, as well as realistic simulations of film stocks and motion picture lab processes.”
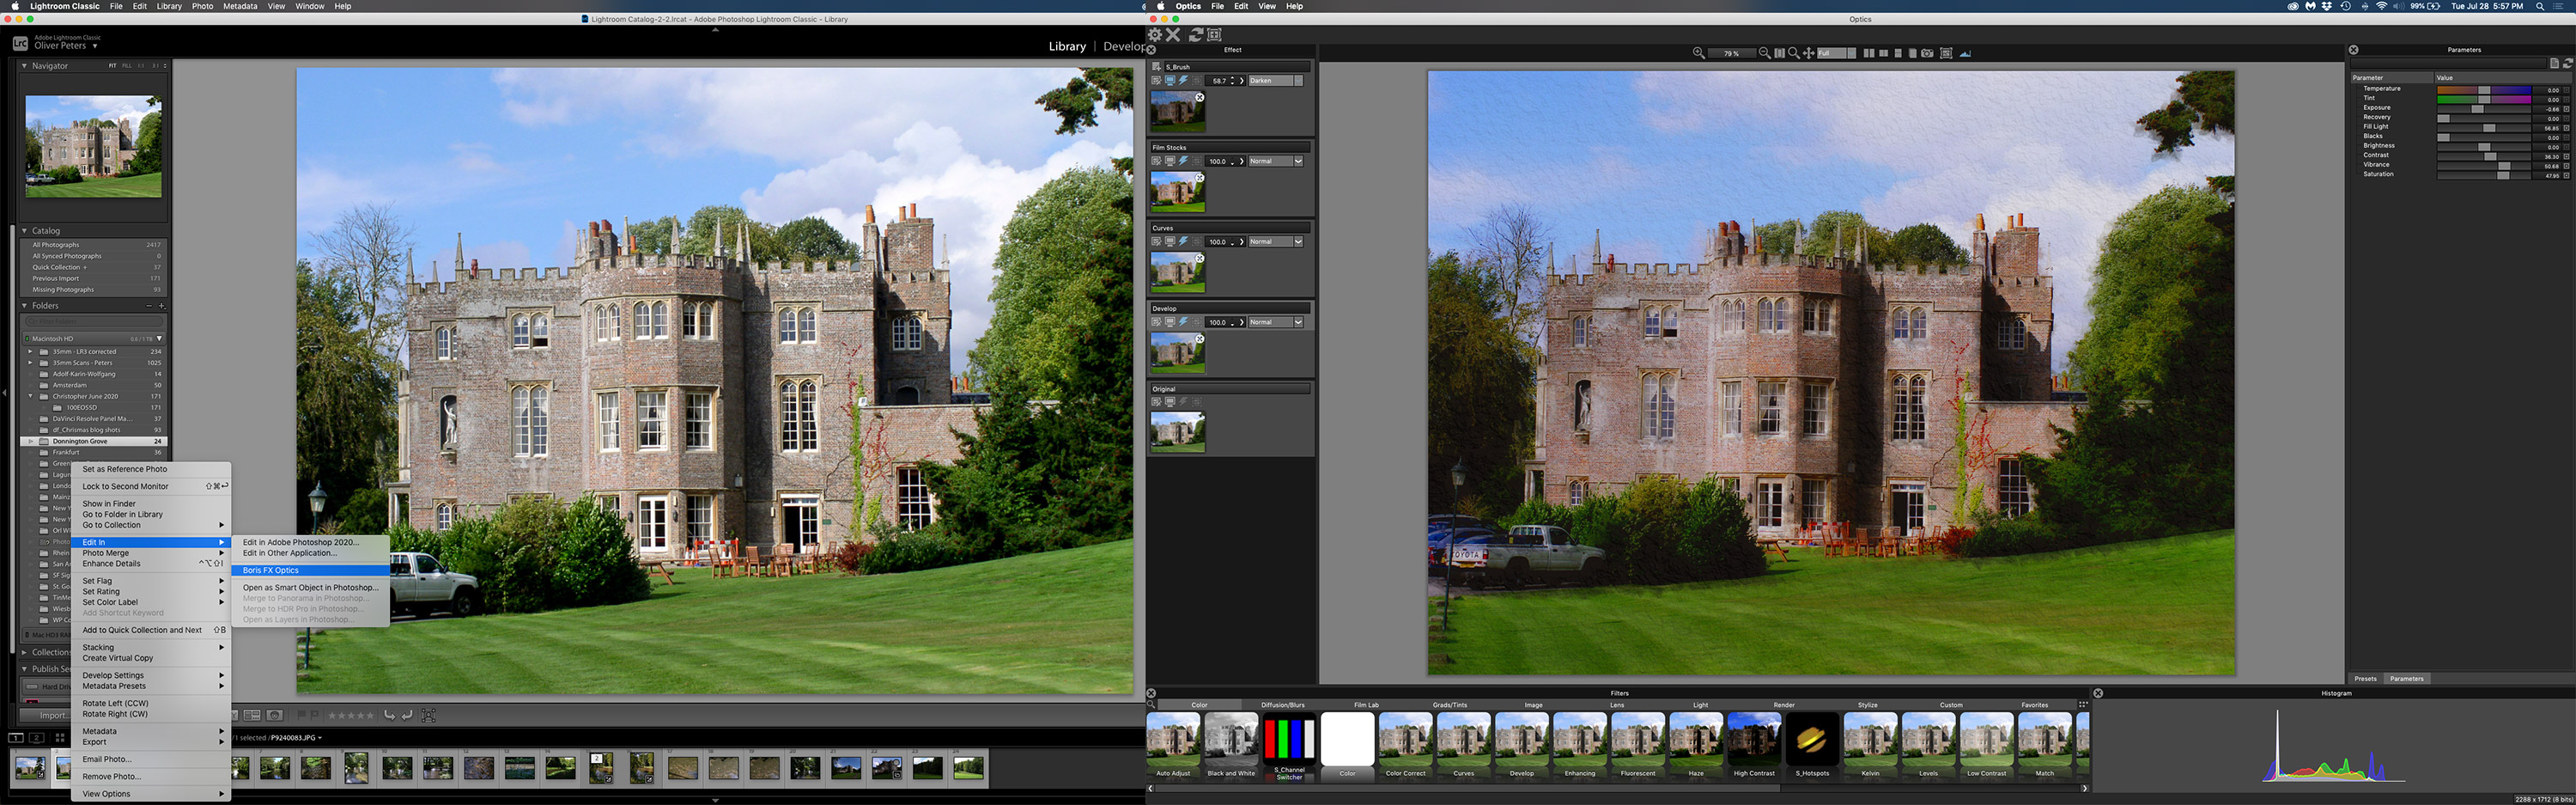
 To use Optics from within Photoshop, simply apply the Optics filter effect to a layer, which opens the Optics Photoshop plug-in. If you first converted that layer into a Smart Object in Photoshop, then the final Optics result will be applied as a Smart Filter and can be toggled on and off in Photoshop. Otherwise, that layer will appear with the “baked in” result once you exit Optics. From Lightroom or Bridge, use the “edit with” command to route the image to the Optics application. Lightroom will send either the original version of the image or with any Lightroom effects applied. When done, a processed copy of the “sent” image appears in Lightroom. The Optics Standalone application supports an extensive set of camera raw file formats in addition to JPEG, TIFF, DPX and Kodak CIN files.
Filters and looks galore
 Optics offers 160 filters with thousands of customizable presets. The filters are grouped into nine categories, including color, diffusion, stylize, and more. The user interface is designed with tools and controls bordering around the image. Top – tool bar for masking and view control. Left side – the layers stack. Bottom – filter groups and selection. Right side – two tabs for presets and parameter adjustments. You can show or hide these panels as you like, depending on what you need to see at the time. Resolution choices for the image viewer include 1K, 2K, 4K, 5K, 6K, 8K, and Full resolution. The available choices in the resolution menu are dynamic depending on the size of your image. A lower resolution helps to speed up processing results on lower-powered machines, but you’ll want Full to correctly judge some effects, like sharpening.
 If you are comfortable in Photoshop, then you already know how to use Optics. You can build up complex effects using a combination of different filters by using layers. Each layer can be masked and includes all of the usual composite modes. Optics uses floating point processing. This means you can blow out highlights or exposure in one layer, but then bring it down again without information loss in a higher layer. Test out different looks simply by building them onto different layers. Then toggle a layer on or off to see one look versus another. For instance, maybe you’re not sure if you want a sepia look. Just make one layer sepia, disable it, and add a new layer for a different style. Then enable or disable layers to compare.
 The EZ Mask is a super-cool function. Let’s say you want to separate a fashion model from the background. First draw rough mask lines for the interior (the model), then rough lines for the exterior or background. Optics will then calculate a very accurate mask. Trim/adjust the mask and re-calculate as needed to better refine the edge. Masks may be inverted as well as copied between layers, which enables you to apply separate effects inside and outside of the mask area. In the example of the model, this means you can create one look or set of effects for the background and a completely different style for the model.
 Optics includes a number of stylized render elements that can be added to images, like the moon or lightning zaps. This also includes a ton of lens flare effects, thanks to the included Sapphire filters. In addition to the variety of presets, you can further customize the flares by launching the separate Lens Flare Designer, which is integrated into Optics.
Working with Optics
Optics runs on Macs (macOS 10.13 or higher) and PCs (Windows 10 or higher) with fairly basic hardware requirements. I was able to test Optics on both an iMac Pro and my mid-2014 MacBook Pro. There was a minor license activation issue with the laptop, which was quickly sorted out by Boris FX’s customer service technician. Otherwise, the installations were very smooth. No hiccups with the iMac Pro. Optics responds well on less powerful computers; however, processing-intense effects as well as workflows with a stack of complex layers will perform better on a faster machine. For example, effects that were instantly responsive on the iMac Pro took a bit more time on the older MacBook Pro. If you are only photo developing/color correcting, then you probably won’t notice much difference.
 The Optics Standalone application may also be used to process single stills without coming in through Photoshop. The new files can be left in their original size or optionally resized. You can save custom presets, which may be used for single images or to batch process a folder of stills. For example, if I wanted all my vacation stills to be processed with a certain Kodak film stock preset.
 Batch processing offers another interesting possibility. Optics will batch process any image sequence, whether from a camera (such as drones) or from a video file exported/rendered out of After Effects. As long as they are JPEG, TIFF, DPX, CIN, or camera raw files, you are good to go. This is a cool way to apply a custom look that you may not have access to as a video filter or plug-in effect, even though Optics is a still photography application.
 Select “batch process” and load the image sequence. Then load a saved Optics setup that you have created. Batch processing will save these files as a new image sequence complete with the custom look applied. Finally, reconstruct the processed image sequence back into a video file using After Effects, Resolve, or any other application that supports image sequences.
If you work with a lot of stills and hate going through the gymnastics that Photoshop requires in order to create truly unique looks, then Boris FX Optics will be a game changer. It’s very addictive, but more importantly, Optics offers a huge improvement in efficiency. Plus you’ll have filter options at your fingertips not normally available in Photoshop alone. You might quickly find yourself doing all of your image processing strictly in Optics.
As with other Boris FX products, Optics is available as a perpetual license or subscription. Click this link for Optics video tutorials.
Click through the gallery images below to see further examples of looks and styles created with Boris FX Optics.
©2020 Oliver Peters