KISS in Post

Of course, I’m talking about the principle, not the band: keep it simple, stupid. Nowhere does this apply more than in mixing and color correction.

Many of the films were admire from the 1970s or the classic hit records of the 1960s and 1970s that are held up as sonic pinnacles were finished with tools that we might now consider primitive. Film timing (the equivalent of modern color correction) and analog mixing were as much alchemy and art as they were the precise application of technology.

Tools have become cheaper, thanks to low-cost software like DaVinci Resolve and a plethora of audio plug-ins. We often look for a quick fix, rather than think through the process to achieve the right result. Add in the many YouTube “experts” – some legit, others with no real credits to their name – and you have a never-ending stream of tutorials trying to teach you the “secrets of the masters.”

Color correction

I’ve graded tons of video projects, including feature films and documentaries. If you have to do a ton of grading/color correction/color timing, then something was probably deficient on the production end. Maybe it’s low budget and the production was rushed. Maybe it’s a run-and-gun reality or documentary project. Or maybe, just maybe, the DP wasn’t very good or simply relied more heavily on manipulation in post than he or she should have. My point is that the better the planning and execution for what happens in front of the camera, the better the final look.

I recently watched A Gentleman in Moscow, which is a period drama set from roughly the 1920s to the 1950s. Nearly all of the story takes place within the grand hotel, which is mostly a set on a soundstage in Manchester. While I know nothing about the particulars of the color grade on this project, to my eye, much of the look was created though set design, costuming, and lighting. Plus some visual effects. I’m sure the grade wasn’t simple, but I’d guess that most of the look was in place with just some standard color transforms, balancing, and shot matching.

Watch any YouTube tutorial that focuses on Resolve and you often see the most elaborate set of nodes. Often this is unnecessary. Remember that many colorists use a node template, but not all of the nodes are used or enabled. I’ve done color correction with many of the NLEs, as well as DaVinci Resolve. I can often get the right look within a single node or layer, however, using several nodes or layers helps you to stay organized. For instance, my typical approach in Resolve uses five to seven nodes when dealing with log footage. This lets me deal with log conversion, exposure, primaries, secondaries, and vignetting – each in separate nodes. The same with layers in a tool like Final Cut Pro.

The bottom line is that if the DP has the time and inclination to set a look on location or on set, then not only will the color grading session go faster with fewer adjustments, but the final look will be better and appear to be more organic.

Mixing

Like YouTube tutorials about grading with Resolve, a quick search will turn up tons of tips-and-tricks videos dealing with audio recording and mixing. The tools are cheap and probably more folks fancy themselves as musicians that can self-produce than fancy themselves as colorists. 

Many of these are product reviews where the plug-in developer sent a free copy of the software in exchange for a review. Most of these are independent without pressure from the company. I do those, too. But others are officially sponsored. Nothing wrong with that as long as you know. However, even though a given Waves Abbey Road plug-in promises to make your mixes sound like those of the Beatles, you can achieve the same results with the tools that were already included with your DAW application.

As noted in some of my other blog posts, I’ve been mixing music as a hobby for a few years now. The source tracks are from various internet downloads. Aside from the enjoyment, this exercise helps to inform the approach I take with the simpler mixes I do on paying video edits. The corollary with color correction is that the better the initial recording, the better the mix is and with fewer machinations to get there.

In the heyday of many of the classic rock hits, there was no differentiation between a recording and a mix engineer. The recording engineer handled the studio recording session and the mix was an organic part of that process. Using a different person for the mix is a relatively new phenomena in music production. A recording engineer had to know a lot about proper mic placement, isolation between players in the studio, and the esoteric of the electronics. Prior to DAWs, software plug-ins, and in-the-box (ITB) mixing, recording engineers had to rely on a relatively small number of outboard units together with the features of the console itself.

Take an orchestra, for example. The reason you have the specific number of brass players versus strings versus winds and so on is that this creates the balance in the sound. Usually that was spelled out by the composer, because the orchestra had to be able to achieve the proper “mix” in a live setting without electronic aids. And so, if you look at how orchestras are recorded, it’s often with relatively few mics arranged in very specific patterns.

I’ve had a chance to sit in on a choral recording session. The engineer recorded a relatively small ensemble in three passes to a 24-track analog recorder – six to eight tracks at a time. With each pass, he re-arranged the pattern and the grouping assignments of the mics. The result was not only the tripling of the sound through overdubs, but a change in the way the group was being picked up in each pass. The mixed result was a whole that was greater than a sum of its parts. My point is that if you have properly recorded tracks, you don’t have to do as much in the mix. In fact, for some projects, the entire session could be recorded with a single stereo microphone, if the mic and the performers are properly positioned.

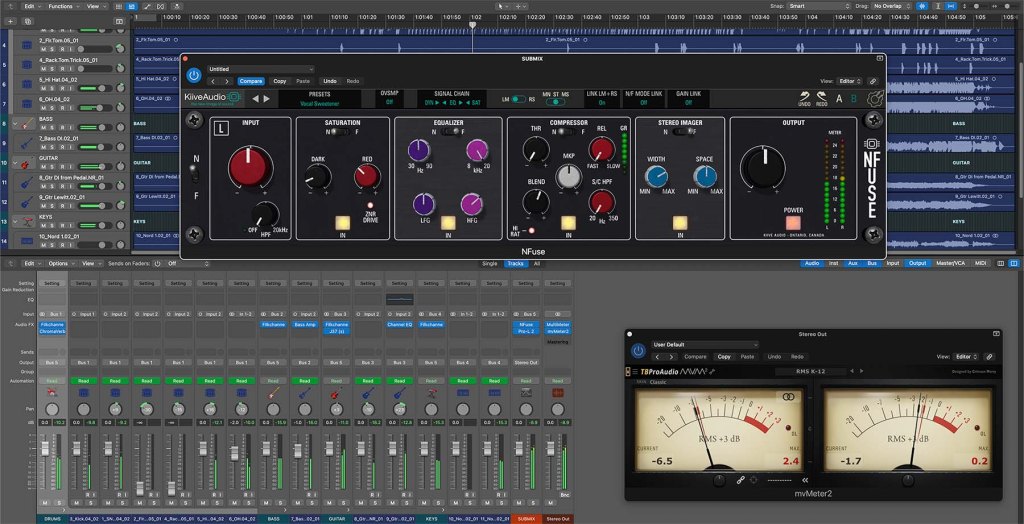
My own mixing method is to group instruments into summed stems (drums, guitars, vocals, etc), which are then mixed into a submix bus before going the to stereo output. Most of the time, I will use native Logic Pro plug-ins on some of the individual instrument tracks (if at all). My favorite plug-in to place on each group bus is the KIT BB N73, which is a Neve 1073 channel strip emulation. I may also use the Logic compressor here as needed. Finally, I like to add the Softube VCA Compressor, Kiive NFuse, and FabFilter Pro-L2 plug-ins on the submix bus. The exact choice of plug-ins will vary with genre, but right now, these are my go-tos.

If the recording session was handled properly, then you should be able to set up the initial mix with a basic balance of levels and be at least 75% of the way there. If you are having to place a long chain of plug-ins onto each track/fader, then either the original recordings weren’t great to start with or you are overthinking the process.

Ultimately all processes in post become more complex when the original production was short-changed. But, start out with the simplest approach and build upon that. It’s likely that you’ll get to your desired result with less fuss and in a shorter amount of time.

©2024 Oliver Peters

The 2024 NAB Show

Many have opined that there’s no longer a need for large trade shows. Clearly the folks running the Las Vegas Convention Center don’t buy into that view. They are in the middle of a multi-year project to expand and renovate their facilities. That was the backdrop for this month’s National Association of Broadcasters annual exhibition. Aside from meetings and presentations to official NAB members, this show is best known as one of two major international showcases for new technology in the areas of radio, film, television, streaming, production, post-production, and distribution. The other is the International Broadcasting Convention (IBC) in Amsterdam, to be held later this year.

The tally this year clocked in at over 61,000 attendees of which more that half were first-timers and over a fourth from outside of the US. Some might suggest that you can get all the info you want about gear by watching YouTube. If you’ve ever been to CES, NAMM, IBC, NAB, InfoComm, or similar shows, then you know that there’s nothing like the in-person experience. That most certainly was part of the draw for these first-time attendees. 

A show like NAB gives you a way to kick the tires and compare. Not only do you experience the look and feel of actual products, but the manufacturers are often presenting them in actual use. Want to see how the various Canon lenses perform? Simply walk down the line in their booth’s camera set-up and see for yourself. Want to compare the features of manufacturer A’s product against those from manufacturer B? Just walk from one booth to the other and check it out for yourself. That’s the value NAB presents. Add to this the opportunity to meet and chat in person with some of the online friends and mentors you’ve had – then, that’s just icing on the cake.

I’ve written a show overview for postPerspective (click this link) if you want to read about some of the new products and features that caught my attention. If you didn’t get a  chance to go, this gallery will give you a sense of NAB 2024.

Click on any image below to view an NAB slideshow.

©2024 Oliver Peters

Kiive Audio NFuse – Best of Both Worlds

In the audio world there are frequent discussions around classic mixing desks – SSL, Neve, API, MCI, Harrison, etc. Most often the debate centers around Neve versus Solid Sate Logic (SSL). But modern mixes are more often than not done “in the box” using only DAW software and plugins. Many professional mixers augment this with outboard processing gear to impart that “warmth” and “color” of analog circuitry. 

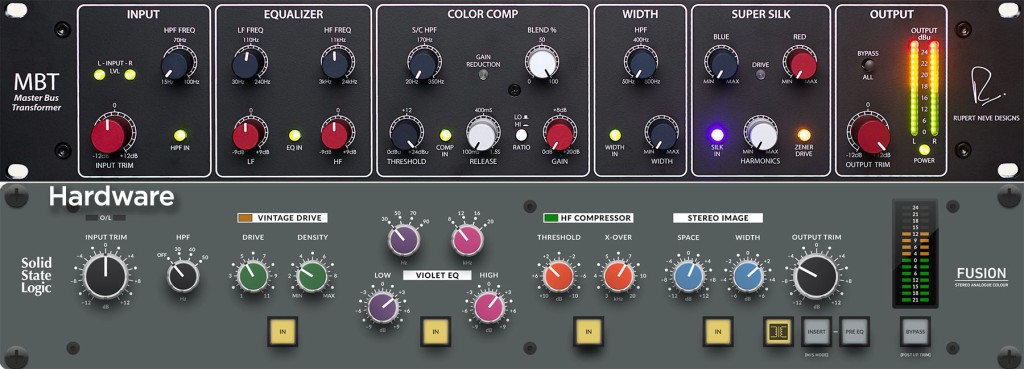
To service this market, both Neve and SSL offer stereo bus processors that combine EQ, compression, saturation, and stereo width components. That’s the Rupert Neve Designs MBT (Master Bus Transformer) and the SSL Fusion. Both offer more or less the same set of controls, but with their own, unique approach to curves, ratios, harmonics, etc. However, this comes at a steep price. The Neve MBT retails for $3,999 and the SSL Fusion for $2,199.

NFuse offers both in one plugin

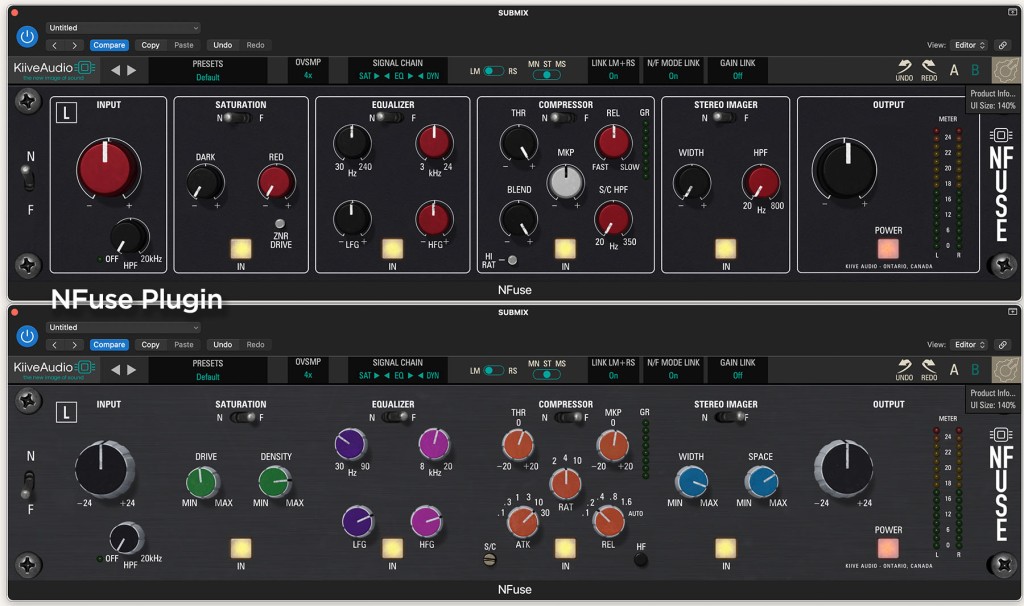
Unless you are earn a solid income from mixing, then buying one of these, let alone both, doesn’t make a lot of sense. That’s where plugins enter the discussion. One of the newest is the NFuse bus processor from Kiive Audio. As the name implies, this plugin combines both the Neve MBT (“N”) and the SSL Fusion (“Fuse”) into a single unit. It features N/F toggles for the whole plugin, as well as each section, in order  to easily switch between modes. If you like the Neve sound for several of these modules, but prefer SSL compression, simply toggle the compression module to the F setting. Of course, this would be impossible with the real hardware. Furthermore, since this is a plugin, you can add it to any and all channels, groups, and the master bus. With hardware you’d need to own multiple units in order to do that.

The basic components of NFuse are saturation, equalization, compression, and stereo imaging. Plus input and output levels. The small windows at the top of the interface let you set the oversampling amount, linking functions, as well as the processing order: sat>eq>comp, eq>com>sat, comp>eq>sat, etc. Stereo imaging is always the last module in this chain.

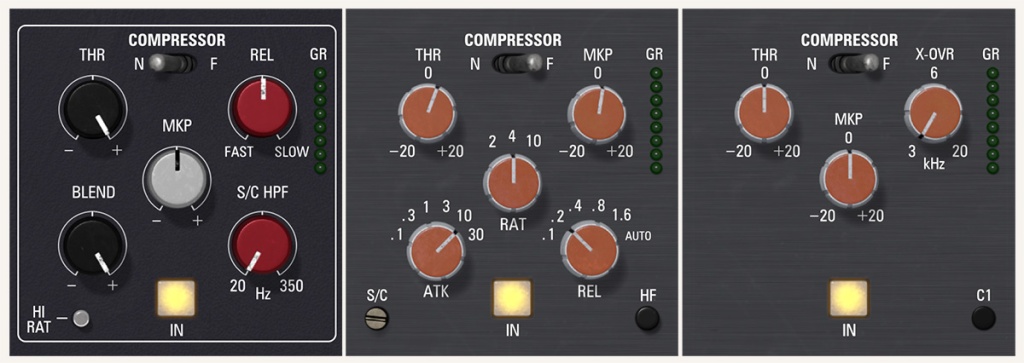
The Neve (N) and SSL (F) controls include slightly different features, just like the hardware. Since Kiive Audio has modeled these based upon the characteristics of each of these two hardware units, there are really two different “circuits” within the design of this plugin. For example, the high and low EQ ranges differ between the two, as do the compression ratios. Kiive recently added a new HF mode to the Fusion Compressor for a total of three compression types in all. Rounding things out, you’ve got a variety of factory presets, plus A and B saved states to easily compare two different settings.

Using NFuse for your mix

You can apply NFuse in various ways. For example, I mix music in Logic Pro, but video projects mostly in Premiere Pro. When working in Logic, I will group similar instruments into track stacks (summed groups), which are then routed to the main mix bus. Thus, combined groups for drums, bass, guitar, keys, and vocals are summed into the final mix. I usually apply a variety of processing effects to each instrument group, as well as the stereo mix bus. These are often third-party plugins, but could be a stack of native effects. The individual tracks get a smattering of native Logic plugins, as needed. Lastly, the master bus gets the final analog color and some compression.

With this approach, I could easily apply NFuse to each of the groups, along with the mix bus. After all, I can turn off some of the modules within the plugin if I don’t need them. However, a plugin that also works well for the groups is Filkchannel, another Kiive Audio plugin. That’s what I did in the test mix and then I applied NFuse to only the mix bus for the final “glue” to shape the mix. I like this approach, because all of the tools I need are in a single plugin interface, as opposed to stacking three or four different plugins when using native tools.

When it comes to my video mixes in Premiere, there’s little need for groups, since my timeline generally has fewer individual tracks. However, Premiere Pro doesn’t have a good multi-effect processor plugin that I feel like using. So instead, I’ll apply a combination of native effects. In this scenario, NFuse is also a good tool for a video editor.

The results

Naturally, the first question to ask is, “How does it sound?” Honestly, I’ve never worked with any of the hardware that this plugin was inspired by, so I can’t tell you how close it sounds to the hardware itself. However, there are plenty of YouTubers doing that, so you can make up your own mind. In most of the comparisons, hardware usually has a slight edge, especially when pushed. But given the price of the hardware, that slight difference is meaningless to most. Ultimately it’s all subjective.

In my mix, the plugin sounds very good. I realize the many people love the SSL sound, but to my ears, I find the various third-party SSL emulations, including NFuse’s “F” settings, to be on the aggressive side and can sound a bit harsh. Instead, I find myself gravitating to the Neve emulations, like 1073-style EQ plugins and so on. At least for my test mix, which was a jazz ensemble, the “N” modes of NFuse sounded smoother and more pleasing to me.

NFuse is a pretty close emulation to the hardware, however, because of that, there’s no limiter. Kiive Audio does market other plugins that do that, like the ADC1, which emulates hardware from Abbey Road Studios. In my case, I will typically apply a native Logic Pro or Premiere Pro limiter or sometimes Fabfilter’s Pro-L2 at the end of my mix bus chain. It would have been nice to include brick wall limiting as part of NFuse, even though that would have deviated from the original hardware.

Final thoughts

Kiive Audio retails NFuse for $199.99 (currently on sale as I post this) with a 14-day free trial. The price is attractive, but like any plugin, it’s worth checking out the trial before committing. The developer also offers licensing that’s easy to deal with. No iLok or cloud authorization required. My one quibble about NFuse is that the PDF manual needs to be a bit more detailed. It also doesn’t explain the newly-added HF Compressor mode. Maybe an update is just around the corner.

Overall, I liked the smooth sound NFuse delivered, especially in how it added character and glue to my final mix. That’s the sweet spot for me. Although you can use it on groups, I feel that other plugins like Filkchannel are better suited for those. NFuse offers a nice range of smooth to aggressive between the Neve and SSL-style emulations. This makes it ideal for various musical genres – especially when you just need that little something extra to enhance your mix.

©2024 Oliver Peters

Analog Mojo For Your Fairlight Mixes

Before Blackmagic Design acquired the assets, Fairlight was one of the originators of the digital audio workstation. Thanks to its modern integration within DaVinci Resolve, Fairlight has added pro-level audio performance to this all-in-one application. When it comes to recording and mixing real musicians, as well as all levels of audio-for-film/video post, Fairlight brings needed competition to the market. There are audio restoration tools, a built-in sound effects library, and advanced features including Dolby Atmos.

As a mixing application, Fairlight uses the traditional track/mixer/meter bridge configuration. Each track has a corresponding channel strip complete with fader, EQ, and gate/compressor/limiter, plus inserts for other plugin effects. The user interface is optimized for single and multi-display arrangements, but also accommodates Fairlight control surfaces with their own integrated screens.

Blackmagic Design offers a broad ecosystem of native hardware accessories to expand the system, similar to those offered by Avid for Pro Tools. This includes several console/control surface options, an Audio Editor panel, and PCIe cards for multi-channel i/o and audio effects acceleration. Put all of this in play and, according to Blackmagic Design, the system is capable of realtime playback with effects for up to 2,000 tracks.

The analog vibe

This makes Fairlight a nice digital audio workstation, with emphasis on the word digital. What it lacks is the harmonic color and character typical of native analog-style plug-ins available in Pro Tools, Luna, Logic Pro, and other DAWs. Furthermore, the presets are focused on film and TV mixing, but not music. For example, there is no suggested “kick drum” preset for the compressor. If you mix music in Fairlight and want the sonic benefits of analog emulation, then that’s where third-party plugin effects enter the picture.

Typical “vintage” plugins emulate classic British and American consoles and outboard equipment from the 1960s and 1970s. The goal is to duplicate the character of the hardware, such as their unique EQ curves, which would be hard to derive with most digital tools. But, the actual sonic character of these plugins is highly dependent on what was used to model the software, which is usually something you wouldn’t know as the user.

KIT Plugins Blackbird Bundle

KIT Plugins, which is a relatively new plugin developer based in Nashville, made their Blackbird Bundle available to me for this review. Blackbird Studio, one of the premier music studios in town, owns a huge collection of vintage gear, including iconic Neve and API consoles. Some of this hardware was used by KIT Plugins to model their software products. Since Blackbird Studio has its name on these products, nothing gets out the door until studio founder/mixer John McBride has put his stamp of approval on it. As a result, the software tools in the Blackbird-branded plugins match the sound and character of the actual hardware at Blackbird Studio.

The Blackbird Bundle includes six analog-style EQs as part of four plugin effects. Licensing is via a free iLok account. Through the iLok application, you can activate any of these licenses to the iLok Cloud or to an iLok USB dongle (generation 2 or 3). Dongles are popular with freelance mixers, because they are transportable between gigs ($45 for USB-A and $55 for USB-C at Sweetwater). If you opt for cloud activation (free), then you’ll need a working internet connection during your session. Activation to the local computer isn’t supported.

Applying the American and British sound

KIT Plugins’ BB A5 Channel Strip emulates classic API (Automated Processes, Inc) hardware from the API 500 modular series for that “American” sound. This plugin includes a 3-band (55A), a 4-band (55L), and a 10-band graphic (56L) EQ. The key to the character of the 3-band and 4-band EQs is an API innovation called “Proportional Q.” The filter bandwidth stays wide when the gain change is small. It narrows and becomes more surgical as the setting is increased in either direction. KIT Plugins replicated this feature, which isn’t always the case with other API emulations on the market. Like the hardware, these EQs use stepped frequency values to quickly dial in a sound. However, the gain controls can be switched between stepped or variable.

The BB A5 interface sports a modern look. Frequency and level knobs are separate and not concentric like on the hardware. Separation makes more sense with mouse control, while concentric works when you can actually place fingers on a physical knob. There are some faux scratches on these interfaces to evoke “vintage.” Fortunately the designers didn’t go overboard with those.

The two Neve emulations (BB N73 and BB N105) give you the classic “British” sound. N105 is based on Blackbird’s highly modified Neve 8078 console. The Neve emulations look more faithful to the hardware with concentric knobs. The N73 uses the familiar 1073 design, but adds an output section modeled after the output bus of Blackbird’s Neve 8058 console. When you enable this function, it adds some subtle harmonics and compression, depending on how hard you drive it. This master bus feature is also on the BB A5.

The last in this bundle is the MO-Q, which is based on a boutique equalizer built by the Motown engineers in the 1960s. McBride owns one of these in his personal collection, which was the basis for KIT’s modeling. It features seven fixed bands at musical frequencies.

On the tech side, these plugins are built with KIT’s proprietary Full Range Modeling that has been sampled from 10 Hz to 96 kHz. There’s oversampling and a ton of presets. The API and Neve models include auto gain and continuous gain. There’s a a function called Analog Hum, which applies 60 Hz (approx.) noise to the signal with three level settings. It remains barely audible even at the full settings with the speaker volume cranked. The term “Hum” has a negative connotation, so don’t let that scare you. I didn’t really hear what would be considered traditional hum, but rather very subtle white noise. I think it helps some mixes, but regardless, its use is optional.

The Fairlight mix

I imported 20 source tracks from a studio recording session into DaVinci Resolve. The tracks included a female singer, background vocals, and the session band. Each channel got an instance of BB A5, which effectively turned the Fairlight mixer into a virtual API console. Pre-amp and EQ control was handled through the Blackbird effect. The channels were routed to the stereo output bus without any additional instrument grouping/summing or VCA bus control.

These plugins come with an extensive array of instrument presets from KIT, Blackbird, and several contributing mix engineers. While I normally treat presets as merely a suggestion or starting point, I decided to leave these pretty much the way they were set up for this test mix. Pull up a different preset for each track – the kick drum, snare drum, vocals, etc. After some minor tweaking, plus level and panning adjustments, the mix was quickly in a really good place. Granted, it still needed some automation for punch here and there, but the mix was already presentable without it. The only other effects used in this mix were the native Fairlight compressor on the kick drum track, as well as the BB N73 and the native compressor/limiter on the stereo output.

One cool feature that’s usually not seen in other plugins is the Link function. If you have multiple instances of these plugins in the mix – as I did by placing BB A5 on each channel – then you can link the oversampling status, UI size, and hum setting. With link enabled, the values for one instance will then be matched on all the others. That’s really useful when setting up 20 instances of the same plugin across all channels.

One minor nuisance in this test mix was that the Link settings didn’t “stick” for the BB A5 plugin when saving a project. I had to change them from the default again when re-opening the project. Fortunately, that’s simply a matter of changing it for one and then the other linked effects will update correctly. I’ve reported this issue to KIT, so hopefully there will be an update soon. It did work correctly for the Neve emulations.

Some could argue that the difference between Fairlight’s native digital effects and using analog emulation is too subtle to worry about. You may or may not agree. But, using plugins like those in the Blackbird Bundle also let you get to a mix more quickly and reduce the amount of time lost to the indecision often caused by a plethora of digital options.

These benefits also apply to any film/TV/social media project. That’s why editors using DaVinci Resolve owe it to themselves to get comfortable with the Fairlight page. Once your project extends past a few tracks, then you’ll get a better mix using Fairlight than simply staying in the Edit page. Plugins, whether native Fairlight or third-party analog emulations, will make your mix sound more polished. I’ve used a number of brands and those in KIT’s Blackbird Bundle are high-quality and easy to use. Given the Grammy-winning pedigree behind the software, it’s a great way to add analog mojo to your digital mix.

This article was originally written for Pro Video Coalition.

©2024 Oliver Peters

FabFilter Pro-Q 3

There are tons of audio plugins on the market, but one company that repeatedly shows up in top mixers’ tool kits is FabFilter – especially their Pro-Q 3 equalizer. Nearly ever DAW application features some type of parametric EQ with a graphical interface sporting four to six control points, plus high and low shelves. However, none of these native tools offer as many features as Pro-Q 3. While FabFilter does have competitors offering their own version for this style of advanced equalizer, it’s hard to beat the intuitive operation of Pro-Q 3.

The interface

When you first apply Pro-Q 3, you are confronted with a plugin window showing the spectrum of the playing audio and an empty horizontal line. You can resize the window and even make it fullscreen. There are no preset bands as with many native EQs. Simply double-click anywhere along the line to create the first band. A control panel will appear below. Slide the point left or right with the mouse or turn the FREQ dial to select the frequency and then up or down (or the GAIN dial) to boost or attenuate the gain at that frequency. When you do, you’ll see the familiar bell shape with a Q-value width. Adjust the width of the band with the Q dial in the lower control panel.

It’s easy to zero in on the right adjustment, because the spectrum graphic displays the frequency spread. Secondly, when you hover over a band’s control point, the pop-up panel enables you to solo the affected range by clicking and holding the headphone icon.

FabFilter also integrated two additional selection methods: a piano keyboard display and Spectrum Grab. When using the piano keyboard, double-click a key and a control point is added at that musical frequency. Alternatively, you can hover over the spectrum during playback and a white outline will momentarily appear around the spectrum graphic. Wait a moment and a number of frequency points will also appear. Simply double-click along this Spectrum Grab outline to add a new band or just pull up or down on one of the highlighted frequencies.

Plenty of tools

The main control panel at the bottom lets you choose from nine band shapes, six bell slopes measured in dB/octave, and stereo placement. The Pro-Q 3 doesn’t just work in the stereo field. Each band can be set to affect the sound in stereo or only left, right, mid, or side. There are 24 general factory presets, plus an additional three preset categories specific to dynamic, stereo, and surround processing. Don’t understand a function? Simply enable the interactive pop-up hints.

When it comes to equalizers, bells, shelves, and high/low filters are the most common. Pro-Q 3 includes those and more. There’s also a band pass control (only that frequency range is audible) and a notch (tight and extreme reduction, such as for de-essing). Even something specialized, like tilt/shift is handled with two different modes.

Furthermore, you can easily control the type of curve and its angle. The default is a 12 dB/octave slope for a standard bell shape. But at the other end, it’s 96 dB/octave, which results in a fairly straight slope angle with a long, flat top (or bottom).

More than just a basic EQ

You could use Pro-Q 3 for straightforward equalization at several bands. But, this is an advanced EQ with dynamic processing. Both compressors and equalizers can be dynamic, allowing you to raise or lower the volume for a given frequency range. Compressors do this by compressing the signal, whereas EQs do so by boosting or attenuating the gain at that frequency.

In Pro-Q 3, simply right-click a control point and select “Make Dynamic.” Or adjust the outer ring of the gain knob and that band immediately becomes dynamic. Turn the outer ring to alter the range of gain change. Rotate right to boost the gain range and left to reduce it. The degree of travel will determine the range of the change. You can also do this by directly dragging the arrows that appear at the edge of the visual range in the graph.

Mid/side processing isn’t new, but not many EQs offer as much for stereo placement. Creative use of EQ can also be used to affect the apparent stereo width of the sound. If you change the EQ at offset frequencies in the left versus the right signal placement, then this will appear to change the position of those sounds spatially. The same for mid versus side adjustments. More importantly, all of these methods can be applied at the same time to different bands within a single instance of Pro-Q 3. You don’t need to apply one EQ for regular adjustments and a separate EQ for left versus right.

EQ Match

Anther advanced feature is EQ Match. Run your reference track long enough to get an averaged spectrum. Determine the number of bands you want to use and save that as a reference. Then apply Pro-Q 3 to your target track and use the saved reference file for your EQ Match on that new file. This will then apply the matching band settings to the new file. I tested this on two different mixes of the same song and it worked pretty well. I’m not sure it’s something I would use a lot; however, it’s useful if you work with location dialogue tracks. This is a great way to match an actor’s mic quality who was recorded in different environments or with different mics with the inevitable differences in the sound. EQ Match will help you to get these to sound similar to each other without a lot of guesswork and trial-and-error.

Like other FabFilter products, Pro-Q 3 features a global output control for panning and level. Optionally, this control can be set to Auto Gain to compensate for loudness changes caused by your EQ adjustments. However, FabFilter adds this caveat in their documentation, “Note that the applied make-up gain is an educated guess based on the current EQ settings, and is not a dynamic process based on actually measured levels.”

Many EQ products include some type of latency or linear phase control. Pro-Q 3 does, as well. But there’s also a third mode: Natural Phase. This is a unique FabFilter feature designed to match analog phase response in order to deliver accurate frequency response with the best sound quality.

Final thoughts

There are many more features than what I can go into in this post. Check out FabFilter’s excellent YouTube videos for more detail. It goes without saying that FabFilter Pro-Q 3 is a high-quality audio plugin. You can build up to 24 bands. It supports immersive/Dolby Atmos (up to 9.1.6) mixing and comes in all of the common plugin formats for Windows and macOS. FabFilter offers a 30-day, fully-functional evaluation period, as well as educational discounts. There’s even an iPad version of it and other FabFilter products.

One thing that shouldn’t be overlooked is the ongoing development and support by FabFilter. Some plugin developers put a product out into the market and then don’t do any ongoing development to their existing releases until it’s time to sell a new version. Not so with FabFilter, which periodically releases compatibility and bug fix updates to their products. FabFilter made this plugin available to me for the review, as they have done with several others in the past. While I was working on this review, FabFilter coincidentally updated all of their products, which they regularly do. These are accessible through a standard download, no fancy plugin management app required.

Admittedly, I’m partial to vintage EQs that mimic iconic studio gear from the 1970s – SSL, Neve, API, Pultec, etc. These are great for quick, simple, and effective adjustments. However, sometimes they simply aren’t the right tool when you have to sculpt the sound. That’s where modern products with modern designs are hard to beat. While you certainly don’t need a lot of these, you do need a handful and should be selective. It’s hard to go wrong with any of the FabFilter products. Pro-Q 3 is prime example, which is why it’s a choice that many mixers can’t do without.

©2024 Oliver Peters