OK, I know the title and AI-generated graphic are a bit cheeky, but this is an issue that plagues all video creation applications. But, it’s not actually a “bug” in spite of what people think. One of the most common editing forum questions that you run across is, “Why does my file look washed out in QuickTime?” Macs, PCs, and televisions use different gamma standards. Not only do the displays differ, but so do the various player applications in how they interpret color space and profiles. Therefore, it is impossible to create a universal file that will look identical across all software and hardware systems.
With the Premiere Pro 2024 update that has been rolled out this week, Adobe is adding color settings to take on the issue. A sizable percentage of video editors use Macs. Editing applications were originally designed around broadcast TV standards, so that what you see in the viewer will look close to what you see on the video output through hardware to a video monitor. We now live in a file-based world, so those exported files are often checked, reviewed by the client, or viewed by the consumer using QuickTime player. (Click on any of these images to see an expanded view.)
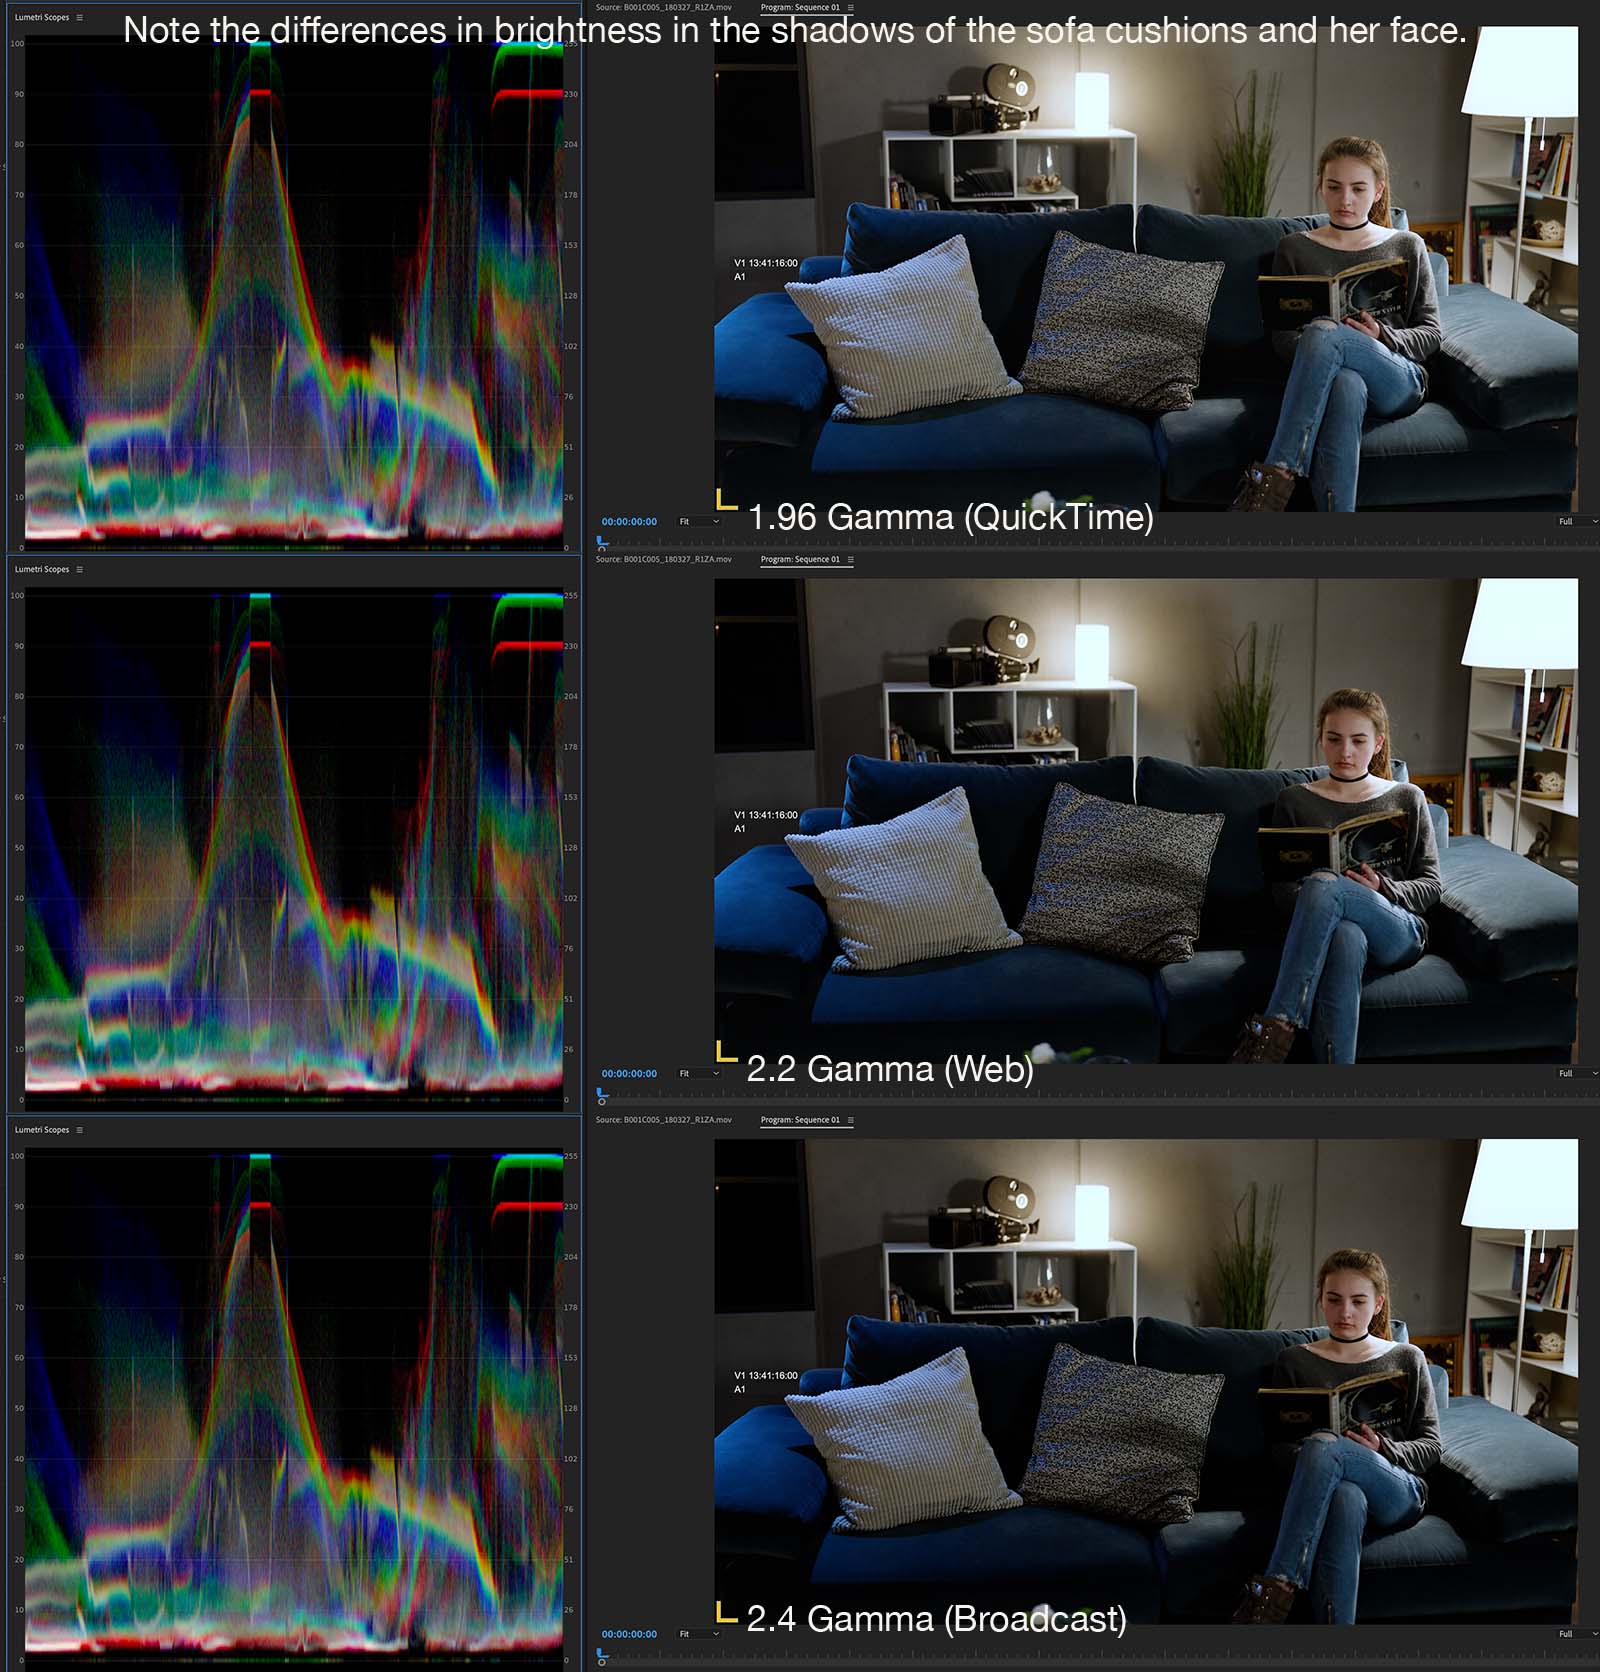
Rec 709 TV standards are based on 2.4 gamma, which is darker than QuickTime’s 1.96 gamma. In a simplistic sense, gamma primarily impacts the middle portion of the brightness range of an image – let’s say 20-60 IRE as a ballpark. Therefore, a file that looks right in the NLE viewer window and/or the video display will often look brighter in the midrange when it’s played through QuickTime. A brighter midrange will tend to show more shadow detail, but also look less saturated. In general, these differences are pretty slight, but they become more apparent depending on the lighting and color correction of the content.
Prior to this Adobe Premiere Pro 2024 update, the application used 2.4 gamma for its viewer display. This 2024 update adds new color settings, which can be found in the Settings tab of the Lumetri panel. Even if you aren’t using Lumetri color correction, this is where you’ll find central control of color settings for the whole project. You will want Display Color Management enabled. Then gamma levels can be set per project.
It’s extremely important that you understand these settings before tweaking anything. These settings only change the viewer and not the Lumetri scopes nor any exported file. If you change the setting in one project, it will not stick if you then open another previous project. So, be sure to check with each project you open. Changes for a new project should stick for the next new project.
Three viewer gamma levels are supported: Broadcast 2.4, Web 2.2, QuickTime 1.96. Changing these settings alters the appearance of the image in the viewer. Files exported with any of these settings will look identical. Set to 2.4, the viewer appears darker than 1.96, with 2.2 in-between. Let’s say that you are grading with Lumetri based on what you see in the viewer without any external video display. If you are working in 2.4 (same as you would have been prior to this update), then the exported file will look brighter and less saturated in QuickTime, but correct on TV. However, if the viewer is set to 1.96 and you grade according to that image, then the appearance of that exported file will match in QuickTime and a number of other players, but look darker on TV.
If you understand these differences, then you can choose to work in any of these viewer gamma settings and switch according to the target destination of your project. Unfortunately it gets tricky if you need to generate a single file that gets used on multiple platforms. Naturally you have no control over how the end consumer will view this content.
If you choose not to change these settings and stick to the 2.4 gamma default, there are three workarounds to explore – an export LUT, exports via After Effects, and/or a custom adjustment layer. Custom export LUTs are available and can be applied in the export dialogue. The advantage of an After Effects export is that you can set the working project color space to sRGB instead of Rec 709 2.4 gamma. Finally, there’s the adjustment layer method, which I’ve been using up until now.
In this workaround, I edit and grade in 2.4. Then for the exported file, I will add an adjustment layer to the top level of my timeline and apply a “global” Lumetri effect. I will make two Lumetri tweaks. First, I’ll pull down the midpoint of the luma curve just slightly, and then secondly, bump up the saturation 2-4%. This gives me a file that will generally pass muster in QuickTime.
I certainly applaud Adobe for taking a shot at a fix, although there might not really be a fix, since there is no universally accepted display standard. Remember that of all of the variables, a true video display is the only device whose brightness and contrast can be easily adjusted. So if you want to work with the gamma setting of 1.96, then a simple adjustment of the display (which is still correctly calibrated) will give you a result that matches both QuickTime and the Premiere Pro viewer.
So far – and I’m still doing some more testing – the only issue has been with the VLC player. It tends to look darker than QuickTime, as well as other player applications, like Telestream’s Switch. As long as you understand what these new Premiere Pro color settings do and how to work with them, then there is no right or wrong approach.
The single best Premiere Pro improvement that Adobe has introduced in recent versions is the text and transcription function, including text-based editing. If you edit with Premiere Pro and don’t know how to use these, you’d better get cracking! These features let you edit from a transcript, as well as create subtitles and closed captioning. If nothing else, closer adherence to ADA compliance for all types of videos will make this a must.
The concept of working from text and scripts originated with Avid Media Composer, based on concepts used by the Cinedco Ediflex. Every major NLE today, except Final Cut Pro, now offers internal transcription and text capabilities. Not too long ago an Adobe executive told me high-quality speech-to-text was always about three to five years away from any point in time. Yet, thanks to AI, speech-to-text has come a long way in just a few short years. Today, Adobe leads the pack.
Transcription
Premiere Pro can transcribe the dialogue of any clip that you import, as well as any timeline. Depending on your preference settings, this can either happen automatically in the background at the time of import or you can opt to activate it manually per clip or per timeline. Transcription happens on your local computer (not in the cloud) and multiple, common languages are supported.
With most of the video I’ve used, as long as the dialogue is relatively clear and understandable, the transcription accuracy is some of the best I’ve seen to date. You can use both fully mixed tracks and isolated dialogue. Even sung lyrics are often transcribed with pretty good accuracy.
Editing audio and video from transcripts
Open the text panel to see the transcripts. If you’ve transcribed both clips and timeline clips, then as you toggle between a clip and the sequence, the transcript that’s displayed changes accordingly. One way to use this is to actually edit from the transcript text to the timeline. Highlight a section of text and perform an edit command. The corresponding video and audio is cut to the open sequence. As you build up a series of clips in the timeline, the text display of the edited sequence reflects the transcript of the timeline.
Let’s say you are working with a producer remotely to edit a project from a series of long interviews. Generate a transcript for each interview and export a plain text file. Let your producer assemble the initial stringout of soundbites from selected text (a “paper cut”). Back in Premiere, find those same lines and assemble the first pass of soundbites. Personally, I don’t like to work that way, but it can prove to be a time-saver.
Another way to use it is similar to using PhraseFind in Avid Media Composer – namely as a dialogue search vehicle. You are editing soundbites together using the usual “Frankenbite” approach. Sometimes the inflection of a word isn’t quite right. Like with PhraseFind, you can search the transcript in Premiere for all instances of that word. Maybe you need it to be the ending of a sentence. The text panel will quickly highlight each occurrence in the clip and/or timeline.
The newest feature was announced at IBC. It comes to Premiere Pro beta and will be in a full release version sometime this Fall. It’s the ability for the AI-enabled transcription to find filler words (um, uh, and ah) and pauses (you can define the length for pause detection). Once highlighted, you can delete these and all of the edits are instantly performed. Of course, you’ll have to cover the resulting jump cuts with B-Roll. On the other hand, jump cuts seem to be the norm for many YouTubers.
Since I haven’t tested this newest feature yet, I’m not sure if it’s something I will use. I tend to prefer a more manual approach in how I work. However, this will certainly expedite the process for many users.
Working with captions
Currently my primary use for the transcript feature is to create captions, which are required for most modern deliverables that will be publicly displayed. From the transcript portion of the text panel you can easily create either open (visible subtitles) or closed (for the hearing impaired) captions. First, select the timeline and then the type of captions for that sequence. Switch to the Captions and Graphics workspace where you can easily set the text format and style.
These transcripts are really accurate with good audio, but you’ll definitely need to proof-read and correct the text. Brand names may be wrong. Sometimes words that should be capitalized aren’t. Often contractions might also be wrong. For example, “cannot” might be shown as “can not.”
Some corrections require you to make a judgement call. For instance, how to handle the text when a speaker uses bad grammar, mispronounces something, or uses singulars and plurals incorrectly. Most of the time I will clean up the text within reason, in order to make what you read on screen as understandable as possible – even if it slightly diverges from the literal dialogue.
Finally, you may need to add text. For example, a :30 open with only instrumental music will have no transcribed text. The common approach is to insert a text clip at the start that reads “music” with brackets around that text. Leave it up for :05 to :10 and then viewers following the captions will understand that there is no spoken dialogue for that section.
Closed versus open captions
Closed captions must adhere to standard formatting, number of characters per line, size, and positioning constraints; therefore, fonts and text styles don’t matter. Once completed, export a standalone (sidecar) .srt file, which is a standard caption file format. Optionally, the master file can also have embedded captioning or captions that are “burned” into the video (subtitles). Embedding closed captions into a video file is not supported by all media formats.
If you intend to have the captions visibly displayed as part of the picture content – subtitles, aka open captions – then you have the ability to add custom graphic styling, such as fonts, sizes, position control, etc. This is important when you need to alter the location of text in order not to interfere with existing graphics, such as lower third name supers. Custom caption text styles can be saved with the project.
Regardless of whether these are open or closed captions, the text is placed on a separate caption track as individual text clips. These can be edited, but they cannot use transition effects. One text clip will cut to another. These clips will follow the audio of the transcript, however, you will need to (or should) do some editing. There will be frequent gaps at pauses between phrases and sentences. I typically extend the ends of these clips to leave the text on screen longer and to butt one clip up to the next.
Then you may also choose to do some video clean-up. Clips don’t necessarily line up with video cuts. This may be jarring when reading the captions during playback. If so, simply trim the clip to match the video cut. This might precede the spoken words slightly, but as long as we are talking about a few frames, the brain accepts it easily. And it looks better visually, especially with subtitles.
There are a number of other solutions, such as Lumberjack System, Simon Says, Speedscriber, and Transcriptive. Specific features and NLE integration vary, but I believe that all of these require processing in the cloud. However, there are several others that run on your computer locally, using the Whisper speech-to-text engine. These include Captionator, MacWhisper, and Jojo Transcribe. All three work in a similar fashion, but have fewer features than what Premiere Pro or Resolve offer. They just transcribe audio and then generate text or SRT files. Whisper is quite accurate and, therefore, each of these solutions will yield similar results.
I recently tested and am recommending Jojo to a cruise line client. They need to generate captions for shows produced by the shipboard video team, which edits with Final Cut Pro. Internet connections are impacted by a ship’s global location, so local processing is important. The video team members come from the general technical staff, so FCP is easy for them to master. Jojo’s simple interface makes it a nice companion app to FCP.
The bottom line is that text-based editing and transcription functions are more important than ever. It’s also an area of technology that has greatly improved in just a few short years. Don’t overlook its power, because it can be quite a problem solver, no matter what your editing skill level is.
2023 marks the 100th year of the NAB Convention, which started out as a radio gathering in New York City. This year you could add ribbons to your badges indicating the number of years that you’d attended – 5, 10, etc. My first NAB was 1979 in Dallas, so I proudly displayed the 25+ ribbon. Although I haven’t attended each one in those intervening years, I have attended many and well over 25.
Some have been ready to sound the death knell for large, in-person conventions, thanks to the pandemic and proliferation of online teleconferencing services like Zoom. 2019 was the last pre-covid year with an attendance of 91,500 – down from previous highs of over 100,000. 2022 was the first post-covid NAB and attendance was around 52,400. That was respectable given the climate a year ago. This year’s attendance was over 65,000, so certainly an upward trend. If anything, this represents a pent-up desire to kick the tires in person and hook back up with industry friends from all over the world. My gut feeling is that international attendance is still down, so I would expect future years’ attendance to grow higher.
Breaking down the halls
Like last year, the convention spread over the Central, North, and new West halls. The South hall with its two floors of exhibition space has been closed for renovation. The West hall is a three-story complex with a single, large exhibition floor. It’s an entire convention center in its own right. West hall is connected to the North hall by the sidewalk, an enclosed upstairs walkway, as well as the LVCC Loop (the connecting tunnel that ferries people between buildings in Teslas). From what I hear, next year will be back to the North, Central, and South halls.
As with most NAB conventions, these halls were loosely organized by themes. Location and studio production gear could mostly be found in Central. Post was mainly in the North hall, but next year I would expect it to be back in the South hall. The West hall included a mixture of vendors that fit under connectivity topics, such as streaming, captioning, etc. It also included some of the radio services.
Although the booths covered nearly all of the floor space, it felt to me like many of the big companies were holding back. By that I mean, products with large infrastructure needs (big shared storage systems, large video switchers, huge mixing desks, etc) were absent. Mounting a large booth at the Las Vegas Convention Center – whether that’s for CES or NAB – is quite costly, with many unexpected charges.
Nevertheless, there were still plenty of elaborate camera sets and huge booths, like that of Blackmagic Design. If this was your first year at NAB, the sum of the whole was likely to be overwhelming. However, I’m sure many vendors were still taking a cautious approach. For example, there was no off-site Avid Connect event. There were no large-scale press conferences the day before opening.
The industry consolidates
There has been a lot of industry consolidation over the past decade or two. This has been accelerated thanks to the pandemic. Many venerable names are now part of larger holding companies. For example, Audiotonix owns many large audio brands, including Solid State Logic, DiGiCo, Sound Devices, among others. And they added Harrison to their portfolio, just in time for NAB. The Sennheiser Group owns both Sennheiser and Neumann. Grass Valley, Snell, and Quantel products have all been consolidated by Black Dragon Capitalunder the Grass Valley brand. Such consolidation was evident through shared booth space. In many cases, the brands retained their individual identities. Unfortunately for Snell and Quantel, those brands have now been completely subsumed by Grass Valley.
A lot of this is a function of the industry tightening up. While there’s a lot more media production these days, there are also many inexpensive solutions to create that media. Therefore, many companies are venturing outside of their traditional lanes. For example. Sennheiser still manufactures great microphone products, but they’ve also developed the AMBEO immersive audio product line. At NAB they demonstrated the AMBEO 2-Channel Spatial Audio renderer. This lets a mixer take surround mixes and/or stems and turn them into 2-channel spatial mixes that are stereo-compatible. The control software allows you to determine the stereo width and amount of surround and LFE signal put into the binaural mix. In the same booth, Neumann was demoing their new KH 120-II near-field studio monitors.
General themes
Overall, I didn’t see any single trend that would point to an overarching theme for the show. AI/ML/Neural Networks were part of many companies’ marketing strategy. Yet, I found nothing that jumped out like the current public fascination with ChatGPT. You have to wonder how much of this is more evolutionary than revolutionary and that the terms themselves are little more than hype.
Stereoscopic production is still around, although I only found one company with product (Stereotec). Virtual sets were aplenty, including a large display byVu Studios and even a mobile expando trailer by Magicbox for virtual set production on-location. Insta360 was there, but tucked away in the back of Central hall.
Of course, everyone has a big push for “the cloud” in some way, shape, or form. However, if there is any single new trend that seems to be getting manufacturers’ attention, it’s passing video over IP. The usual companies who have dealt in SDI-based video hardware, like AJA, Blackmagic Design, and Matrox, were all showing IP equivalents. Essentially, where you used to send SDI video signals using the uncompressed SDI protocol, you will now use the SMPTE ST2110 IP protocol to send it through 1GigE networks.
The world of post production
Let me shift to post – specifically Adobe, Avid, and Blackmagic Design. Unlike Blackmagic, neither Avid nor Adobe featured their usual main stage presentations. I didn’t see Apple’s Final Cut Pro anywhere on the floor and only one sighting in the press room. Avid’s booth was a shadow of itself, with only a few smaller demo pods. Their main focus was showing the tighter integration between Media Composer and Pro Tools (finally!). There were no Pro Tools control surfaces to play with. However, in their defense, NAMM 2023 (the large audio and music products exhibition) was held just the week before. Most likely this was a big problem for any audio vendor that exhibits at both shows. NAMM shifts back to January in 2024, which is its historical slot on the calendar.
Uploading media to the cloud for editing has been the mantra at Frame io, which is now under the Adobe wing. They’ve enhanced those features with direct support by Fujifilm (video) and Capture One (photography). In addition, Frame has improved features specific to the still photography market. New to the camera-to-cloud game is also Atomos, which demoed its own cloud-based editor developed by asset management developer Axle ai.
Adobe’s approach seems better for documentary projects. Text is generated through speech-to-text software within Premiere Pro. That is now processed on your computer instead of in the cloud. When you highlight text in the transcription panel, it automatically marks the in and out points on that source clip. Then, using insert and overwrite commands while the transcription panel is still selected, automatically edit that portion of the source clip to the timeline. Once you shift your focus to the timeline, the transcription panel displays the edited text that corresponds to the clips on the timeline. Rearrange the text and Premiere Pro automatically rearranges the clips on the timeline. Or rearrange the clips and the text follows.
I was surprised to see that Blackmagic Design was not promoting Resolve on the iPad. There was only one demo station and no dedicated demo artist. I played with it a bit and it felt to me like it’s not truly optimized for iPadOS yet. It does work well with the Speed Editor keyboard. That’s useful for any user, since the Cut page is probably where anyone would do the bulk of the work in this version of Resolve. When I used the Apple Pencil, the interface lacked any feedback as icons were clicked. So I was never quite sure if an action had happened or not when I used the Pencil. I’m not sure many will do a complete edit with Resolve on the iPad; however, it could evolve into a productive tool for preliminary editing in the field.
Here’s an interesting side note. Nearly all of the Blackmagic Design demo pods for DaVinci Resolve were running on Apple’s 24″ candy-colored iMacs. Occasionally performance was a bit sluggish from what I could tell. Especially when the operator demoed the new Relight feature to me. Nevertheless, they seemed to work well throughout the show.
Of course, not everyone wants their raw media in the cloud and Blackmagic Design wasn’t showing the only storage products. Most of the usual storage vendors were present, including Facilis, OpenDrives, Synology, OWC, and QNAP. The technology trends include a shift away from spinning drives towards solid state storage, as well as faster networking protocols. Quite a few vendors(like Sonnet) were showing 25GbE (and faster) connections. This offers a speed improvement over the 1GbE and 10GbE ports and switches that are currently used.
Everything Everywhere All at Once dominated the Academy Awards night, including winning the Best Film Editing award for Paul Rogers. The team used Adobe Premiere Pro as their NLE of choice. By extension this becomes the first editing Oscar win for Premiere. Of course, it’s the team and editor that won the award, not the software that they used. Top editors could cut with any application and get the same result.
When it comes to editing, Avid has been the 800-pound gorilla in the modern digital era. Ever since Walter Murch won for editing The English Patient using Media Composer, the specific NLE on an Oscar-winning film has become a hot topic among editors. This was never the case when the only options were Moviola, KEM, or Steenbeck.
There are, of course, many awards competitions around the world, including the ACE Eddie Awards, BAFTA, Golden Globes, and others, including various film festivals. Many of these don’t give out specific craft awards for editors or editing; however, a lot of these winning films have been edited with other tools. For example, many award-worthy indie films, especially documentaries, have been edited with Premiere Pro. Even Final Cut Pro (the current “X” version) has had wins in such categories. This includes wins for the short films, The Silent Child and Skin at the 2018 and 2019 Academy Awards.
Stacking up the NLE competitors
The truth of the matter is that today, there are seven viable applications that might be used to cut a professional feature film or documentary: Media Composer, Final Cut Pro, Premiere Pro, DaVinci Resolve, Lightworks, Edius X, and Vegas Pro. You could probably also factor in others, such Final Cut Pro 7 (now zombie-ware) and Media 100 (yes, still alive), not to mention consumer-oriented NLEs like iMovie or Movie Maker. Realistically, most experienced film editors are likely to only use one of the first five on the list.
When an application is used on an award-winning film, I’d bet that the manufacturer’s marketing department is doing high-fives. But does this really move the sales needle? Maybe. It’s all aspirational marketing. They want you to feel that if you use the same software as an Oscar-winning film editor used, then you, too, could be in that league. Talent is always the key factor, but we can all dream. Right? That’s what marketing plays upon, but it also impacts the development of the application itself.
Both Avid and Adobe have been fine-tuning their tools with professional users in mind for years. They’ve added features based on the needs of a small, but influential (or at least vocal) market sector. This results in applications that tick most of the professional boxes, but which are also harder to learn and eventually master.
Apple and Final Cut Pro’s trajectory unexpectedly changed course with the introduction of Final Cut Pro X. This shift coincided with the growth of social media and a new market of many non-traditional video editors. Final Cut Pro in its current iteration is the ideal application for this market and has experienced a huge growth in users. But, it still gets labelled as being not ready for professional users, even though a ton of professional content is posted using the app. Apple took the platform approach – opting to leave out many advanced features and letting third party developers fill in the gaps where needed. This is the core of much of the criticism.
How advanced/complex does a professional NLE really need to be?
The internal corporate discussion goes like this. Marketing asks, “What do we have to do to get broader adoption among professional film editors?” Engineering answers, “It will take X dollars and X amount of time.” Top management asks, “What’s the return if we do that?” And that’s usually where the cycle stops, until the next year or awards season.
The truth is that the traditional high-end post market is extremely small for a company like Apple. The company is already selling hardware, which is their bread and butter. Will a more advanced version of FCP sell more hardware? Probably not. Avid, Adobe, and Blackmagic Design are already doing that for them. On the other hand, what is more influential for sales in today’s market – Oscar-winning professional editors or a bevy of YouTube influencers touting your product?
I’m not privy to sales numbers, so I have no idea whether or not going after the very small professional post market makes financial sense for either Blackmagic Design or Adobe. In the case of Avid, their dominance pays off through their ecosystem. Avid-based facilities are also likely to have Avid storage and Pro Tools audio facilities. Hardware most likely covers the development costs. Plus, both Avid and Adobe have shifted to subscription models (Adobe fully, Avid as an option). This seems to be good for both companies.
Blackmagic Design is also a hardware developer and manufacturer. Selling cameras and a wide range of other products enables them to offer DaVinci Resolve for as little as free. You’d be hard-pressed to find a production company that wasn’t using one or more Blackmagic products. Only time will tell which company has taken the approach that a) ensures their long term survival, and b) benefits professional film editors in the best way. In the case of Apple, it’s pretty clear that adding new feature to Final Cut Pro will generate more revenue in an amount that many competitors would envy. Yet, it would be small by Apple’s measurement.
I’ve written quite a few blog posts and articles about audio mixing methods in Premiere Pro and Final Cut Pro. But over time, methods evolve, change, or become more streamlined, so it’s time to revisit the subject. When you boil down most commercials and short-subject videos (excluding trailers), the essence of the soundtrack is just voice against a music bed with some sound effects. While I’ll be the first to say you’ll get the best results sending even a simple mix to a professional mixer, often budget and timeframe don’t allow for that. And so, like most editors, I do a lot of my own mixes.
My approach to these mixes is straightforward and rather systematic. I’m going to use Premiere Pro examples, but track-based mixing techniques can be universally applied to all NLEs. Even FCP works with track-based mixing if you properly use its audio roles function. I will almost never apply audio effects at the individual clip level, unless it something special, like simulated phone call voice processing.
All dialogue clips usually end up on A1 with crossfades between to smooth the edits. Add room tone between for consistency. This also helps the processing of the track effects, especially noise reduction. If I have more than one voice or character, then each goes onto a separate track. I will use clip volume adjustments in order to get the track to sound even across the length of the video. With this done, it’s time to move to the track mixer.
In this example from a recent product video, the reviewer’s voice is on A1. There’s a motor start-up sound that I’ve isolated and placed on A2. Music is on A3 and then the master mix bus. These audio plug-in effects are the ones I use on almost every video in a pretty systematic fashion. I have a nice collection of paid and free, third-party audio plug-ins, but I often stick to only the stock effects that come with a given NLE. That’s because I frequently work with other editors on the same project and I know that if I stick with the standard effects, then they won’t have any compatibility issues due to missing plug-ins. The best stock plug-in set can be found in Logic Pro and many of those are available in FCP. However, the stock audio effects available in Premiere are solid options for most projects.
Audio track 1 – Dialogue – Step 1 – noise reduction. Regardless of how clean the mic recording is, I will apply noise reduction to nearly every voice track recorded on location. My default is the light noise reduction preset, where I normally tweak only the percentage. If you have a really noisy recording, I suggest using Audition first (if you are a Creative Cloud subscriber). It includes several noise reduction routines and a spectral repair function. Process the audio, bounce out an export, and bring the cleaned-up track into your timeline. However, that’s going to be the exception. The new dialogue isolation feature in Resolve 18.1 (and later) as well as iZotope RX are also good options.
Step 2 – equalization. I apply a parametric EQ effect after the noise reduction stage. This is just to brighten the voice and cut any unnecessary low end. Adobe’s voice enhancer preset is fine for most male and female voices. EQ is very subjective, so feel free to tweak the settings to taste.
Step 3 – compressor. I prefer the tube-modeled compressor set to the voice leveling preset for this first compression stage. This squashes any of the loudest points. I typically adjust the threshold level. You can also use this filter to boost the gain of the voice as you see in the screenshot. You really need to listen to how the audio sounds and work interactively. Play this compressor off against the audio levels of the clip itself. Don’t just squash peaks using the filter. Duck any really loud sections and/or boost low areas within the clip for an even sound without it becoming overly compressed.
Audio track 2 – Sound FX – Step 1 – equalization. Many of my videos are just voice and music, but in this case, the reviewer powers up a boat motor and cruises off at the end of the piece. I wanted to emphasis the motor rumble, so I split that part of the clip’s audio and moved it down to A2. This let me apply different effects than the A1 track effects. Since I wanted a lot of bottom end, I used parametric EQ at full reset and boosted the low end to really get a roaring sound.
Step 2 – compressor. I once again applied the tube-modeled compressor in order to keep the level tame with the boosted EQ settings.
Audio track 3 – Music – Step 1 – equalization. Production music helps set the mood and provides a bed under the voice. But you don’t want it to compete. Before applying any effects, get the volume down to an acceptable level and adjust any really loud or quiet parts in the track. Then, apply a parametric equalizer in the track mixer panel. Pull down the level of the midrange in the frequencies closest to the voice. I will also adjust the Q (range and tightness of the bell curve at that frequency). In addition, I often boost the low and high ends. In this example, the track included a bright hi-hat, which I felt was a bit distracting. And so in this example, I also pulled down some of the high end.
Step 2 – stereo expander. This step is optional, but it helps many mixes. The stereo expander effect pushes the stereo image out to the left and right, leaving more of the center open for voice. However, don’t get carried away, because stereo expander plug-ins also alter the phase of the track. This can potentially throw some of the music out of phase when listened to in mono, which could cause your project to be rejected. If you are mixing for the web, then this is less of an issue, since most modern computers, tablets, smart phones, not to mention ear buds, etc are all set up for stereo. However, if you mix is for broadcast, then be sure to check your mix for proper phase correlation.
Mix bus – Step 1 – multi-band compression. The mix bus (aka master bus or output bus) is your chance to “glue” the mix together. There are different approaches, but for these types of projects, I like to use Adobe’s multi-band compressor set to the classical master preset. I adjust the threshold of the first three bands to -20 and a compression ratio of 4 across the board. This lightly knocks down any overshoots without being heavy-handed. The frequency ranges usually don’t need to be adjusted. Altering the output gain drives the volume hitting the limiter in the next step. You may of may not need to adjust this depending on your target level for the whole mix.
Step 2 – hard limiter. The limiter is the last plug-in that controls output volume. This is your control to absolutely stay below a certain level. I use the -3 or -6 preset (depending on the loudness level I’m trying achieve) and reduce the input boost back to 0. I also change it to read true peaks instead of only peak levels.
Step 3 – loudness meter. The loudness meter keeps you honest. Don’t just go by the NLE’s default audio meters. If you have been mixing to a level of just below 0 on those, then frankly you are mixing the wrong way for this type of content. Really loud mixes close to 0 are fine for music production, but not OK for any video project.
The first step is to find out the target deliverable and use the preset for that. There are different presets for broadcast loudness standards versus web streaming, like YouTube. These presets don’t change the readout of the numbers, though. They change the color indicators slightly. Learn what those mean.
Broadcast typically requires integrated loudness to be in the -23 to -24 area, whereas YouTube uses -14. I aim for a true peak target of -3 or -6. This tracks with the NLE audio meters at levels peaking in the -9 to -6 range. Adjusting the gain levels of the multi-band compressor and/or limiter help you get to those target levels.