
The Avid – Resolve Roundtrip Workflow
Avid Media Composer has always been regarded as the best offline editing tool and its heritage was built upon a strong offline-to-online workflow. The file-based world has complicated things and various camera formats have made life even more complex for editors. Many have become quite fond of using Blackmagic Design’s DaVinci Resolve as a great companion to Media Composer. It’s cross-platform and even the free version will do most of what you need. Here’s a step-by-step example of how you might use the combo. Relinking varies a bit, based on file metadata and might need to be modified for your particular circumstances. This workflow is great with ARRI ALEXA files and will most likely work well with other similar camera formats. (Click images for an expanded view.)
 Creating edit proxies files with Resolve – ALEXA files are usually Apple ProRes 4444 or ProRes HQ QuickTime files that have been recorded with a Log-C gamma profile. So, they are big files with a flat appearance. To start, launch Resolve, load the ProRes camera clips into the Media Pool (Media or Edit tab) and select/edit all of the full clips to a new timeline. In the Color tab, select “track” instead of “clip” and apply a single node. In that node, apply an ARRI Log-C-to-Rec709 LUT. Go to the Deliver tab and pick the Avid roundtrip Easy Set-up. Make sure “Individual Source Clips” is selected (not a single file), define a render location and
  decide whether or not to add a file name prefix or suffix (not required). Render using the DNxHD 36 codec choice.
Moving to Media Composer for the creative cut – When the render process has been completed, you’ll have a folder containing Avid MXF media and a corresponding AAF file. This media has the LUT “baked in” and has been rendered with the very lightweight  DNxHD 36 codec. Drag the AAF file out of this folder to another location. Now drag this complete folder into any of your Avid MediaFiles/MXF subfolders. Unless you’ve already added extra folders there, you will typically find one existing folder (with Avid’s default label of “1”) that contains MXF media. Change the label of the new folder (the one that you’ve just dragged in) to another number, such as “2”.
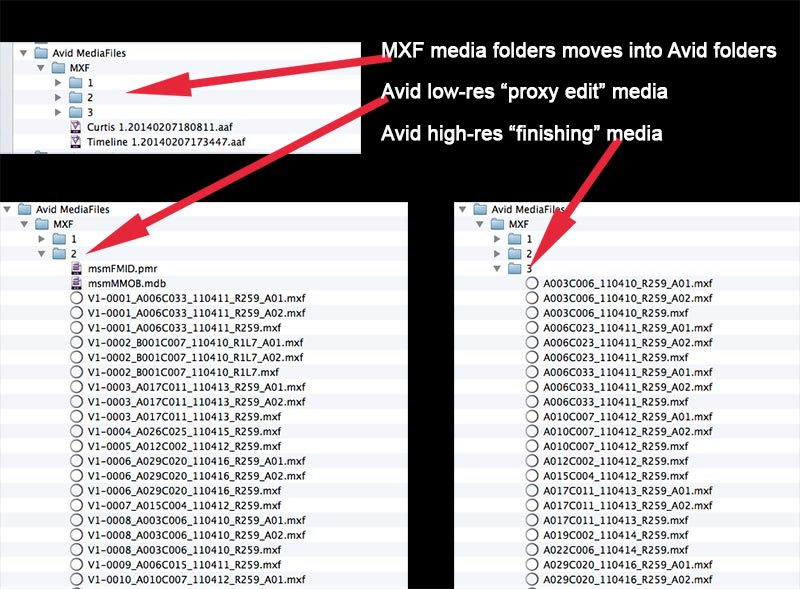
Launch Media Composer, create a new project, open the first bin and import the AAF file that was created by Resolve. This bin will become populated by the color corrected, DNxHD 36 files created by Resolve. Voila, you are ready to edit your Oscar-winner! Cut until the project is locked. When you are done and are ready to move to the online or finishing phase of the edit, export an AAF file from Media Composer. Select “AAF Edit Protocol” and “Link to” media in the AAF options.
 Returning to Resolve for the final grade – Launch Resolve and start a new project. Import the AAF file that you exported from Media Composer. You’ll end up with a timeline that matches your Avid cut and it will be linked to the DNxHD 36 media. You will want to relink the files back to the original camera media – the ProRes HQ or ProRes 4444 files. To do this, delete all the media in the Resolve Media Pool (Edit tab), which will make the timeline clips appear offline.
  Now, navigate to the folder with the original camera files and bring those into the Media Pool. Your timeline clips will now be relinked to this original camera media. You’ll recognize this because the clips on the timeline will be back to their original, flat, Log-C appearance. In some instances, Resolve may see some files as duplicate and might possibly relink to the wrong file. In that case, you’ll see an error icon on the timeline clip. Click on it and Resolve will present a dialogue window with the possible alternate media options. Pick the correct one and the clip should then be linked to the right shot. Color correct your timeline with the desired grade and any reframing.
 Returning to Media Composer to complete the edit – When you’ve completed the color grading, go to the Deliver tab and pick the Avid roundtrip Easy Set-up again, but this time pick a higher-quality codec (like DNxHD 175x). Make sure to set handle lengths (usually 2-5 sec.) and render (as “Individual Source Clips” again). The result will be a new folder of rendered MXF media with the “baked in” grade, plus a new corresponding AAF file. As before, drag out this AAF file and drag the folder of rendered media into the Avid MediaFiles/MXF subfolder. Relabel the folder of this new Resolve media with a different number (such as “3”).
 Launch Media Composer, open your existing project and create a new bin. Import the new AAF file, which will now populate this bin with the high-quality media. This bin will also include the sequence that you sent over to Resolve, but now linked to the high-resolution media files. In many cases, you would simply use this sequence for any final effects, titles and other adjustments.
 Relinking the sequence in Media Composer – If for some reason the sequence that was “round-tripped” does not correctly reflect the edited cut as built in the offline stage, then you will need to relink a copy of that sequence to the new media. To do so, duplicate the sequence from your DNxHD 36 edit and move that copy into the bin with the 175x media. Close all other bins, except the 175x bin. Right-click the sequence and select “Relink” from the menu. Set your options to “Select Items In All Open Bins” and relink by “Timecode – Start” and “Source Name – Tape Name or Source File ID”. This will cause the sequence to be relinked to the new 175x final-quality media.
If everything worked correctly, you will have done a complete offline (creative cut) and online (finishing) workflow between Media Composer and Resolve, without the need for Avid’s traditional import or newer AMA processes!
©2014 Oliver Peters
