The editing world includes a number of software options, such as Autodesk Smoke, Grass Valley EDIUS, Lightworks, Media 100, Sony Vegas and Quantel. The lion’s share of editing is done on three platforms: Apple Final Cut Pro, Avid Media Composer or Adobe Premiere Pro. For the last two years many users have been holding onto legacy systems, wondering when the dust would settle and which editing tool would become dominant again. By the end of 2013, these three companies released significant updates that give users a good idea of their future direction and has many zeroing in on a selection.

Differing business models
Adobe, Apple and Avid have three distinctly different approaches. Adobe and Avid offer cross-platform solutions, while Final Cut Pro X only works on Apple hardware. Adobe offers most of its content creation software only through a Creative Cloud subscription. Individual users have access to all creative applications for $49.99 a month (not including promotional deals), but when they quit subscribing, the applications cease to function after a grace period. Users may install the software on as many computers as they like (Mac or PC), but only two can be activated at any time.
Apple’s software sells through the Mac App Store. Final Cut Pro X is $299.99 with another $49.99 each for Motion and Compressor. Individual users may install and use these applications on any Mac computers they own, but enterprise users are supposed to purchase volume licenses to cover one installation per computer. With the release of FCP X 10.1, it appears that Apple is offering updates at no charge, meaning that once you buy Final Cut, you never pay for updates. Whether that continues as the official Apple policy from here on is unknown. FCP X uses a special version of XML for timeline interchange with other applications, so if you need to send material via EDL, OMF or AAF – or even interchange with previous versions of Final Cut Pro – you will need to augment FCP X with a variety of third-party utilities.
Avid Media Composer remains the only one of the three that follows a traditional software ownership model. You purchase, download and install the software and activate the license. You may install it on numerous Macs and PCs, but only one at a time can be activated. The software bundle runs $999 and includes Media Composer, several Avid utilities, Sorenson Squeeze, Avid FX from BorisFX and AvidDVD by Sonic. You can expand your system with three extra software options: Symphony (advanced color correction), ScriptSync (automated audio-to-script alignment) and PhraseFind (a dialogue search tool). The Symphony option also includes the Boris Continuum Complete filters.
Thanks to Avid’s installation and activation process, Media Composer is the most transportable of the three. Simply carry Mac and Windows installers on a USB key along with your activation codes. It’s as simple as installing the software and activating the license, as long as any other installations have been de-activated prior to that. While technically the FCP X application could be moved between machines, it requires that the new machine be authorized as part of a valid Apple ID account. This is often frowned upon in corporate environments. Similarly, you can activate a new machine as one of yours on a Creative Cloud account (as long as you’ve signed out on the other machines), but the software must be downloaded again to this local machine. No USB key installers here.

Dealing with formats
All three applications are good at handling a variety of source media codecs, frame rates and sizes. In some cases, like RED camera files, plug-ins need to be installed and kept current. Both Apple and Avid will directly handle some camera formats without conversion, but each uses a preferred codec – ProRes for Final Cut Pro X and DNxHD for Media Composer. If you want the most fluid editing experience, then transcode to an optimized codec within the application.
Adobe hasn’t developed its own mezzanine codec. In fact, Premiere Pro CC has no built-in transcoding tools, leaving that instead to Adobe Prelude or Adobe Media Encoder. By design, the editor imports files in their native format without transcoding or rewrapping and works with those directly in the sequence. A mix of various formats, frame rates, codecs and sizes doesn’t always play as smoothly on a single timeline as would optimized media, like DNxHD or ProRes; but, my experience is that of these three, Premiere Pro CC handles such a mix the best.
Most of us work with HD (or even SD) deliverables, but higher resolutions (2K, UHD, 4K) are around the corner. All three NLEs handle bigger-than-HD formats as source media without much difficulty. I’ve tested the latest RED EPIC Dragon 6K camera files in all three applications and they handle the format well. Both Adobe and Apple can output bigger sequence sizes, too, such as 2K and 4K. For now, Avid Media Composer is still limited to HD (1920 x 1080 maximum) sequences and output sizes. Here are some key features of the most recent updates.

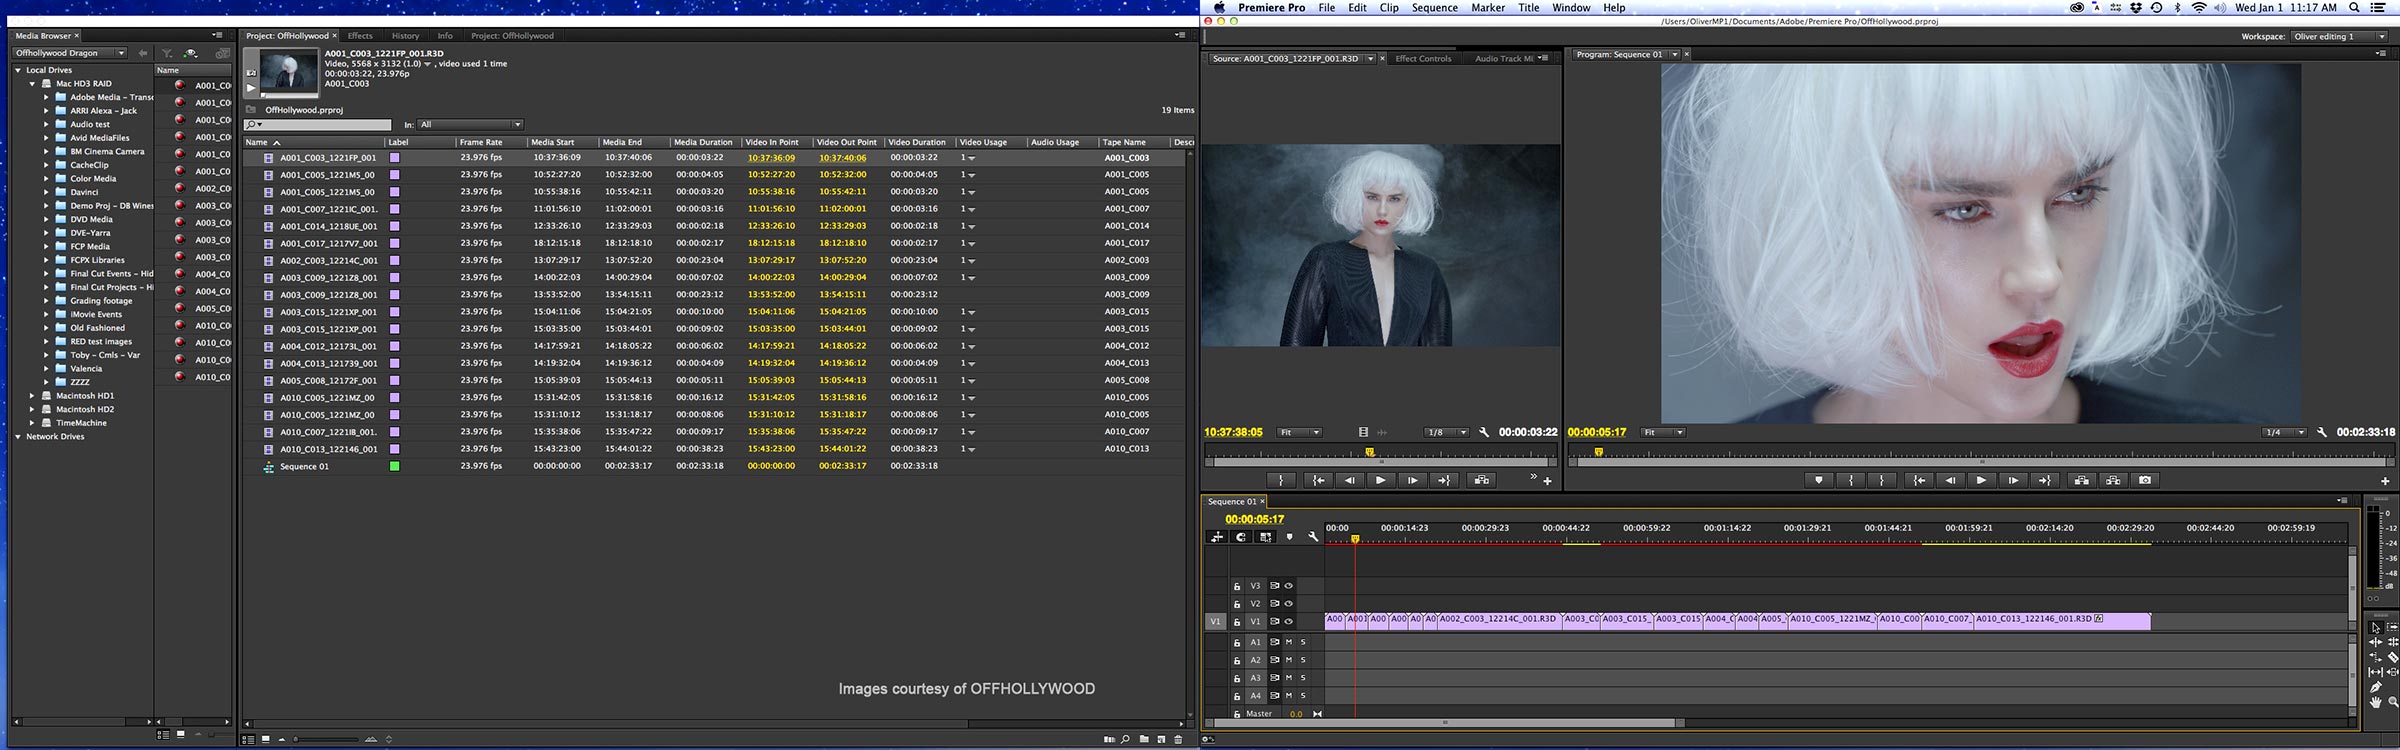
Adobe Premiere Pro CC (version 7.2.1)
The current build of Premiere Pro CC was released towards the end of 2013. Adobe has been enhancing editing features with each new update, but two big selling points of this version are Adobe Anywhere integration and Direct Link between Premiere Pro CC and SpeedGrade CC. Anywhere requires a shared server for collaborative workflows and isn’t applicable to most users who don’t have an Anywhere infrastructure in place. Nevertheless, this adds the client-side application integration, so those who do, can connect, sign in and work.
 Of more interest is Direct Link, which sends the complete Premiere Pro CC timeline into SpeedGrade CC for color correction. Since you are working directly with the Premiere Pro timeline, SpeedGrade functions with a subset of its usual controls. Operations, like conforming media to an EDL, are inactive. Direct Link facilitates the use of various compressed codecs that SpeedGrade wouldn’t normally handle by itself, since this is being taken care of by Premiere Pro’s media engine. When you’ve completed color correction, the saved timeline is sent back to Premiere Pro. Each clip has an applied Lumetri filter that contains grading information from SpeedGrade. The roundtrip is achieved without any intermediate rendering.
 This solution is a good first effort, but I find that the response of SpeedGrade’s controls via Direct Link are noticeably slower than working directly in a SpeedGrade project. That must be a result of Premiere Pro working in the background. Clips in Premiere Pro with applied Lumetri effects also require more resources to play well and rendering definitely helps. The color roundtrip results were good in my tests, with the exception of any clips that used a filter layer with a LUT. These displayed with bizarre colors back in Premiere Pro.
You can’t talk about Premiere Pro without addressing Creative Cloud. I still view this as a “work in progress”. For instance, you are supposed to be able to sync files between your local drive and the Cloud, much like DropBox. Even though everything is current on my Mac Pro, that tab in the Creative Cloud application still says “coming soon”. Others report that it’s working for them.

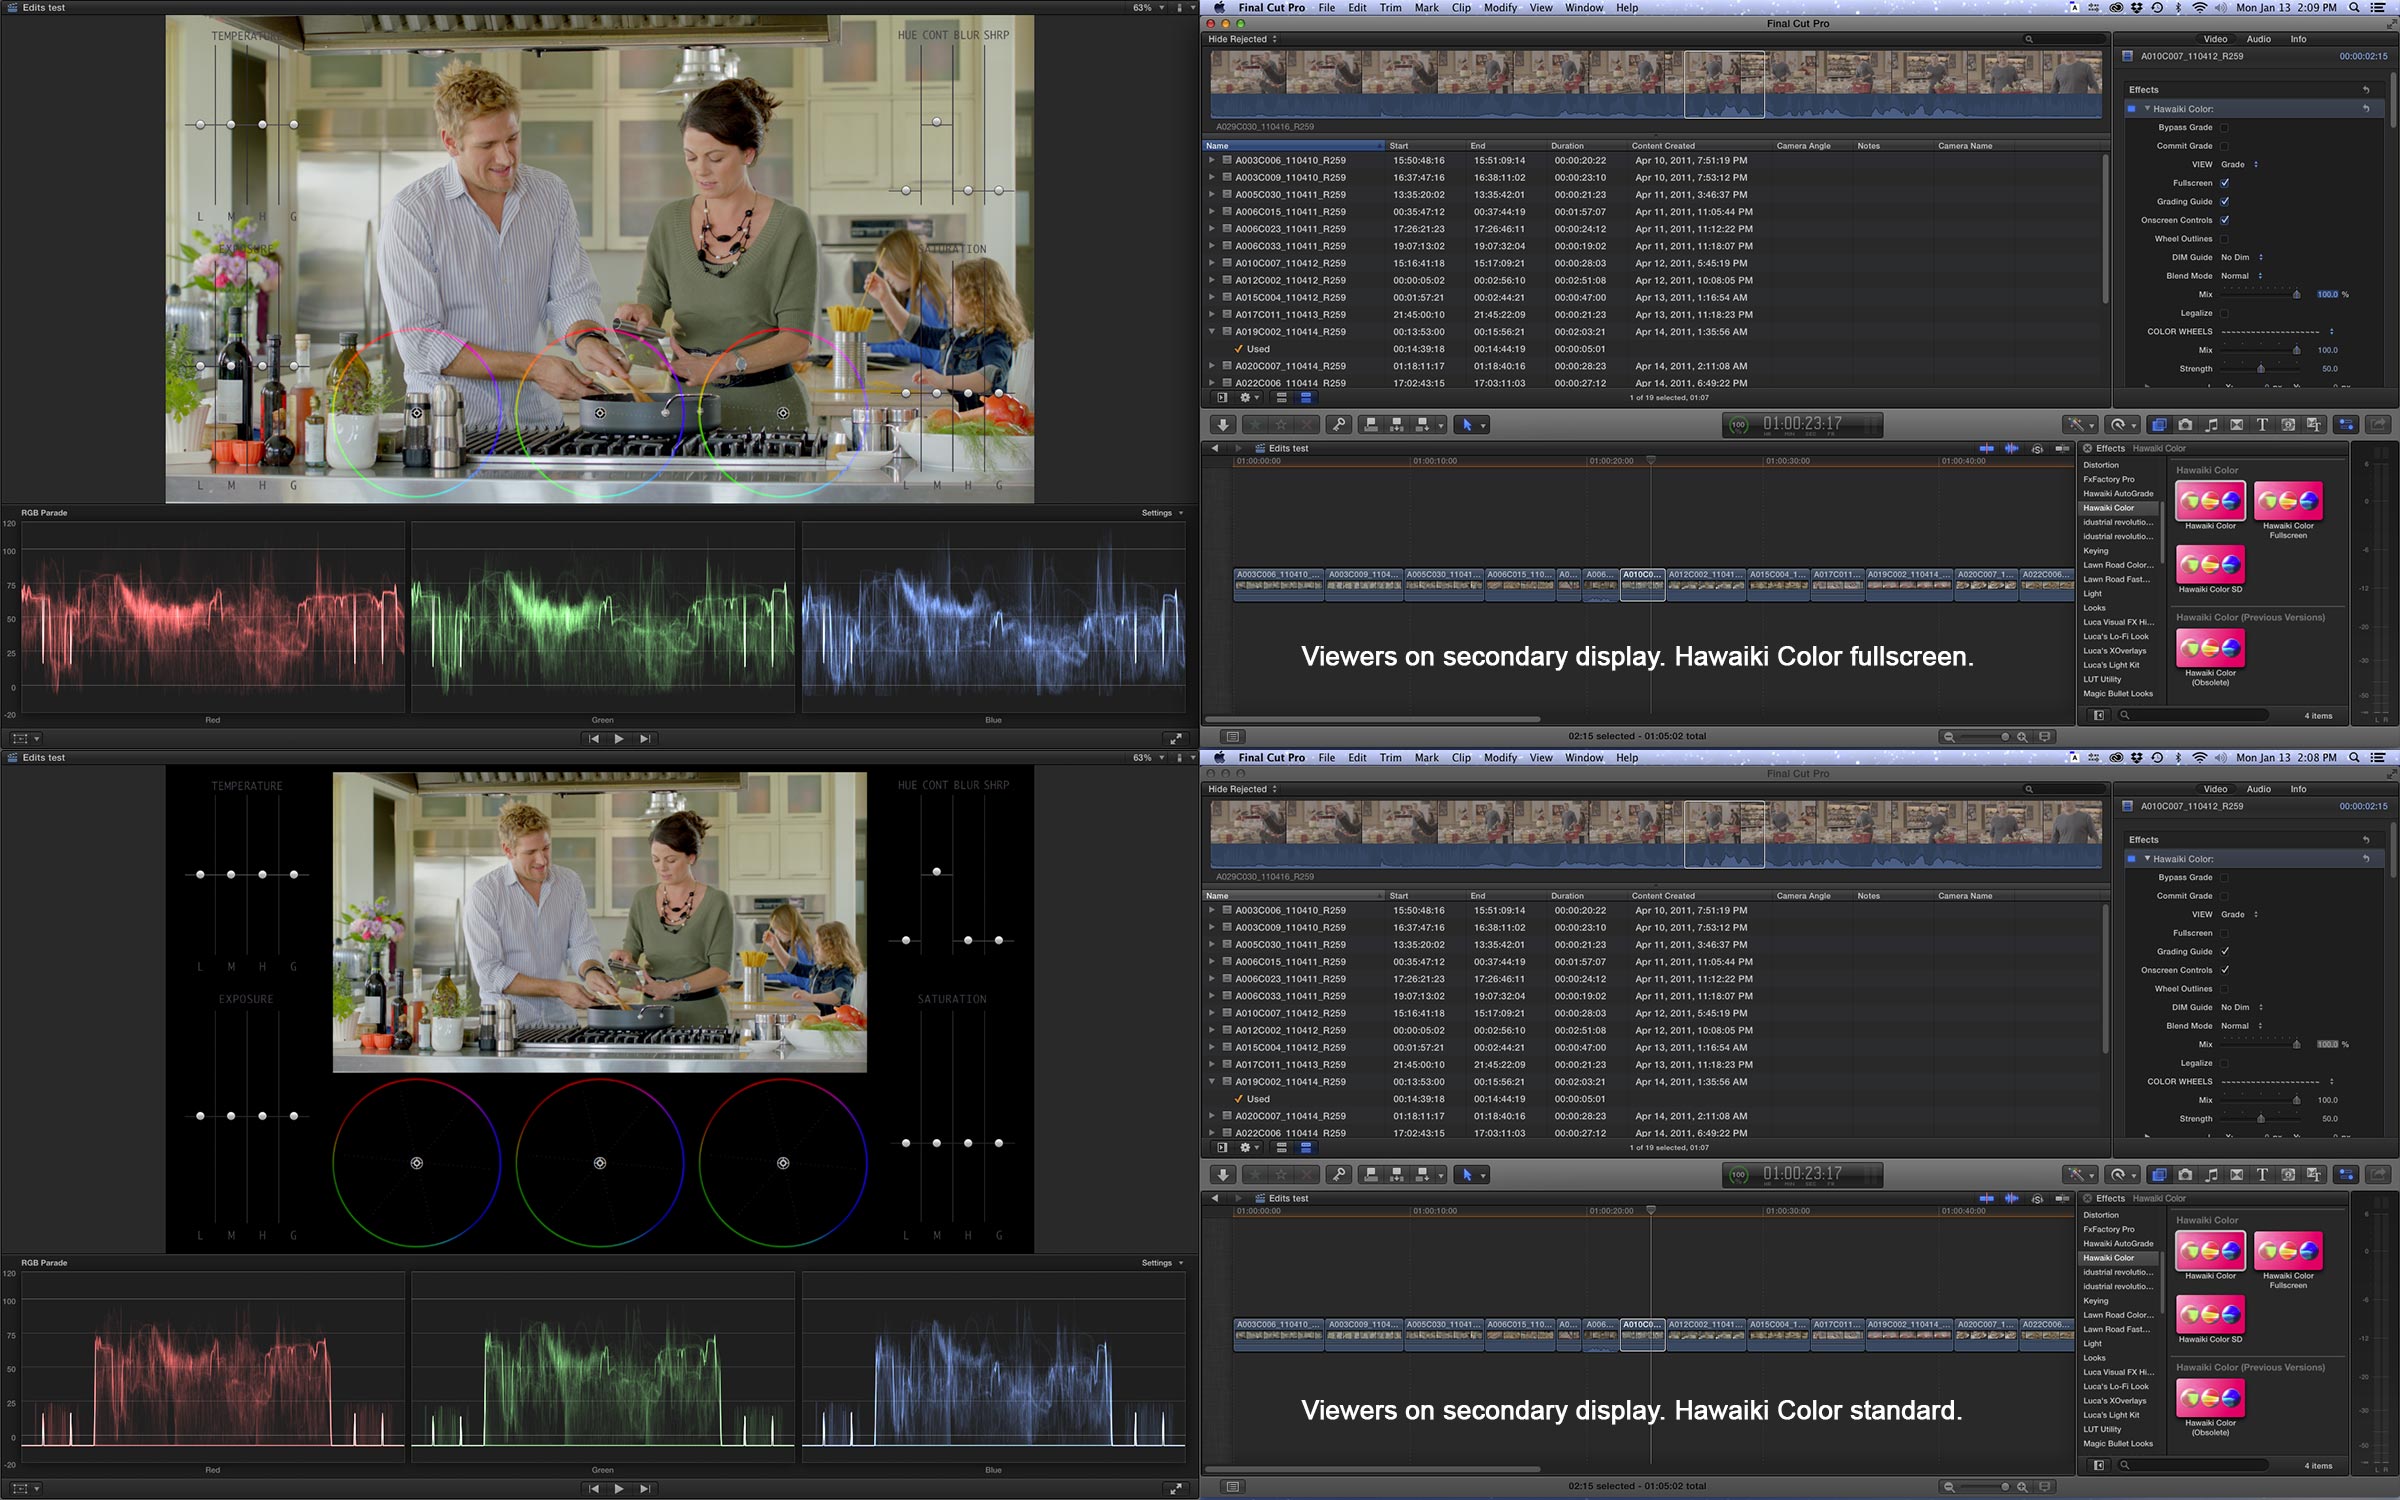
Apple Final Cut Pro X (version 10.1)
This update is the tipping point for many FCP 7 users. Enough updates have been released in over two years to address many of the concerns professional editors have expressed. 10.1 requires an operating system update to Mavericks (10.9 or later) and has three marquee items – a revised media structure, optimization for 4K and overall better performance. It is clear that Apple is not about to change the inherent design of FCP X. This means no tracks and no changes to the magnetic timeline. As with any update, there are plenty of small tweaks, including enhanced retiming, audio fades on individual channels, improved split edits and a new InertiaCam stabilization algorithm.
 The most obvious change is the move from separate Events and Projects folders to unified Libraries, similar to Aperture. Think of a Library as the equivalent to a Final Cut Pro 7 or Premiere Pro CC project file, containing all data for clips and sequences associated with a production. An FCP X Library as viewed in the Finder is a bundled file, which can be opened using the “show package contents” Finder command. This reveals internal folders and files for Events, Projects and aliases linked to external media files. Imported files that are optionally copied into a Library are also contained there, as are rendered and transcoded files. The Libraries no longer need to live at the root of a hard drive and can be created for individual productions. Editors may open and close any or all of the Libraries needed for an edit session.
 FCP X’s performance was optimized for Mavericks, the new Mac Pro and dual GPU processing. By design, this means improved 4K throughput, including native 4K support for ProRes, Sony XAVC and REDCODE camera raw media files. This performance boost has also filtered down to older machines. 10.1 brought better performance with 1080p ProRes and even 5K RED files to my 2009 Mac Pro. Clearly Apple wants FCP X to be a showcase for the power of the new Mac Pro, but you’ll get benefits from this update, even if you aren’t ready to leap to new hardware.
Along with Final Cut Pro X 10.1, Apple also released updates to Motion and Compressor. The Motion update was necessary to integrate the new FxPlug3 architecture, which enables developers to add custom interface controls. Compressor was the biggest change, with a complete overhaul of the interface in line with the look of FCP X.

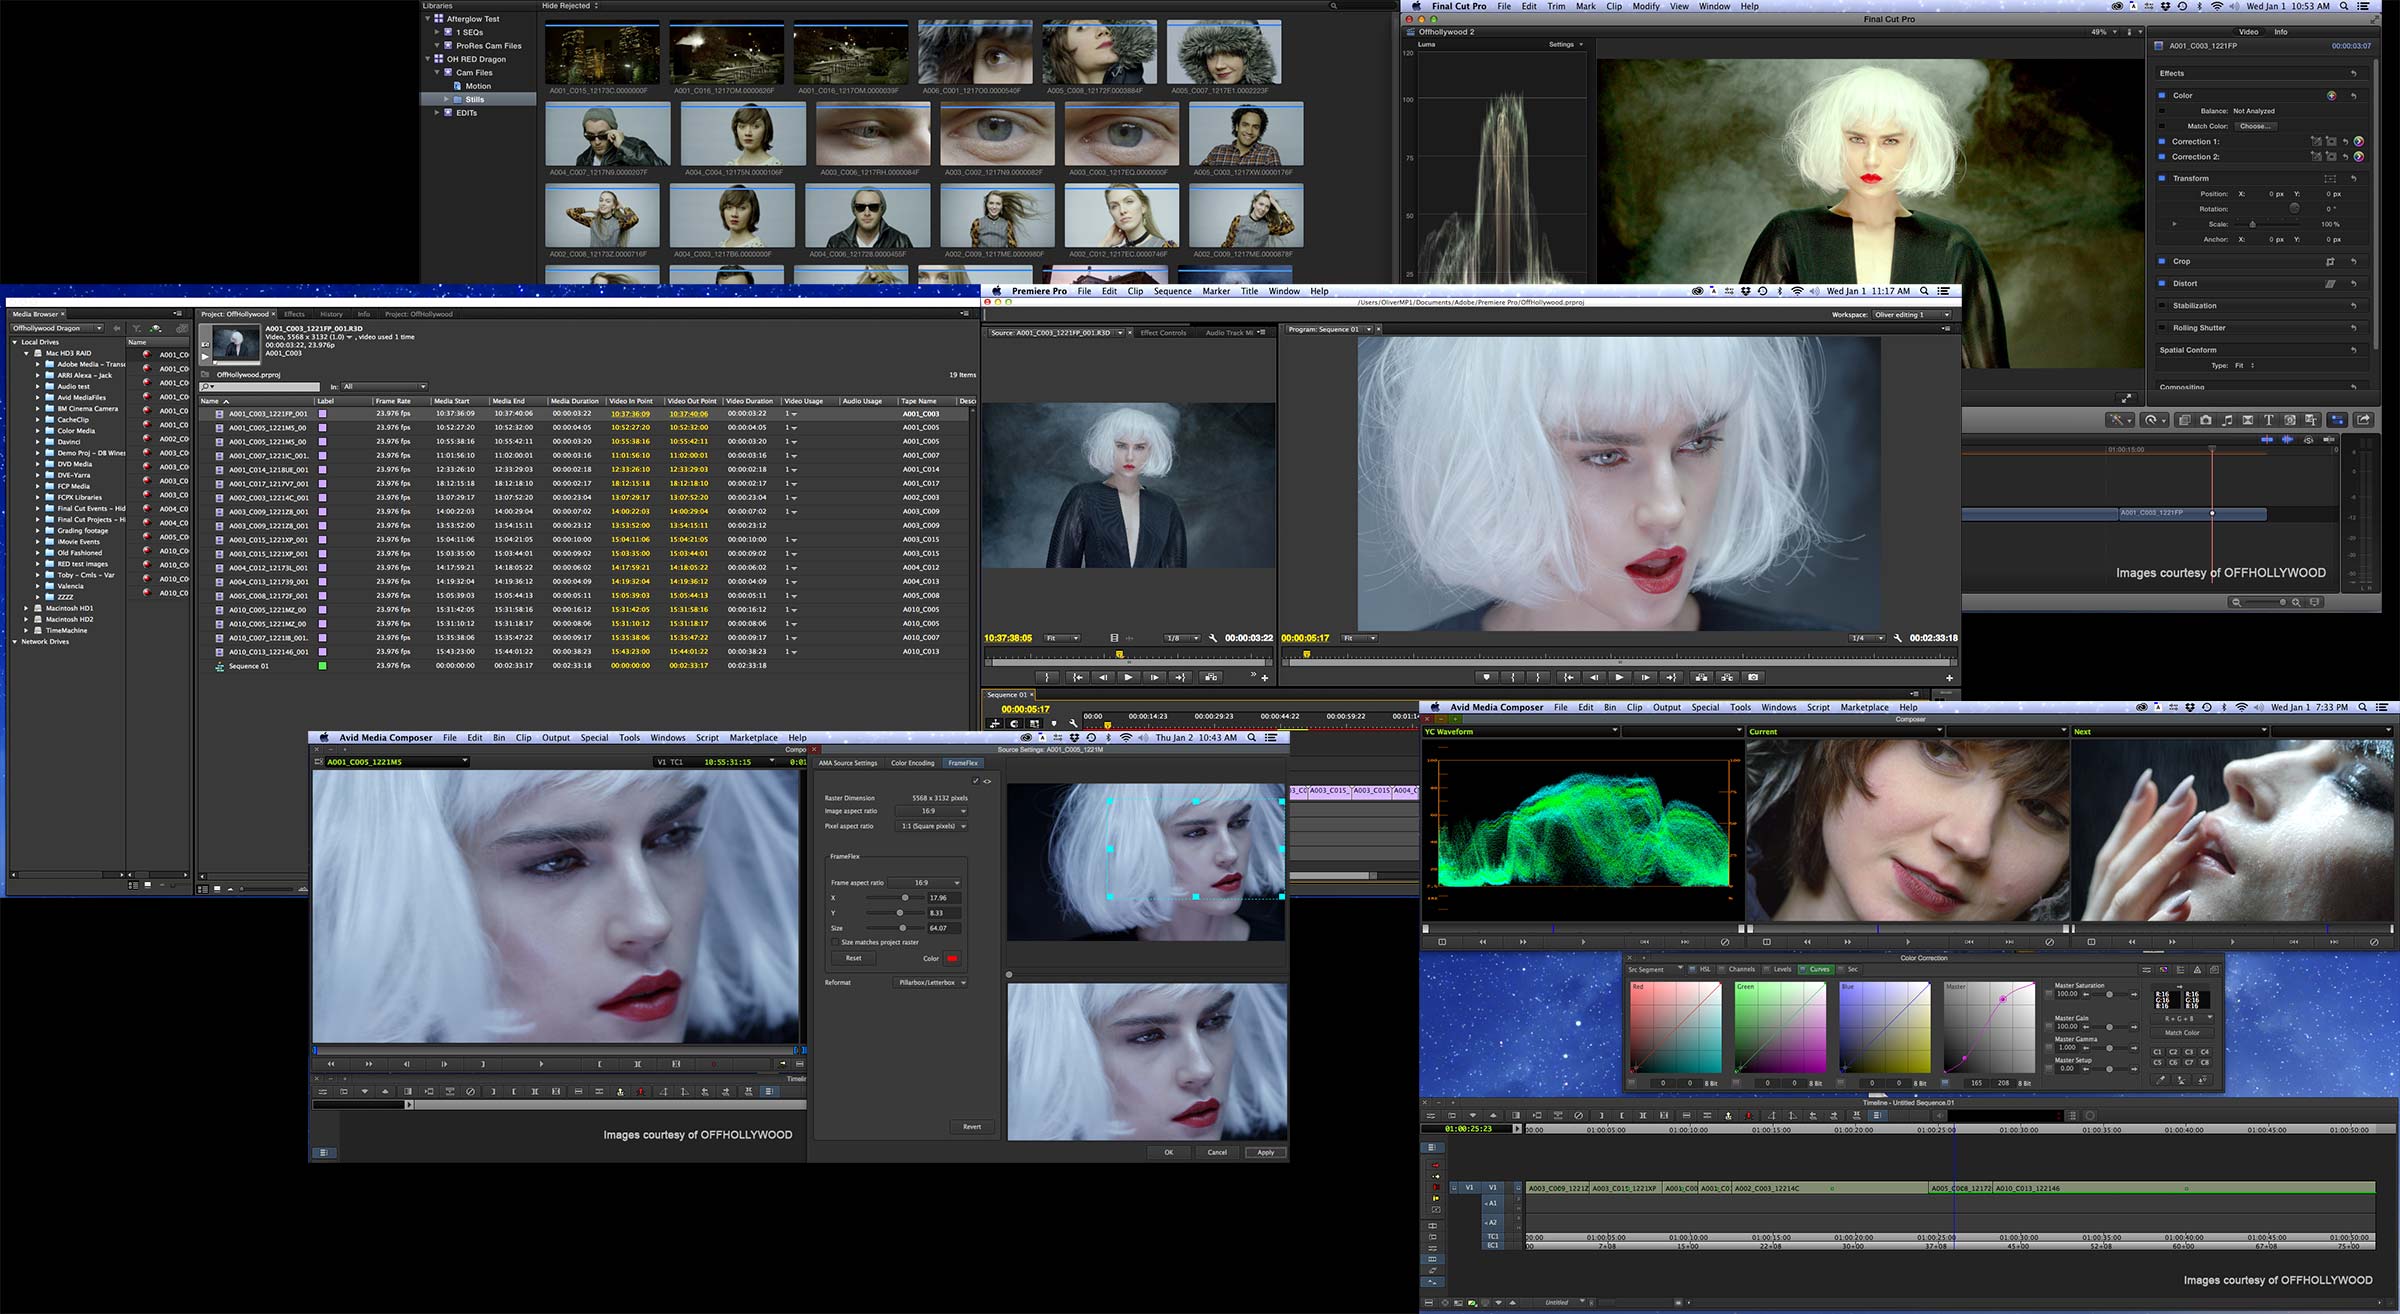
Avid Media Composer (version 7.0.3)
The biggest feature of Media Composer 7.0.3 is optimization for new operating systems. It is qualified for Windows 8.1 and Mac OS X 10.8.5, 10.9 and 10.9.1. There are a number of interface changes, including separate audio and video effects palette tabs and changing the appearance of background processing indicator icons. 24fps sound timecode is now supported, the responsiveness with the Avid Artist Color Controller has been improved and the ability to export a simplified AAF file has been added.
 Transcode choices gain a set of H.264 proxy file codecs. These had been used in other Avid news and broadcast tools, but are now extended into Media Composer. Support for RED was updated to handle the RED Dragon format. With the earlier introduction of 7.0, Avid added background transcoding services and FrameFlex – Avid’s solution for bigger-than-HD files. FrameFlex enables resizing and pan/scan/zoom control within that file’s native resolution. Media Composer also accepts mixed frame rates within a single timeline, by applying Motion Adapters to any clip that doesn’t match the frame rate of the project. 7.0.3 improves control over the frame blending method to give the editor a better choice between temporal or spatial smoothness.
There is no clear winner among these three. If you are on Windows, then the choice is between Adobe and Avid. If you need 4K output today, Apple or Adobe are your best option. All three handle a wide range of popular camera formats well – especially RED. If you like tracks – go Avid or Adobe. If you want the best application for the new Mac Pro, that will clearly be Apple Final cut Pro X. These are all great tools, capable of any level of post production – be it commercial, corporate, web, broadcast entertainment or feature films. If you’ve been on the fence for two years, now is the time to switch, because there are no bad tools – only preferences.
Originally written for Digital Video magazine / CreativePlanetNetwork.
©2014 Oliver Peters
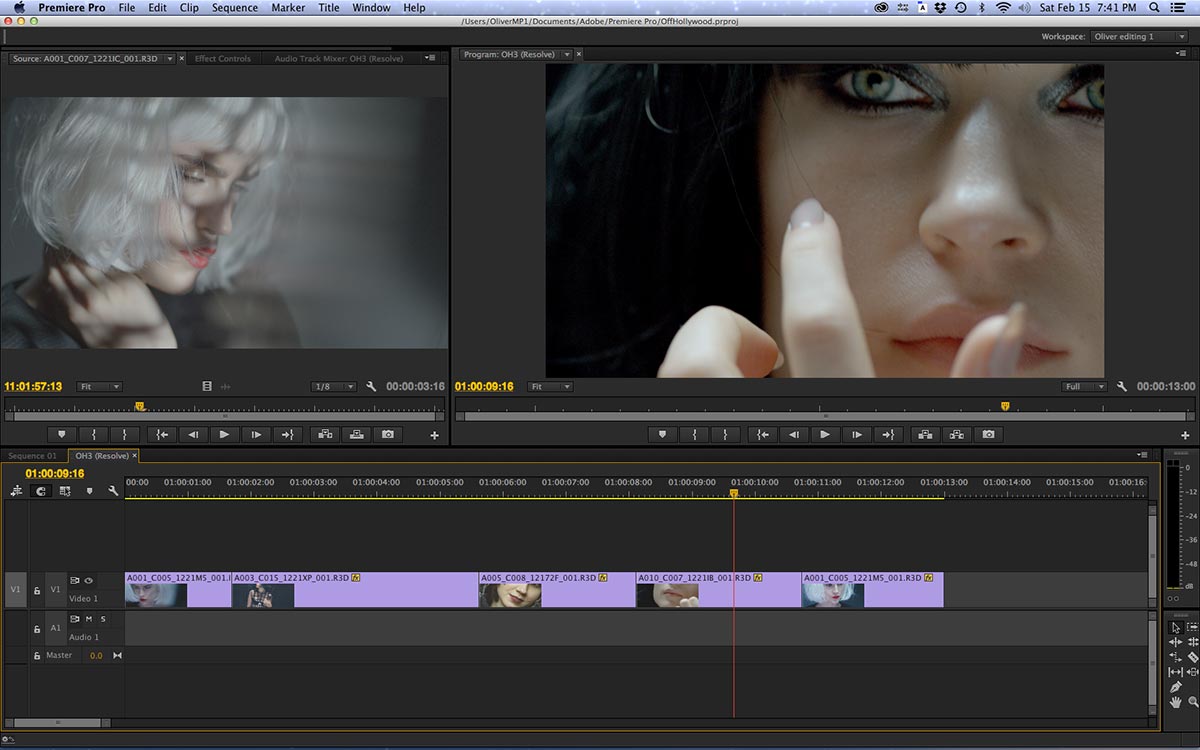
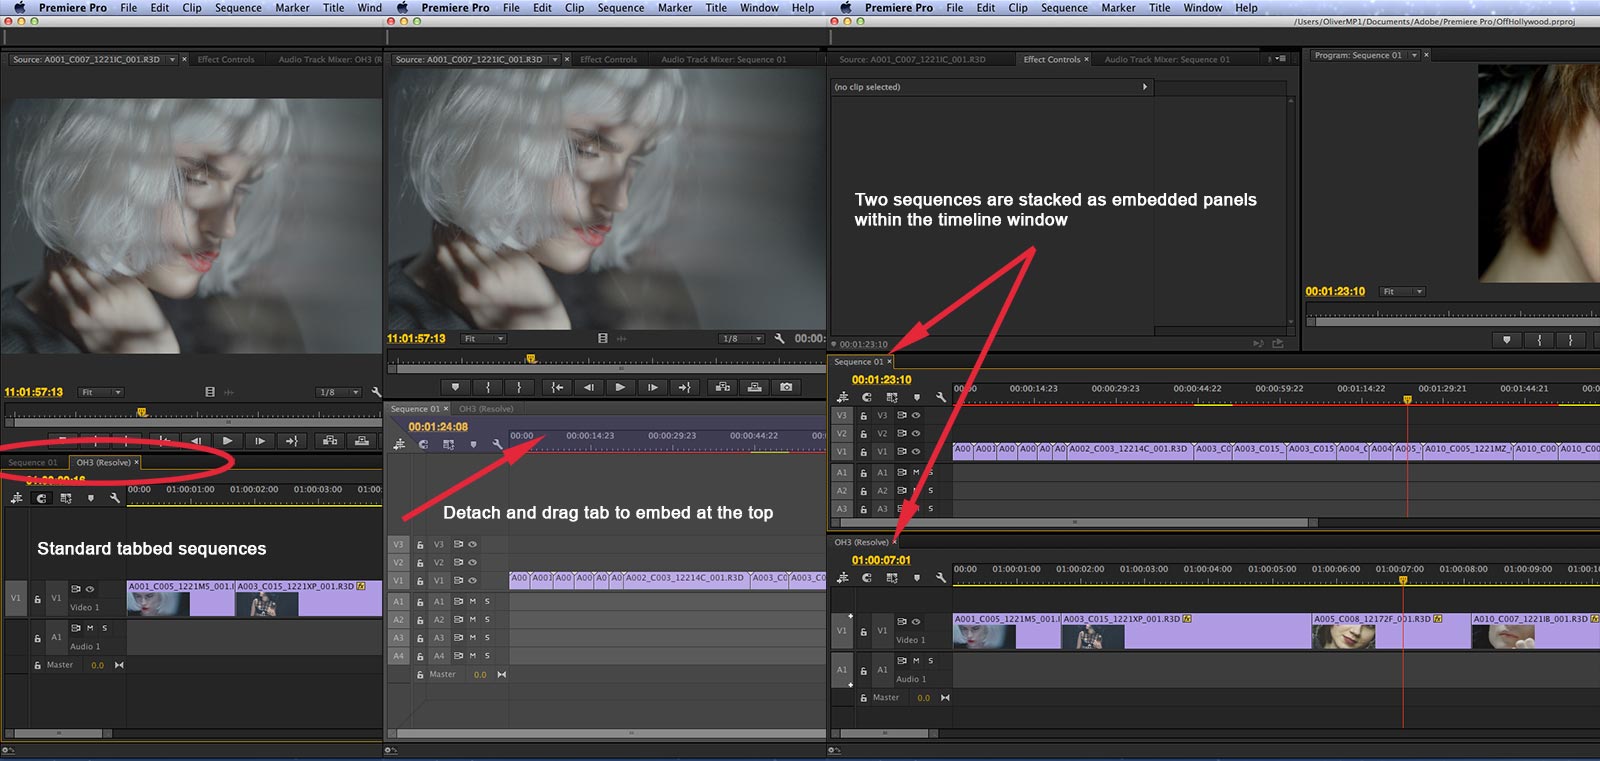 Let’s say that you like to work from a “selected takes” sequence to a second sequence that is a “cutdown” of these selects. Stack one sequence above the other and then simply drag a clip from sequence 1 to sequence 2. Or highlight a clip in sequence 1, copy it and paste it to sequence 2. This also makes it easy to re-arrange the order of clips from one sequence to the other, when building stories based on soundbite and voice-over elements.
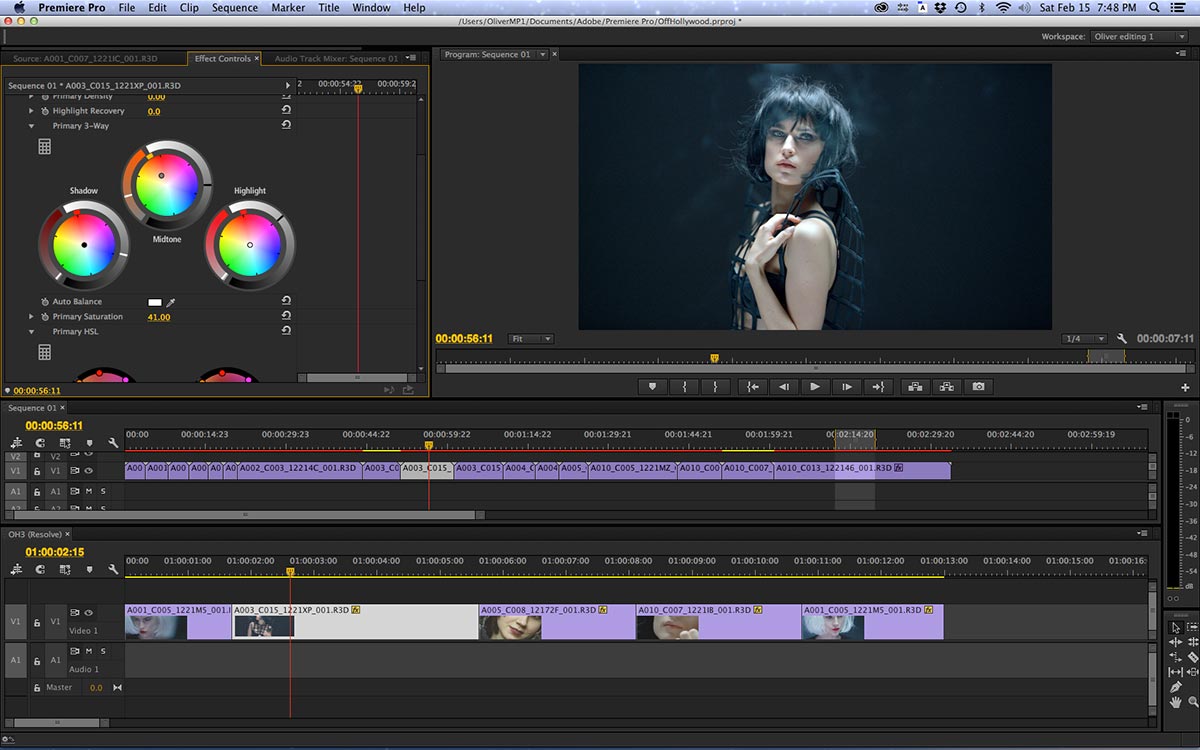 Once you’ve applied and adjusted effects in the long-form cut, select the effects in that window and copy them. Then click on the same shot in the second sequence. The effect control window has been “refocused” on the other clip and is therefore empty. Paste the matching effect(s) to the empty effects control panel. Now the shot in the short-form cut will match the appearance of that same shot from the long-form cut. All done by simply moving back and forth between the two stacked sequences in the timeline window.