For those interested in a preview of NAB 2014, check out my article written for Digital Video magazine.
Monthly Archives: March 2014
DaVinci Resolve 10

Last NAB, Blackmagic Design caused everyone to perk up when it touted Resolve 10 as an online editor. Once it was released, it became a bit more obvious that Resolve was still primarily a color corrector, but one that also added editing features. This latest update has been out for a number of months (including a lengthy public beta period) and gone through several updates. Resolve 10 was a free update for owners of previous versions. No short review can do this program justice, due to the depth of its toolset, but let’s take a quick dive into what it has to offer. (Click any image to enlarge.)
 DaVinci Resolve 10 comes in several versions for Mac and Windows, including Resolve Lite (free), Resolve Software ($995) and Resolve ($29,995), which includes the custom Resolve control surface. There are also Linux configurations. All versions will only work with Blackmagic video devices for I/O and monitoring, but these are not required for operation. In addition to mouse, trackpad and tablet control, Tangent Devices (Wave, Elements), JL Cooper (Eclipse) and Avid Artist control panels may be used as lower cost alternatives to the Resolve control surface. The free Lite version is most likely the biggest software bang-for-the-buck in the industry, but you’ll need the paid version for blur and noise reduction, 3D stereoscopic work, support for more than two GPUs and output at sizes bigger that UltraHD.
New in Resolve 10
 Since Resolve 10 was a pretty thorough overhaul of the Resolve 9 interface, there’s a lot new in terms of minor changes throughout the application. Many functions are more streamlined and logical and will make more sense to the new user. Editing is the biggest new addition and most of the typical functions are there, including various edit modes, tracks, effects, titles, speed changes, transitions and audio. Although I really can’t envision starting any edit from scratch in Resolve 10, it’s easier than ever to make editorial changes when the client has last minute adjustments in mind. The point is that this can now be achieved in the grading session, without having to go back into an edit bay.
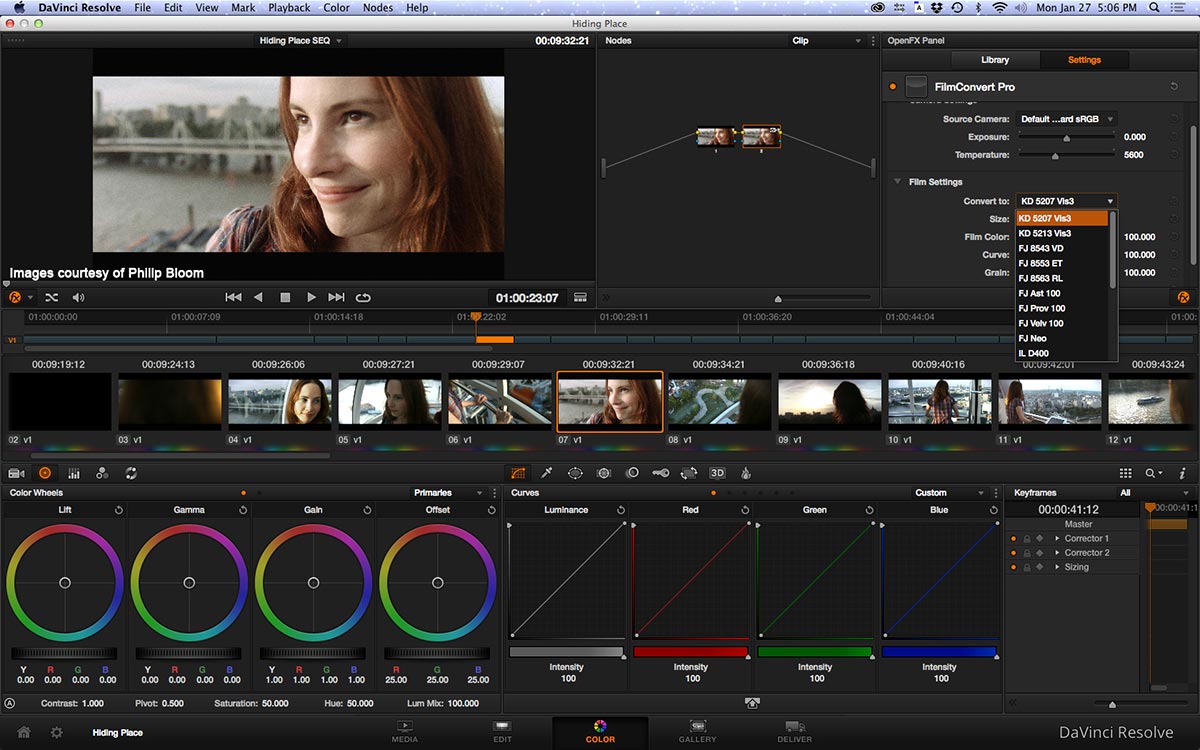 A big addition is the integration of an effects architecture, using the OpenFX plug-in format. Various developers are tweaking their OpenFX filters for compatibility with Resolve 10, but already I’ve been able to test the FilmConvert film emulation plug-in. Filters are applied to clips or a complete track as a node, so there are no third-party transition effects. However, since Resolve can render the timeline as a single file or as individual source clips, this means that the rendered clips will also have the applied effects baked into the rendered media. The application of an OpenFX filter to a node will slow down render speeds.
Resolve 10 also gained the ability to create DCPs straight from the timeline for cinema masters. However this only preps the project settings and does not cover the licensing fees that you need for an actual DCP export.
Nodes
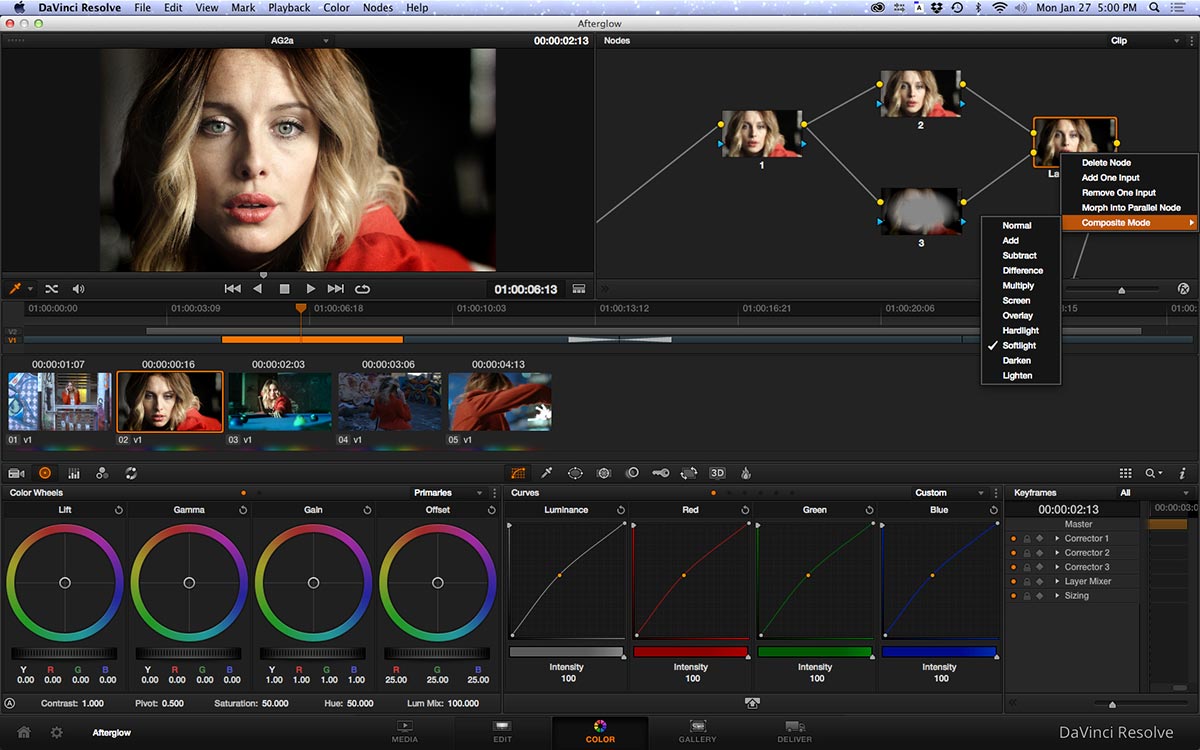 Every color corrector takes a different approach for how to build up a series of color correction adjustments. Resolve uses nodes, which have become fairly sophisticated. Although, it’s not a true compositor’s node tree, it does start to approach that. Node types include serial, parallel, splitters, combiners and layer mixers. These let a colorist not only string together a series of adjustments (serial nodes), but also split and recombine a signal, and create parallel node paths that are combined for a final output. The layer mixer node includes composite modes, similar to those used in Photoshop. While a lot of Resolve demos got very deep into node trees that dissect every aspect of a shot, I tend to take a simpler approach, sticking to curves and lift/gamma/gain controls. Nevertheless, if you need that power, it’s there in Resolve 10.
Strengths
 DaVinci Resolve 10 – even the free Lite version – represents an amazing level of versatility. For example, many editors and DITs use it to prep media for an edit. It’s super simple to apply LUTs to log-profile camera files and spit out edit-ready, adjusted source files. Resolve is one of the fastest renderers I’ve encountered and it handles cross-format conversions quite well. For example, it can render Avid-compliant MXF media, which is relatively uncommon. The scaling function is second to none. After Effects used to be my preferred tool for upscaling images, but I’ve found that Resolve is even better. Not only is the quality great, but you have control over the smoothness or crispness of the scaled image.
 You can’t talk about Resolve without mentioning the tracker. If you apply a “power window” to a portion of a shot (like a person’s face), you need to track the movement. The tracker in Resolve is a very fast, point-cloud style tracker. These tracks are almost always dead-on, so you never think twice about using the tracker. One the things I especially like about Resolve is the image quality and processing. It uses 32-bit floating math. Essentially this means that you can crank up video in one node – even past the point of clipping – and then pull it back down (recovering detail without a clip) in the next node.
Weaknesses
User interfaces are a very subjective issue in color correction tools, just like they are for editing software. I find this to be a weakness, because I work with a dual-display system. With Resolve you can’t place the viewer on the secondary monitor, like you can with Adobe SpeedGrade CC or Apple Color. You can place the video scopes and the new audio mixer there, but the viewer is locked to the primary screen. If you use the enhanced viewer mode, it hides the node tree. This tends to make operation awkward if you don’t have a control surface nor an external broadcast monitor.
 The depth of Resolve’s color correction toolkit is amazing, but it’s almost too much. For example, you have both wheels and sliders for primary control. That makes it very adaptive to different working styles, but it also makes it easy to lose track of which tool you used to make adjustments. Some things don’t make sense to me. For instance, the maximum saturation level isn’t all that large and if you really want a shot dripping with chroma, it takes several serial nodes to do that.
A personal peeve, since I use dual 20” screens, is that something broke between Resolve 9 and Resolve 10. The earliest version of Resolve on the Mac was optimized for 1920×1080 screens (or larger), but then this was subsequently corrected for smaller resolutions, like laptops and the 20” Apple Cinemas. Apparently this has reverted a little with the latest version. With Resolve 9, the interface opened and was correctly scaled for the 20” display. With Resolve 10, the interface opens with the right edge running off the screen. You have to click the green “plus” button (one of the top three buttons in every Mac OS X window) to resize the window to fit the display.
Roundtrips with your editor
 DaVinci Resolve 10 has the broadest support for roundtrips of any color correction tool, translating XML (Final Cut Pro 7 and Premiere Pro), FCPXML (Final Cut Pro X), EDL and AAF (Avid) list formats. This is a bi-directional roundtrip, so you can import sequences from your NLE into Resolve 10, but then also export NLE-compatible lists that properly relink to the rendered media. When Final Cut Pro X version 10.1 was released, compatibility was broken, but that’s recently been fixed with the latest updates from each company. However, it’s still not quite perfect. I tried two very simple sequences of a few shots each. One sequence used 1920×1080 ProRes HQ files from a Blackmagic Cinema Camera. The other used native, camera raw files from a RED EPIC (various sizes and frame rates). Both sequences were cut in FCP X and the FCPXML from each imported without issue into Resolve 10.
 Going the other way, back into FCP X, did present some issues. Both of the new FCPXMLs that were imported into FCP X reported error messages, although the clips and sequences imported correctly. The 1920×1080 files from the BMCC were fine. The EPIC files, which had been resized in the original FCP X timeline, were all interpreted by FCP X as 1280×720, even though Resolve 10 had correctly rendered the media as 1920×1080. These same timelines imported fine into Premiere Pro using standard XMLs.
Final thoughts
DaVinci Resolve 10 is currently the most popular color correction tool, largely because of the free version. It is powerful, though at times I feel that the correction tends to be a little harsher than with other grading applications. The interface could stand to be even more streamlined. Nevertheless, I’ve done grades that required extensive correction, which would have been impossible to achieve in any other color correction application.
It’s an essential tool that functions like a “Swiss Army knife” and as such, you owe it to yourself to spend some time learning it. The manual, written by noted colorist and author Alexis Van Hurkman, is easy to follow. Training resources include online tutorials at Color Grading Central, Ripple Training, Tao of Color and Mixing Light.
Originally written for Digital Video magazine / Creative PlanetNetwork.
©2014 Oliver Peters
NLE Tips – Week 4

Apple FCP X and Lined Scripts
Feature film editing is facilitated by the information coming from the script supervisor’s notes and adjusted script. This is frequently called a “lined script” because the supervisor will draw vertical lines with notations that indicate which angles and takes cover specific sections of every scene. In addition, editors developed another notation of horizontal lines that separate the dialogue. This was the basis of the original Ediflex Script Mimic process that eventually found its way into Avid as Script Integration and Script Sync. (Click on any image for an expanded view.)
There are a couple of simple ways to adapt this concept to Apple Final Cut Pro X. A few methods have been proposed, but the easiest and fastest method for me is to use markers. The first step is to take the printed script with the script supervisor’s notations and add the horizontal line notation that splits up the dialogue.
 Start at line 1 on page one and you’ll eventually end up with 1,000 or more at the end of the last page. Other numbering conventions are fine. Ideally this could be added to the script by the supervisor before the start of the production. If not, you or the assistant editor (if you are lucky enough to have one) will need to do this. You can add as many lines as you want to, depending on how granular you want the division of the dialogue to be. This could be with every carriage return of the printed script or it could be just between every paragraph.
When the camera files are imported and logged into the FCP X event, you’ll need to add scene and take information. This can be done by renaming the clip name or (which I prefer) by entering it into the scene/take columns (or both). As each clip is reviewed, add markers at every point within the clip that matches the position of the horizontal divisions made to the script dialogue. Rename these markers to match the numbers assigned on the written script.
 When you’ve gone through this process for each file that covers the scene, you will have scene/take information that matches the supervisor’s vertical lines and markers that align with the horizontal separation. Under each clip, there’s now a list of markers, which you’ve labelled to match the script lines. By clicking on one of these, you can instantly jump to that point in the dialogue within any given clip.
In a lengthy scene, if you want to see all the coverage options that are available for a particular line of dialogue somewhere in the middle of the scene, all you have to do is go to the corresponding numbered marker closest to that line of dialogue. If that number is “201” for example, simply click on the marker labelled “201” within each clip and you can successively review each angle and take at that point.
Naturally you can leverage FCP X’s capabilities by creating favorites and smart collections based on these choices, but script lining and using markers is a good and easy starting point.
©2014 Oliver Peters
NLE Tips – Week 3

The Avid – Resolve Roundtrip Workflow
Avid Media Composer has always been regarded as the best offline editing tool and its heritage was built upon a strong offline-to-online workflow. The file-based world has complicated things and various camera formats have made life even more complex for editors. Many have become quite fond of using Blackmagic Design’s DaVinci Resolve as a great companion to Media Composer. It’s cross-platform and even the free version will do most of what you need. Here’s a step-by-step example of how you might use the combo. Relinking varies a bit, based on file metadata and might need to be modified for your particular circumstances. This workflow is great with ARRI ALEXA files and will most likely work well with other similar camera formats. (Click images for an expanded view.)
 Creating edit proxies files with Resolve – ALEXA files are usually Apple ProRes 4444 or ProRes HQ QuickTime files that have been recorded with a Log-C gamma profile. So, they are big files with a flat appearance. To start, launch Resolve, load the ProRes camera clips into the Media Pool (Media or Edit tab) and select/edit all of the full clips to a new timeline. In the Color tab, select “track” instead of “clip” and apply a single node. In that node, apply an ARRI Log-C-to-Rec709 LUT. Go to the Deliver tab and pick the Avid roundtrip Easy Set-up. Make sure “Individual Source Clips” is selected (not a single file), define a render location and
  decide whether or not to add a file name prefix or suffix (not required). Render using the DNxHD 36 codec choice.
Moving to Media Composer for the creative cut – When the render process has been completed, you’ll have a folder containing Avid MXF media and a corresponding AAF file. This media has the LUT “baked in” and has been rendered with the very lightweight  DNxHD 36 codec. Drag the AAF file out of this folder to another location. Now drag this complete folder into any of your Avid MediaFiles/MXF subfolders. Unless you’ve already added extra folders there, you will typically find one existing folder (with Avid’s default label of “1”) that contains MXF media. Change the label of the new folder (the one that you’ve just dragged in) to another number, such as “2”.
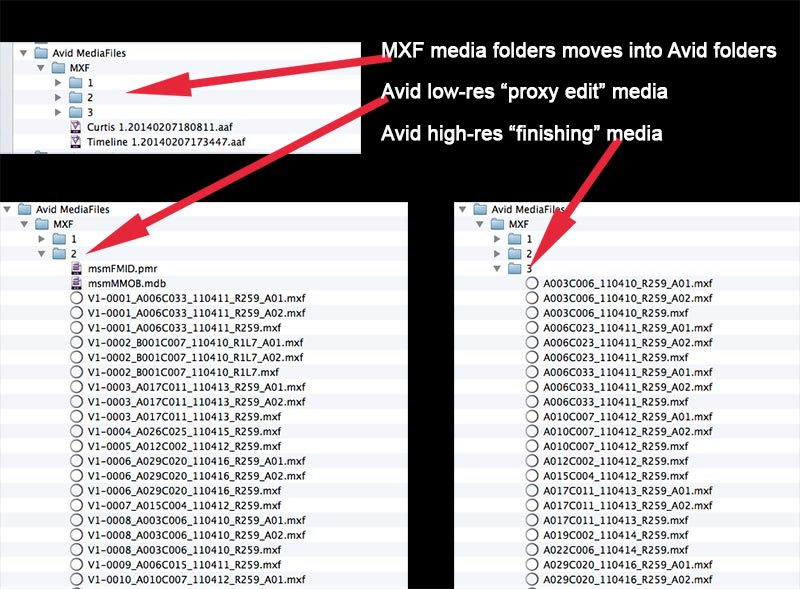
Launch Media Composer, create a new project, open the first bin and import the AAF file that was created by Resolve. This bin will become populated by the color corrected, DNxHD 36 files created by Resolve. Voila, you are ready to edit your Oscar-winner! Cut until the project is locked. When you are done and are ready to move to the online or finishing phase of the edit, export an AAF file from Media Composer. Select “AAF Edit Protocol” and “Link to” media in the AAF options.
 Returning to Resolve for the final grade – Launch Resolve and start a new project. Import the AAF file that you exported from Media Composer. You’ll end up with a timeline that matches your Avid cut and it will be linked to the DNxHD 36 media. You will want to relink the files back to the original camera media – the ProRes HQ or ProRes 4444 files. To do this, delete all the media in the Resolve Media Pool (Edit tab), which will make the timeline clips appear offline.
  Now, navigate to the folder with the original camera files and bring those into the Media Pool. Your timeline clips will now be relinked to this original camera media. You’ll recognize this because the clips on the timeline will be back to their original, flat, Log-C appearance. In some instances, Resolve may see some files as duplicate and might possibly relink to the wrong file. In that case, you’ll see an error icon on the timeline clip. Click on it and Resolve will present a dialogue window with the possible alternate media options. Pick the correct one and the clip should then be linked to the right shot. Color correct your timeline with the desired grade and any reframing.
 Returning to Media Composer to complete the edit – When you’ve completed the color grading, go to the Deliver tab and pick the Avid roundtrip Easy Set-up again, but this time pick a higher-quality codec (like DNxHD 175x). Make sure to set handle lengths (usually 2-5 sec.) and render (as “Individual Source Clips” again). The result will be a new folder of rendered MXF media with the “baked in” grade, plus a new corresponding AAF file. As before, drag out this AAF file and drag the folder of rendered media into the Avid MediaFiles/MXF subfolder. Relabel the folder of this new Resolve media with a different number (such as “3”).
 Launch Media Composer, open your existing project and create a new bin. Import the new AAF file, which will now populate this bin with the high-quality media. This bin will also include the sequence that you sent over to Resolve, but now linked to the high-resolution media files. In many cases, you would simply use this sequence for any final effects, titles and other adjustments.
 Relinking the sequence in Media Composer – If for some reason the sequence that was “round-tripped” does not correctly reflect the edited cut as built in the offline stage, then you will need to relink a copy of that sequence to the new media. To do so, duplicate the sequence from your DNxHD 36 edit and move that copy into the bin with the 175x media. Close all other bins, except the 175x bin. Right-click the sequence and select “Relink” from the menu. Set your options to “Select Items In All Open Bins” and relink by “Timecode – Start” and “Source Name – Tape Name or Source File ID”. This will cause the sequence to be relinked to the new 175x final-quality media.
If everything worked correctly, you will have done a complete offline (creative cut) and online (finishing) workflow between Media Composer and Resolve, without the need for Avid’s traditional import or newer AMA processes!
©2014 Oliver Peters
