It’s time to dive into some of the terms and concept that brought you modern color correction software. First of all – color grading versus color correction. Many use these terms to identify different processes, such as technical shot matching versus giving a shot a subjective “look”. I do this too, but the truth of the matter is that they are the same and are interchangeable. Grading tends to be a more European way of naming the process, but it is the same as color correction. (Click on any of the images in this article for an expanded and more descriptive view.)
All of our concepts stem from the film lab process known as color timing. Originally this described the person who knew how long to leave the negative in the chemical bath to achieve the desired result (the “timer”). Once the industry figured out to manipulate color in the negative-to-positive printing process, the “color timer” was the person who controlled the color analyzer and who dialed in degrees of density and red/blue/green coloration. The Dale Grahn Color iPad application will give you a good understanding of this process. Alexis Van Hurkman also covers it in his “Color Correction Handbook”.
Electronic video color correction started with early color cameras and telecine (film-to-tape transfer or “film chain”) devices. These were based on red/blue/green color systems, where the video engineer (or “video shader”) would balance out the three components, along with exposure and black level (shadows). He or she would adjust the signal of the pick-up systems, including tubes, CCDs and photoelectric cells.
RCA added circuitry onto their cameras called a chroma proc, which divided the color spectrum according to the six divisions of the vectorscope – red, blue, green, cyan, magenta and yellow. The chroma proc let the operator shift the saturation and/or hue of each one of these six slices. For instance, you could desaturate the reds within the image. Early color correction modules for film-to-tape transfer systems adopted this same circuity. The “primary” controls manipulated the actual pick-up devices, while the “secondary” controls were downstream in the signal chain and let you further fine tune the color according to this simple, six-vector division.
Early color correction system were built to transfer color film to air or to videotape. They were part machine control and part color corrector. Modern color correction for post production came to be, because of these three key advances: memory storage, scene detection and signal decoding.
Memory storage. Once you could store and recall color correction settings, then it was easy to go back and forth between camera angles or shots and apply a different setting to each. Or you could create several looks and preview those for the client. The addition of this technology was the basis for a seminal patent lawsuit, known as the Rainbow patent suit, as the battle ranged over who first developed this technology.
Scene detection. Film transfer systems had to play in real-time to be recorded to videotape, which meant that shot changes had to trigger the change from one color correction setting to the next. Early systems did this via the operator manually marking an edit point (called “notching”), via an EDL (edit decision list) or through automatic scene detection circuitry. This was important for the real-time transfer of edited content, including film prints, cut negative and eventually videotape programs.
Signal decoding. The ability of color correction systems to decode a composite or component analog (and later digital) signal through added hardware, shifted color correction from camera shading and film transfer to being another general post production tool at a post facility. The addition of a signal decoder board in a DaVinci unit split the input signal into RGB parts and enabled the colorist to enhance the correction of an already-edited master using the “secondary” signal electronics of the system. This enabled “tape-to-tape” color correction of edited masters. Thanks to scene detection or an EDL, color correction could be shot-to-shot and frame-accurate, when played back in real-time for its re-encoded, corrected output back to a second videotape master.
Eventually the tools used in hardware-based, tape-to-tape color correction systems became standard. Quantel and Avid led the way by being first to incorporate these features into their nonlinear editing software.
_________________________________
Color correction software tends to break up its control into primary and secondary functions. As you can see from the earlier explanations, there’s really no reason to do that, since we are no longer controlling the pick-up devices within a camera or telecine. Nevertheless, it’s terminology we seem to be comfortable with. Often secondary controls enable masking and keys to isolate color – not because it has to be that way – but, because DaVinci added these features into their secondary control set. In modern correction tools, any function could happen on any layer, node, room, etc.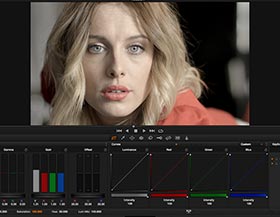
The core language for color manipulation still boils down to the simple controls exemplified by the Dale Grahn app. A signal can be brighter, darker, more or less “dense” (contrast) and have its colorimetry shifted by added or subtracting red, blue or green for the overall image or in the highlight, midrange or shadow portions of the image. This basic approach can be controlled through sliders, knobs, color wheels and other user interfaces. Different software applications and plug-ins get to the same point through different means, so I’ll cover a few approaches here. Bear in mind, that since some of these actually represent somewhat different color science and math, examples that I present might not yield exactly the same results. Many controls are equivalent in their effect, though not necessarily identical in how they affect the image.
 A common misconception is that shadow/mid/highlight controls on a 3-way color corrector will evenly divide the waveform into three discrete ranges. In fact, these are very large, overlapping ranges that interact with each other. If you shift a shadow luminance control up, it doesn’t typically just expand or compress the lower third of the waveform. Although some correctors act this way, most tend to shift the whole waveform up or down. If you change the color balance of the midrange, this color change will also affect shadows and highlights. The following is a quick explanation of some of the popular color control models.
Contrast/pivot/temperature/tint
 Contrast and temperature controls have recently become more popular and are considered a more photographic approach to correction. When you adjust contrast, the image levels expand or stretch as viewed on a waveform. Highlights get brighter and shadows deepen. This contrast expansion centers on a pivot point, which by default is at the center of the signal. If you change the pivot slider you are shifting the center point of this contrast expansion. In one direction, this means the contrast control will stretch the range below the pivot point more than above it. Shift the pivot slider in the other direction for the opposite effect.
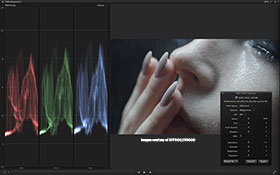 Color temperature and tint (also called magenta) controls balance the red/blue/green signal channels in relationship to each other. If you slide a color temperature control while watching an RGB parade display on a waveform, you’ll note that adjustments shift the red and blue channels up or down in the opposite direction to each other, while leaving green unaffected. When you adjust the tint (or magenta) slider, you are adjusting the green channel. As you raise or lower the green, both the red and blue channels move together in a compensating direction.
Slope/offset/power
 The SOP model is used for CDL (color decision list) values and breaks down the signal according to luma (master), red, green and blue and are expressed in the form of plus or minus values for slope, offset and power. Scratch Play’s color adjustments are a good example of the SOP model in action. Slope is equivalent to gain. Picture the waveform as a diagonal line from dark to light. As you rotate this imaginary line, the higher part becomes taller, which represents brightness values. Think of the slope concept as this rotating line. As such, its results are comparable to a contrast control.
The offset control shifts the entire signal up or down, similar to other shadow or lift controls. The power control alters gamma. As you adjust power, the gamma signal is curved in a positive or negative direction, effectively making the midrange tones lighter or darker.
Lift/gamma/gain
 The LGG model is the common method used for most 3-way color wheel-style correctors. It effectively works in a similar manner to contrast and SOP, except that the placement of controls makes more sense to most casual users. Gain, as the name implies, increases the signal, effectively expanding the overall values and making highlights brighter. Lift shifts the entire signal higher or lower. Changing a lift control to darken shadows, will also have some effect on the overall image. Gamma bends the curve and effectively makes the midrange values lighter or darker.
Luma ranges
 The portions of the signal altered by highlight/shadow/midrange controls (like SOP, LGG or other) overlap. If you change the color balance for the midrange tones, you will also contaminate shadows and highlights with this color shift. The extent of the portion that is affected is controlled by a luma range control. Many color correction applications do not give you control over shifting the crossover points of these luma ranges. Some that do, include Avid Symphony, Synthetic Aperture Color Finesse and Adobe SpeedGrade. Each offers curves or sliders to reduce or expand the area controlled by each luma range and effectively tightens or widens the overlap or crossover between the ranges.
DaVinci Resolve includes a similar function within its log-style color wheels panel. It uses range adjustments that can limit the area affected by the balance and saturation controls. Similar results may be achieved by using HSL keyers or qualifiers that include softening controls.
Channels or printer lights
 Video signals are made up of red, blue and green channel information. It is not uncommon for properly-balanced digital cameras to still maintain a green color cast to the overall image, especially if log-profile recording was used. Here, it’s best to simply balance the overall channels first to neutralize the image, rather than attempt to do this through color wheel adjustments. Some software uses actual channel controls, so it’s easy to make a base-level adjustment to the output or mix of a channel. If your software uses printer lights, you can achieve the same results. Printer lights harken back to lab color timing, using point values that equate to color analysis values. Regardless, dialing in a plus or minus red/blue/green printer light value effectively gives you the same results as altering the output value of a specific color channel.
This is just a short post to go over some of the more confusing terminology found in modern color correction software. Many applications tend to blend the color science models, so as you apply the points mentioned to your favorite tool, you may see somewhat different results. Hopefully I’ve gotten you in the ballpark, in order to understand what happens when you twirl the knob the next time.
©2014 Oliver Peters



 This accelerated schedule with a December release target was facilitated by the post production sound team getting an early jump on things. Headed up by sound editor/re-recording mixer
  Struthers continued, “David likes to dive right into post after production. We don’t watch a first assembly of the full movie as with many other directors. We tend to cut individual scenes and then David reviews those and works with us to build the scenes moment by moment. David is very confident about the editing process, so he’s covered himself in order to have options. He likes to shoot the performances with different ‘calibrations’ to the actors’ emotions to give himself choices in the cutting room.”
 Editors often face creative challenges from a film’s length or structure and American Hustle was no exception. Baumgarten explained, “We used a pattern of parallel and overlapping action to condense the film. Rather than drop whole scenes, we found that many of the important story points from those scenes could be preserved by inserting pieces of them into other scenes. This let us tell a more succinct and better story, plus frame the information into a context that makes sense for the audience. Once we did that on a few scenes and saw that it worked well for this film, we decided to find other sections where we could use the same pattern.”
 Visual effects were handled in a unique fashion. Cassidy said, “This film has a surprising number of effects, including green screen composites and period fixes. Also the characters wear sunglasses. Many of those shots ended up needing some touch-up to remove unwanted reflections. The production company set up an in-house team and hired the compositors to do most of the effects. They were divided up into two groups, running
  American Hustle was edited using