
With the introduction of Premiere Pro CC 2015, Adobe altered how color correction can be handled within its editing application. The addition of the Lumetri Color effect puts a very powerful and intuitive color correction tool at the editor’s fingertips. I touched on some of its capabilities with SpeedGrade look files in a previous post, but now I’d like to dive into a deeper explanation of the features of Lumetri Color.
Previously in Premiere Pro CC 2014, the Lumetri effect was the conduit between grades in SpeedGrade and Premiere Pro. When you sent a sequence to SpeedGrade CC via Direct Link, the correction done there would show up back in Premiere Pro CC as a self-contained Lumetri effect applied to the clip or an adjustment layer. You could add more effects to the clip, but not edit the Lumetri effect itself in Premiere Pro. If you bounced back into SpeedGrade, then you had further edit control to change the settings from the earlier SpeedGrade session.
Now in Premiere Pro CC 2015, that previous method has been altered. When a Lumetri Color effect is added in the Premiere Pro CC timeline, that is no longer editable when you send it to SpeedGrade CC via Direct Link. Any grading added in SpeedGrade is in addition to the Lumetri Color effect. When you go back to Premiere Pro, those corrections will show up as a SpeedGrade Custom group at the bottom of the Lumetri Color effect stack. It is a separate, self-contained, uneditable correction applied to the clip. It can only be disabled if desired. In other words, Lumetri Color adjustments made in Premiere Pro are separate and apart from any color corrections done in SpeedGrade.
You can apply a Lumetri Color effect in two ways. The first, traditional way is to drag-and-drop the filter from the Effects palette (Color Correction folder) onto the clip or adjustment layer. The new, CC 2015 way is to select the Color workspace, which automatically reveals the Lumetri Color panel and the new, real-time Lumetri scopes. If you change any setting in the panel, it immediately applies a Lumetri Color effect to that clip. Color corrections can be made either in the Lumetri panel or in the standard Effects Control panel. If you don’t like the Lumetri Color effect or panel, you can still use the other color correction filters, like the Three-Way Color Corrector, Luma Curve, etc. These options have not been removed. (Click on any image for an expanded view.)
Master Clip Effects
 Since CC 2014, Premiere Pro has enabled Master Clip effects. These are source-side settings and any change made as a Master Clip effect will affect all instances of that clip throughout the timeline. This is important with camera raw files, like CinemaDNG or REDCODE raw, because there are color metadata adjustments that can be made at the point where the raw image is encoded into RGB video. This is in addition to any color corrections made in the Lumetri Color panel, another filter, or in SpeedGrade. Previously these controls were accessed as a right-click contextual menu option called Source Settings.
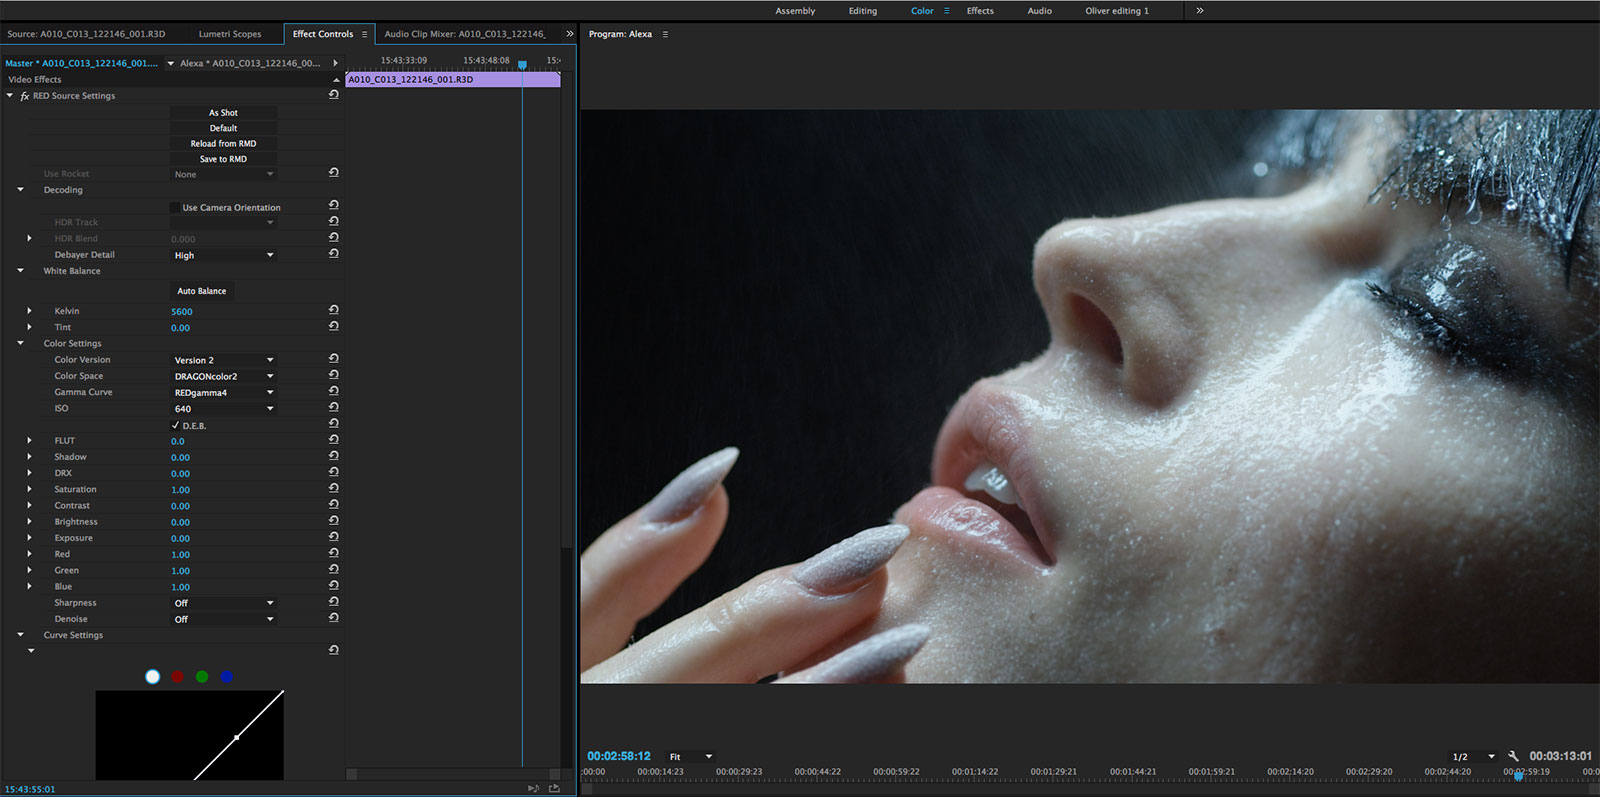
With CC 2015, source setting adjustments have been moved to the Effects Control panel. At the top of the panel you’ll see the clip name appear twice – once as the master clip (left) and once in the sequence (right). The sequence portion has all the usual controls, like motion, opacity, time remapping, and any applied filters. The master clip portion will show all the source color controls. In the case of RED files, you’ll find the full range of RED controls made available from their SDK. For CinemaDNG files, such as from Blackmagic cameras, the options are limited to exposure, temperature and tint. You should make any necessary camera raw adjustments to these clips here, before applying Lumetri Color effects.
In addition to raw adjustments, Lumetri Color effects can also be applied as Master Clip effects and/or as timeline effects. The Lumetri Color panel also displays the clip name twice – master clip (left) and sequence clip (right). Generally you are going to make your corrections to sequence clips, however, some common settings, like adding a Log-to-Rec709 LUT might be best done as a Master Clip effect. Just understand that adjustments in the Lumetri Color panel can be applied to either or both sides, but that Master Clip effects will automatically ripple to other instances of that same clip elsewhere on the timeline. When you make changes to the sequence side (right), you are only altering that one location on the timeline.
The Lumetri Color Panel
 The Lumetri Color panel is organized as a stack of five control groups – Basic Correction, Creative, Curves, Color Wheels and Vignette. The controls within each group are revealed when you click on that section. You can enable or disable a group, but you can’t change the order of the stack, which flows from Basic out through Vignette. This control method and the types of controls offered are very similar to Adobe Lightroom’s Develop page. Its control groups include Basic, Tone Curve, HSL/Color/B&W, Split Toning, Detail, Lens Corrections, Effects and Camera Calibration. There are more groups in Lightroom simply because there are more image attributes available to be adjusted within a still photo image.
Basic Correction
 The Basic Correction group is where you’ll perform the majority of your primary color grading. It includes a pulldown for input LUTs (camera-specific color transforms), white balance, tone and saturation. White balance adjusts temperature and tint. When you move the temperature slider it increases or decreases red versus blue in an inverse relationship of one to the other, with minimal change of green. Sliding tint alters red and blue together versus green.
Tone gives you control over the luminance of the image with sliders for exposure, contrast, highlights, shadows, whites and blacks. White and black controls move the top and bottom ends of the image up or down toward clip points, while the highlight and shadow sliders adjust the upper and lower portions of the image within the parameters set by the white and black sliders. The highlight and shadow sliders would be what you use to see more or less detail within the bright or dark areas of the image.
Creative
 The Creative group is where stylistic adjustments are made, including the addition of creative “looks” (.look or .cube LUTs). There are sliders for the intensity of the LUT, plus adjustment controls for a faded film effect, sharpening, vibrance and saturation. Finally, there are shadow and highlight tint controls with a balance slider to change the crossover threshold between them.
The faded film slider moves the black level you’ve established for the image higher for elevated blacks, but without opening any shadow detail. If you slide the control more to the right it will also compress the highlights, thus creating an overall flatter image. The sharpen slider blurs or enhanced detail in the image. Saturation uniformly increases the intensity of all chroma. Vibrance is a smart tool that increases the saturation of the more muted colors and has less change on the already-intense colors. The highlight and shadow tint controls shift the color balance of those portions of the image towards any area on the color wheel. The tint balance slider changes how much much of the image is considered to be the shadow or highlight range. For example, if you move the slider all the way to the left, then all of the image is affected by the highlight tint wheel only.
Curves
 The Curves group includes both standard RGB curves and a color wheel for control of the hue/saturation curve. The RGB curves offer four dots – white (overall control), plus red, green and blue for individual control over each of the R, G or B curves. The hue/sat curve is really a vector-based secondary color control and is akin to Lightroom’s HSL group. However, in the Lumetri Color panel a wheel control is used.
If you select one of the six color vector dots under the hue/sat curve wheel, then three control points are added along the circular curve. The center point is the color chosen and the points to the left and right establish a boundary. Pull the center point up or down to increase or decrease the saturation of the curve. Pulling the point left or right doesn’t change the hue of that color. The wheel works like a “hue vs. sat” curve and not as “hue vs. hue” when you compare it to the way in which other color correction tools operate. If I select red, I can increase or decrease the intensity of red, but pulling the control point towards orange or magenta doesn’t shift the red within the image itself towards that hue. You can also select one or more points along the curve without selecting a vector color first and make more extensive adjustments to the image.
Color Wheels
 Color Wheels is the next control group and it functions as an standard three-way corrector would. There are luma sliders and a color wheel for shadows, midtones and highlights. Moving the color wheel control effectively adds a color wash to that portion of the image instead of shifting the color balance. If you shift a wheel towards blue, the blue portion of the parade signal on a scope is increased, but red and green are not lowered in a corresponding fashion. Therefore, these wheels act as secondary color controls, which explains why Adobe placed them further down in the stack.
Vignette
 The last group is Vignette and it works in much the same fashion as the Post-Crop Vignetting control in Lightroom. There are sliders for amount, midpoint, roundness and feather. In general, it acts more like a photographic vignette or one that’s a result of a lens artifact – and less like masks that you typically add in creative grading for vignette effects. Moving the amount slider controls the lightness or darkness of the vignette (yes, you can have a white vignette), but it only changes the outer edges of the frame. You cannot invert the effect. Midpoint moves the vignette edge farther into or out of the frame. Roundness adjusts the aspect ratio of the vignette and feather controls the softness of the edge.
There is no position control to move the vignette away from dead center. While the vignette group is useful for “pinching in the edges of the frame” (as a DP friend of mine is fond of saying), it’s less useful for directing the viewer’s attention. That’s the “power windows” approach, which I often use in tools like Resolve, Color, or SpeedGrade. There are other ways to achieve that inside of Premiere Pro, but just not self-contained within a single instance of the Lumetri Color effect.
It’s clear that Adobe has added a very deep toolset within this single effect and its corresponding control panel. For most color correction sessions, you can pretty well get everything done using just Lumetri Color. I believe most editors prefer to use a comprehensive grading tool that allows them to stay within the confines of the editing application. Lumetri Color within Premiere Pro CC 2015 brings that wish to reality without the need for roundtrips or third-party color correction filters.
©2015 Oliver Peters
