Kirk Baxter, ACE on editing Mank

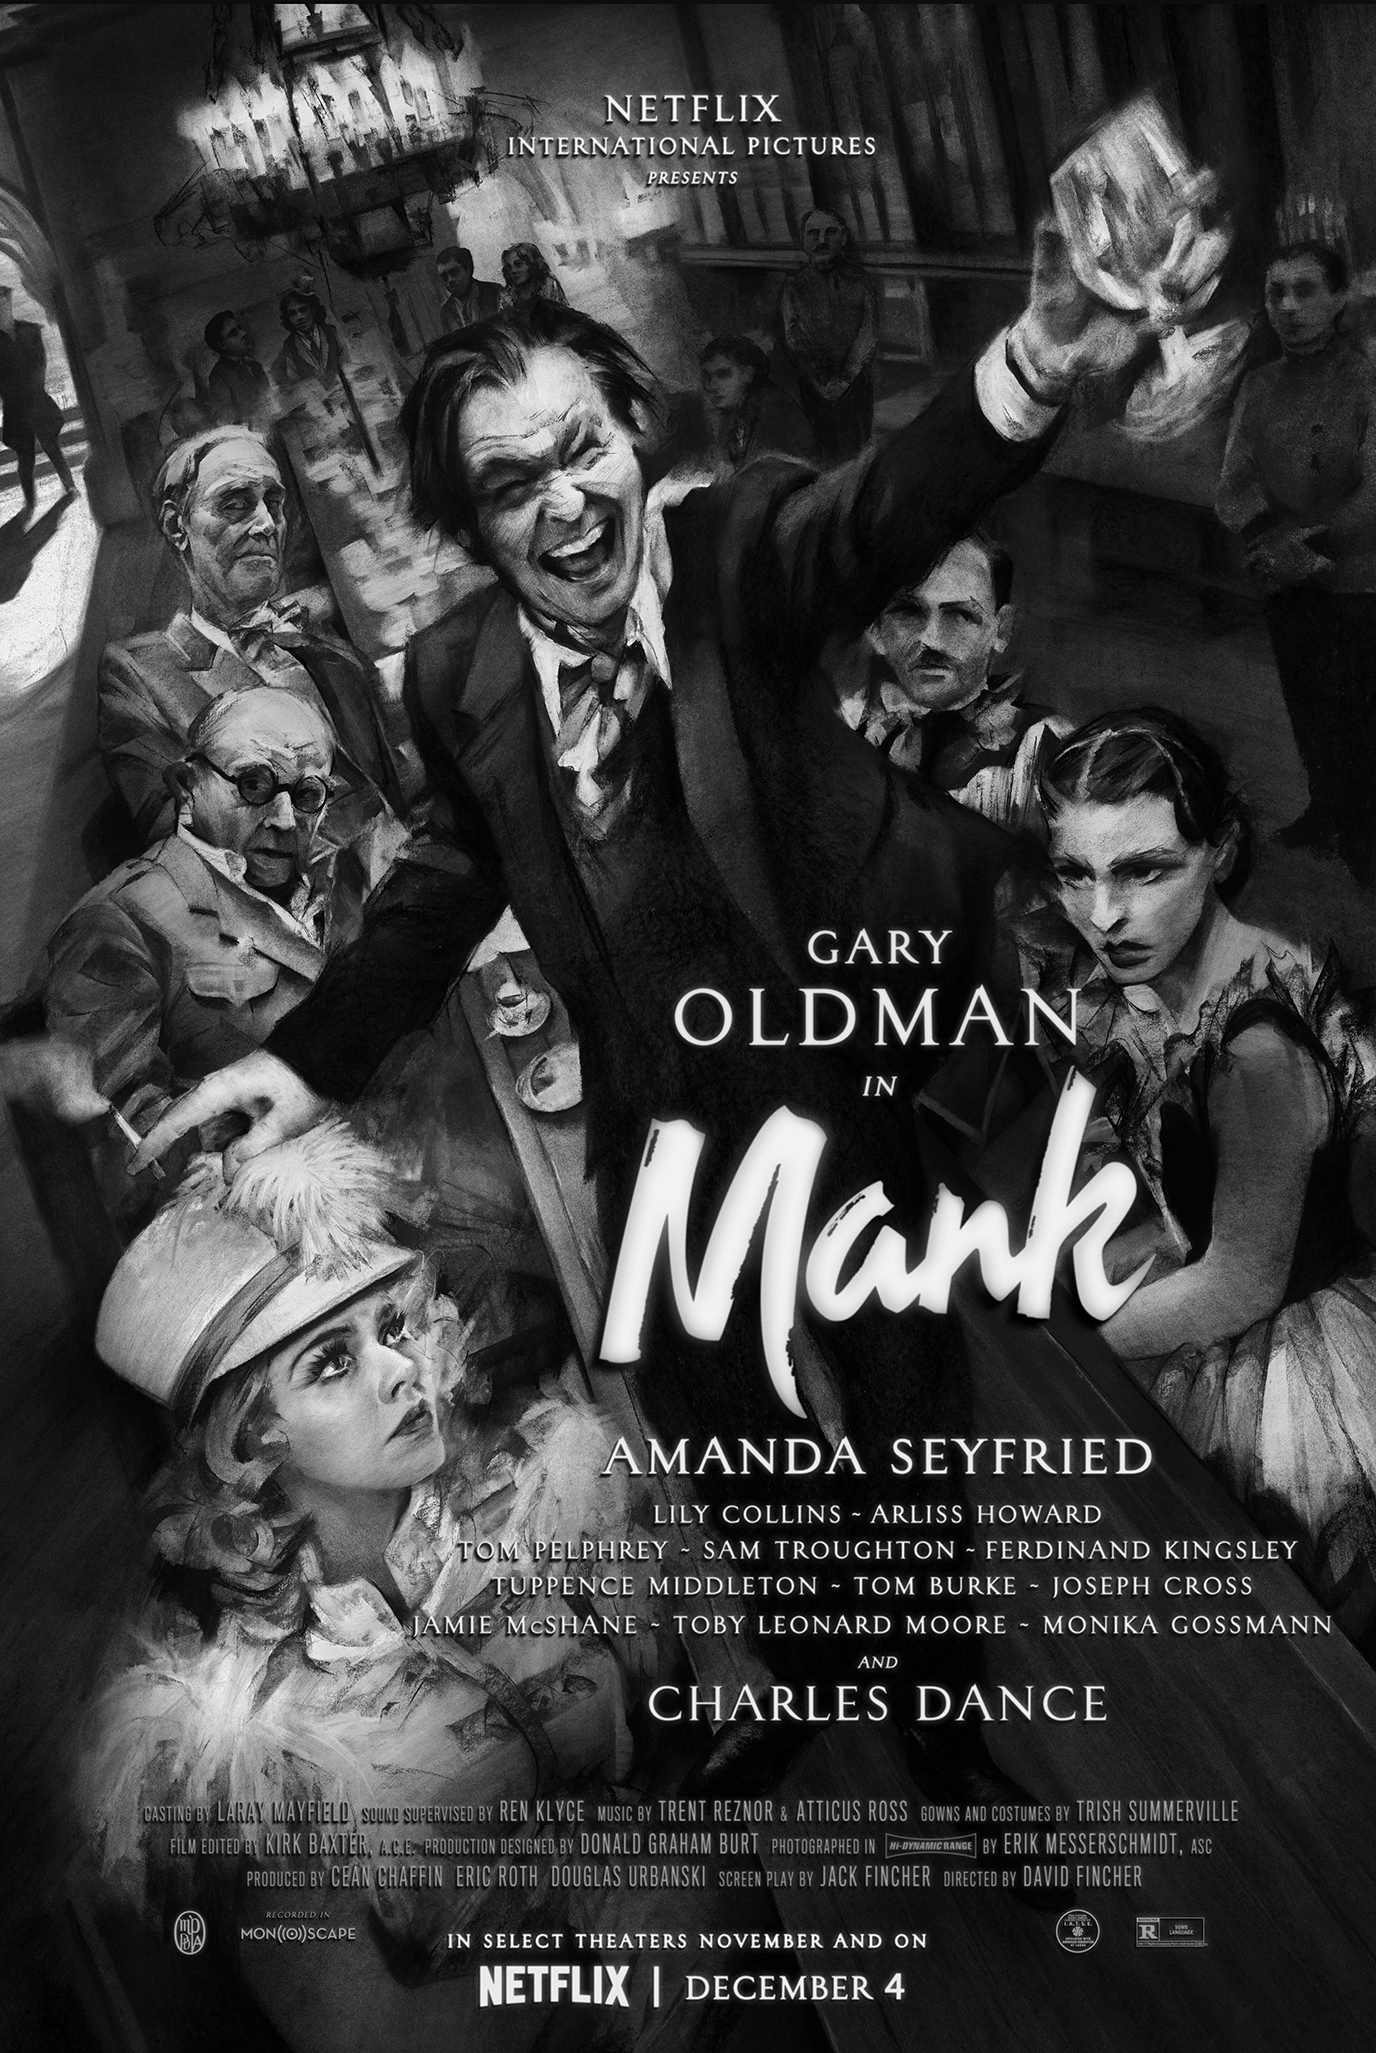
Mank, David Fincher’s eleventh film, chronicles Herman Mankiewicz (portrayed by Gary Oldman) during the writing of the film classic, Citizen Kane. Mankiewicz, known as Mank, was a witty New York journalist and playwright who moved to Los Angles in the 1930s to become a screenwriter. He wrote or co-wrote about 40 films, often uncredited, including the first draft of The Wizard of Oz. Together with Orson Welles, he won an Academy Award for the screenplay of Citizen Kane. It’s long been disputed whether or not he, rather than Welles, actually did the bulk of the work on the screenplay. 

The script for Mank was penned decades ago by David Fincher’s father, Jack Fincher, and was finally brought to the screen thanks to Netflix this past year. Fincher deftly blends two parallel storylines: Mankiewicz’ writing of Kane during his convalescence from an accident – and his earlier Hollywood experiences with the studios, as told through flashbacks. These experiences, including his acquaintance with William Randolph Hearst – the media mogul of his time and the basis for Charles Foster Kane in Citizen Kane – inspired Mankiewicz’ script. This earlier period is infused with the political undercurrent of the Great Depression and the California gubernatorial race between Upton Sinclair and Frank Merriam.

David Fincher and director of photography Erik Messerschmidt, ASC (Mindhunter) used many techniques to pay homage to the look of Citizen Kane and other classic films of the era, including shooting in true black-and-white with RED Monstro 8K Monochrome cameras and Leica Summilux lenses. Fincher also tapped other frequent collaborators, including Trent Reznor and Atticus Ross for a moving, vintage score, and Oscar-winning editor, Kirk Baxter, ACE. I recently caught up with Baxter to discuss Mank, the fourth film he’s edited for David Fincher.

***

Citizen Kane is the 800 pound gorilla. Had you seen that film before this or was it research for the project?

I get so nervous about this topic, because with cinephiles, it’s almost like talking about religion. I had seen Citizen Kane when I was younger, but I was too young to appreciate it. I was growing up on Star Wars, Indiana Jones, and Conan the Barbarian. Then advancing my tastes to the Godfather films and French Connection. Citizen Kane is still just such a departure from all of that. I was kind of like, “What?” That was probably in my late teens.

I went back and watched it again before the shoot after reading the screenplay. There were certain technical aspects to the film that I thought were incredible. I loved the way OrsonWelles chose to leave his scenes by turning off lights like it was in the theater. There was this sort of slow decay and I enjoy how David picked up on that and took it into Mank. Each time one of those shots came up in the bungalow scenes, I thought it was fantastic.

Overall, I don’t consider myself any sort of expert on 1930s and 1940s movie-making and I didn’t make a conscious effort to try to replicate any styles. I approached the work in the same way I do with all of David’s work – by being reactionary to the material and the coverage that he shot. In regard to how close David took the stylings, well, that was more his tight rope walk. So, I felt no shackling to slow down an edit pace or stay in masters or stay in 50-50s as might have been common in the genre. I used all the tools at my disposal to exploit every scene the best I could. 

Since you are cutting while the shooting goes on, do you have the ability to ask for coverage that you might feel is missing? 

I think a little bit of that goes on, but it’s not me telling Fincher what’s required. It’s me building assemblies and giving them to David as he’s going and he will assess where he’s short and where he’s not. I’ve read many editor interviews over the years and I’ve always kind of gone, “huh,” when someone’s projecting they’re in the control seat. When you’re with someone with the ability that Fincher has, then I’m in a support position of helping him make his movie as best he can. Any other way of looking at it is delusional. But, I take a lot of pride in where I do get to contribute. 

Mank is a different style of film than Fincher’s previous projects. Did that change the workflow or add any extra pressure? 

I don’t think it did for me. I think it was harder for David. The film was in his head for so many decades and there were a couple of attempts to make it happen. Obviously a lot changes in that time frame. So, I think he had a lot of internal pressure about what he was making. For me, I found the entire process to be really buoyant and bubbly and just downright fun. 

As with all films, there were moments when it was hard to keep up during the shoot. And definitely moments coming down to that final crunch. That’s when I really put a lot of pressure on myself to deliver cut scenes to David to help him. I felt the pressure of that, but my main memory of it really was one of joy. Not that the other movies aren’t, but I think sometimes the subject matter can control the mood of the day. For instance, in other movies, like Dragon Tattoo, the feeling was a bit like your head in a vise when I look back at it.

Sure. Dragoon Tattoo is dark subject matter. On the other hand, Gary Oldman’s portrayal of Mankiewicz really lights up the screen. It certainly looks like he’s having fun with the character. 

Right. I loved all the bungalow scenes. I thought there was so much warmth in those. And I had so much compassion for the lead character, Mank. Those scenes really made me adore him. But also when the flashback scenes came, they’re just a hoot and great fun to put together. There was this warmth and playfulness of the two different opposing storylines. No matter which one turned up, I was happy to see it. 

Was the inter-cutting of those parallel storylines the way it was scripted? Or was that a construction in post? 

Yes, it was scripted that way. There was a little bit of pulling at the thread later. Can we improve on this? There was a bit of reshuffling later on and then working out that ‘as written’ was the best path. We certainly kicked the tires a few times. After we put the blueprint together, mostly the job became tightening and shortening. 

Obviously one of the technical differences was that this film was a true black-and-white film shot with modified, monochrome RED cameras. So not color and then changed to black-and-white in the grade. Did that impact your thinking in how to tackle the edit?

For the first ten minutes. At first you sit down and you go, “Oh, we work in black and white.” And then you get used to it very quickly. I forwarded the trailer when it was released to my mother in Australia. She texted back, “It’s black and white????” [laugh] You’ve got to love family!

Black-and-white has a unique look, but I know that other films, like Roma, were shot in color to satisfy some international distribution requirements. 

That’s never going to happen with someone like David. I can’t picture who that person would be that would tell him with any authority that his movie requires color. 

Of course, it matches films of the era and more importantly Citizen Kane. It does bring an intentional, stylistic treatment to the content. 

Black-and-white has got a great way of focusing your attention and focusing your eye. There’s a discipline that’s required with how shots are framed and how you’re using the images for eye travel. But I think all of David work comes with that discipline anyway. So to me, it didn’t alter it. He’s already in that ballpark.

In terms of recreating the era, I’ve seen a few articles and comments about creating the backgrounds and sets using visual effects, but also classic techniques, like rear projection. What about the effects in Mank

As in most of David’s movies, it’s everywhere and a lot of the time it looks invisible, but things are being replaced. I don’t have a ratio for it, but I’d say almost half the movie. We’ve got a team that’s stabilizing shots as we’re going. We’ve got an in-house visual effects team that is building effects, just to let us know that certain choices can be made. The split screen thing is constant, but I’ll do a lot of that myself. I’ll do a fairly haphazard job of it and then pass it on for our assistant editors to follow up on. Even the montage kaleidoscope effect was all done in-house down the hall by Christopher Doulgeris, one of our VFX artists. A lot of it’s farmed out, but a fair slice is done under the roof. 

Please tell me a bit about working with Adobe Premiere Pro again to cut this film.

It’s best for me not even to attempt to answer technical questions. I don’t mind exposing myself as a luddite. My first assistant editor, Ben Insler, set it up so that I’m able to move the way I want to move. For me, it’s all muscle memory. I’m hitting the same keystrokes that I was hitting back when we were using Avid. Then I crossed those keys over to Final Cut and then over to Premiere Pro. 

In previous versions, Premiere Pro required projects to contain copies of all the media used in that project.  As you would hand the scene off to other people to work on in parallel, all the media would travel into that new project, and the same was true when combining projects back together to merge your work.  You had monstrously huge projects with every piece of media, and frequently duplicate copies of that media, packed into them. They often took 15 minutes to open. Now Adobe has solved that and streamlined the process. They knew it was a massive overhaul, but I think that’s been completely solved. Because it’s functioning, I can now purely concentrate on the thought process of where I’m going in the edit. I’m spoiled with having very technical people around me so that I can exist as a child. [laugh]

How was the color grade handled?

We had Eric Weidt working downstairs at Fincher’s place on Baselight. David is really fortunate that he’s not working in this world of “Here’s three weeks for color. Go into this room each day and where you come out is where you are at.” There’s an ongoing grade that’s occurring in increments and traveling with the job that we’re doing. It’s  updated and brought into the cut. We experience editing with it and then it’s updated again and brought back into the cut. So it’s this constant progression. 

Let’s talk about project organization. You’ve told me in the past that your method of organizing a selects reel was to string out shots in the order of wide shots, mediums, close ups, and so on. And then bump up the ones you like. Finally, you’d reduce the choices before those were presented to David as possible selects. Did you handle it the same way on Mank?

Over time, I’ve streamlined that further. I’ve found that if I send something that’s too long while he’s in the middle of shooting that he might watch the first two minutes of it, give me a couple of notes of what he likes and what he doesn’t like, and move on. So, I’ve started to really reduce what I send. It’s more cut scenes with some choices. That way I get the most relevant information and can move  forward.

With scenes that are extremely dense, like Louis B. Mayer’s birthday party at Hearst’s, it really is an endless multiple choice of how to tackle it. I’ll often present a few paths. Here’s what it is if I really hold out these wides at the front and I hang back for a bit longer. Here’s what it is if I stay more with Gary [Oldmam] listening. It’s not that this take is better than the other take, but more options featuring different avenues and ways to tell the story. 

I like working that way, even if it wasn’t for the sake of presenting it to David. I can’t watch a scene that’s that dense and go, “Oh, I know what to do.” I wouldn’t have a clue. I like to explore it. I’ve got to turn the soil and snuff the truffles and try it all out. And then the answers present themselves. It all just becomes clear. Unfortunately, the world of the editor, regardless of past experiences, is always destined to be filled with labor. There is no shortcut to doing it properly.

With large-scale theatrical distribution out of the question – and the shift to Netflix streaming as the prime focus – did the nature of studio notes change at all? 

David’s generous about thought and opinion, if it’s constructive and helpful.  He’s got a long history of forwarding those notes to me and exploring them. I’m not positive if I get all of them. Anything that’s got merit will reach me, which is wise. Having spent so many years in the commercial world, there’s a part of me that’s always a little eager to solve a puzzle. If I’m delivered a pile of notes, good or bad, I’m going to try my best to execute them.  So, David is wise to just not let me see the bad ones.

Were you able to finish Mank before the virus-related lockdowns started? Did you have to move to a remote workflow? 

The shooting had finished and we already had the film assembled. I work at a furious rate whilst David’s shooting, so that we can interface during the shoot. That way he knows what he’s captured, what he needs, and he can move on and strike sets, release actors, etc. There’s this constant back and forth.

At the point when he stops shooting, we’re pretty far along in terms of replicating the original plan, the blueprint. Then it’s what I call the sweeps, where you go back to the top and you just start sweeping through the movie, improving it. I think we’d already done one of those when we went remote. So, it was very fortunate timing.

We’re quite used to it. During shooting, we work in a remote way anyway. It’s a language and situation that we’re completely used to. I think from David’s perspective, it didn’t change anything. 

If the timing had been different and you would have had to handle all of the edit under remote conditions, would anything change? Or would you approach it the same way? 

Exactly the same. It wouldn’t have changed the amount of time that I get directly with David. I don’t want to give the impression that I cut this movie and David was on the sidelines. He’s absolutely involved, but pops in and out and looks at things that are made. He’s not a director that sits there the whole time. A lot of it is, “I’ve made this cut, let’s watch it together. I’ve done these selects, let’s watch them together.” It’s really possible to do that remotely. 

I prefer to be with David when he’s shooting and especially in this one that he shot in Los Angeles. I really tried to have one day a week where we got to be together on the weekends and his world quieted down. David loves that. I would sort of construct my week’s thinking towards that goal. If on a Wednesday I had six scenes that were backed up, I’d sort of think to myself, “What can I achieve in the time frame before David’s with me on Saturday? Should I just select all these scenes and then we’ll go through the selects together? Or should I tackle this hardest one and get a good cut of that going?”

A lot of the time I would choose – if he was coming in and had the time to watch things – to do selects. Sometimes we could bounce through them just from having a conversation of what his intent was and the things that he was excited about when he was capturing them. With that, I’m good to go. Then I don’t need David for another week or so. We were down to the short hand of one sentence, one email, one text. That can inform me with all the fuel I need to drive cross-country. 

The film’s back story clearly has political overtones that have an eerie similarity to 2020. I realize the script was written a while back at a different time, but was some of that context added in light of recent events? 

That was already there. But, it really felt like we are reliving this now. In the beginning of the shutdown, you didn’t quite know where it was going to go. The parallels to the Great Depression were extreme. There were a lot of lessons for me.

The character of Louis B. Mayer slashes all of his studio employees’ salaries to 50 percent. He promises to give every penny back and then doesn’t do it. I was crafting that villain’s performance, but at the same time I run a company [Exile Edit] that has a lot of employees in Los Angeles and New York. We had no clue if we would be able to get through the pandemic at the time when it hit. We also asked staff to take a pay cut, so that we could keep everyone employed and keep everybody on health insurance. But the moment we realized we could get through it six months later, there was no way I could ever be that villain. We returned every cent. 

I think most companies are set up to be able to exist for four months. If everything stops dead – no one’s anticipating that – the 12-month brake pull. It was really, really frightening. I would hope that I would think this way anyway, but with crafting that villain’s performance, there was no way I was going to replicate it.

***

Mank was released in select theaters in November and launched on Netflix December 4, 2020.

Be sure to check out Steve Hullfish’s podcast interview with Kirk Baxter.

This article originally written for postPerspective.

©2021 Oliver Peters

Mindhunter

The investigation of crime is a film topic with which David Fincher is very familiar. He returns to this genre in the new Netflix series, Mindhunter, which is executive produced by Fincher and Charlize Theron. The series is the story of the FBI’s Behavioral Science Unit and how it became an elite profiling team, known for investigating serial criminals. The TV series is based on the nonfiction book Mind Hunter: Inside the FBI’s Elite Serial Crime Unit, co-written by Mark Olshaker and John Douglas, a former agent in the unit who spent 25 years with the FBI. Agent Douglas interviewed scores of serial killers, including Charles Manson, Ted Bundy, and Ed Gein, who dressed himself in his victims’ skin. The lead character in the series, Holden Ford (played by Jonathan Groff) is based on Douglas. The series takes place in 1979 and centers on two FBI agents, who were among the first to interview imprisoned serial killers in order to learn how they think and apply that to other crimes. Mindhunter is about the origins of modern day criminal profiling.

As with other Fincher projects, he brought in much of the team that’s been with him through the various feature films, like Gone Girl, The Girl with the Dragon Tattoo, and Zodiac. It has also given a number in the team the opportunity to move up in their careers. I recently spoke with Tyler Nelson, one of the four series editors, who was given the opportunity to move from the assistant chair to that of a primary editor. Nelson explains, “I’ve been working with David Fincher for nearly 11 years, starting with The Curious Case of Benjamin Button. I started on that as an apprentice, but was bumped up to an assistant editor midway through. There was actually another series in the works for HBO called Videosyncrasy, which I was going to edit on. But that didn’t make it to air. So I’m glad that everyone had the faith in me to let me edit on this series. I cut the four episodes directed by Andrew Douglas and Asif Kapadia, while Kirk Baxter [editor on Gone Girl, The Girl with the Dragon Tattoo, The Social Network] cut the four shows that David directed.”

Pushing the technology envelope

The Fincher post operation has a long history of trying new and innovative techniques, including their selection of editing tools. The editors cut this series using Adobe Premiere Pro CC. Nelson and the other editors are no stranger to Premiere Pro, since Baxter had cut Gone Girl with it. Nelson says, “Of course, Kirk and I have been using it for years. One of the editors, Byron Smith, came over from House of Cards, which was being cut on [Apple] Final Cut Pro 7. So that was an easy transition for him. We are all fans of Adobe’s approach to the entertainment industry and were onboard with using it. In fact, we were running on beta software, which gave us the ability to offer feedback to Adobe on features that will hopefully make it into released products and benefit all Premiere users.”

Pushing the envelope is also a factor on the production side. The series was shot with custom versions of the RED Weapon camera. Shots were recorded at 6K resolution, but framed for a 5K extraction, leaving a lot of “padding” around the edges. This allowed room for reposition and stabilization, which is done a lot on Fincher’s projects. In fact, nearly all of the moving footage is stabilized. All camera footage is processed into EXR image sequences in addition to ProRes editing files for “offline” editing. These ProRes files also get an added camera LUT so everyone sees a good representation of the color correction during the editing process. One change from past projects was to bring color correction in-house. The final grade was handled by Eric Weidt on a FilmLight Baselight X unit, which was sourcing from the EXR files. The final Netflix deliverables are 4K/HDR masters. Pushing a lot of data through a facility requires robust hardware systems. The editors used 2013 (“trash can”) Mac Pros connected to an Open Drives shared storage system. This high-end storage system was initially developed as part of the Gone Girl workflow and uses storage modules populated with all SSD drives.

The feature film approach

Unlike most TV series, where there’s a definite schedule to deliver a new episode each week, Netflix releases all of their shows at once, which changes the dynamic of how episodes are handled in post. Nelson continues, “We were able to treat this like one long feature film. In essence, each episode is like a reel of a film. There are 10 episodes and each is 45 minutes to an hour long. We worked it as if it was an eight-and-a-half to nine hour long movie.” Skywalker Sound did all the sound post after a cut was locked. Nelson adds, “Most of the time we handed off locked cuts, but sometimes when you hear the cleaned up sound, it can highlight issues with the edit that you didn’t notice before. In some cases, we were able to go back into the edit and make some minor tweaks to make it flow better.”

As Adobe moves more into the world of dialogue-driven entertainment, a number of developers are coming up with speech-to-text solutions that are compatible with Premiere Pro. This potentially provides editors a function similar to Avid’s ScriptSync. Would something like this have been beneficial on Mindhunter, a series based on extended interviews? Nelson replies, “I like to work with the application the way it is. I try not to get too dependent on any feature that’s very specific or unique to only one piece of software. I don’t even customize my keyboard settings too much, just so it’s easier to move from one workstation to another that way. I like to work from sequences, so I don’t need a special layout for the bins or anything like that.”

“On Mindhunter we used the same ‘KEM roll’ system as on the films, which is a process that Kirk Baxter and Angus Wall [editor on Zodiac, The Curious Case of Benjamin Button, The Social Network] prefer to work in,” Nelson continues. “All of the coverage for each scene set-up is broken up into ‘story beats’. In a 10 minute take for an interview, there might be 40 ‘beats’. These are all edited in the order of last take to first take, with any ‘starred’ takes at the head of the sequence. This way you will see all of the coverage, takes, and angles for a ‘beat’ before moving on to the group for the next ‘beat’. As you review the sequence, the really good sections of clips are moved up to video track two on the sequence. Then create a new sequence organized in story order from these selected clips and start building the scene. At any given time you can go back to the earlier sequences if the director asks to see something different than what’s in your scene cut. This method works with any NLE, so you don’t become locked into one and only one software tool.”

“Where Adobe’s approach is very helpful to us is with linked After Effects compositions,” explains Nelson. “We do a lot of invisible split screen effects and shot stabilization. Those clips are all put into After Effects comps using Dynamic Link, so that an assistant can go into After Effects and do the work. When it’s done, the completed comp just pops back into the timeline. Then ‘render and replace’ for smooth playback.”

The challenge

Certainly a series like this can be challenging for any editor, but how did Nelson take to it? He answers, “I found every interview scene to be challenging. You have an eight to 10 minute interview that needs to be interesting and compelling. Sometimes it takes two days to just get through looking at the footage for a scene like that. You start with ‘How am I going to do this?’ Somewhere along the line you get to the point where ‘This is totally working.’ And you don’t always know how you got to that point. It takes a long time approaching the footage in different ways until you can flesh it out. I really hope people enjoy the series. These are dramatizations, but real people actually did these terrible things. Certainly that creeps me out, but I really love this show and I hope people will see the craftsmanship that’s gone into Mindhunter and enjoy the series.”

In closing, Nelson offered these additional thoughts. “I’d gotten an education each and every day. Lots of editors haven’t figured it out until well into a long career. I’ve learned a lot being closer to the creative process. I’ve worked with David Fincher for almost 11 years. You think you are ready to edit, but it’s still a challenge. Many folks don’t get an opportunity like this and I don’t take that lightly. Everything that I’ve learned working with David has given me the tools and I feel fortunate that the producers had the confidence in me to let me cut on this amazing show.”

Click here for Steve Hullfish’s Art of the Cut interview with Tyler Nelson and Kirk Baxter.

Click here for Scott Simmons’ interview from NAB 2018.

Originally written for Digital Video magazine / Creative Planet Network

©2017 Oliver Peters

Film Editor Techniques

df2416_filmedit_sm

Editing is a craft that each editor approaches with similarities and differences in style and technique. If you follow my editor interviews or those at Steve Hullfish’s Art of the Cut series, then you know that most of the top editors are more than willing to share how they do things. This post will go through a “baker’s dozen” set of tips and techniques that hopefully will help your next, large project go just a bit more smoothly.

Transcoding media. While editing with native media straight from the camera is all the rage in the NLE world, it’s the worst way to work on long-term projects. Camera formats vary in how files are named, what the playback load is on the computer, and so on. It’s best to create a common master format for all the media in your project. If you have really large files, like 4K camera media, you might also transcode editing proxies. Cut with these and then flip to the master quality files when it comes time to finish.

Transcode audio. In addition to working with common media formats, it’s a good practice to get all of your audio into a proper format. Most NLEs can deal with a mix of audio formats, bit depths and sample rates, but that doesn’t mean you should. It’s quite common to get VO and temp music as MP3 files with 44.1kHz sampling. Even though your NLE may work with this just fine, it can cause problems with sync and during audio post later. Before you start working with audio in your project, transcode it to .wav of .aif formats with 48kHz sampling and 16-bit or 24-bit bit-depth. Higher sampling rates and bit-depths are OK if your NLE can handle them, but they should be multiples of these values.

Break up your project files by reel. Most films are broken down into 20 minute “reels”. Typically a feature will have five or six reels that make up the entire film. This is an old-school approach that goes back to the film day, yet, it’s still a good way to work in the modern digital era. How this is done differs by NLE brand.

With Media Composer, the root data file is the bin. Therefore, each film reel would be a separate timeline, quite possibly placed into a separate bin. This facilitates collaboration among editors and assistants using different systems, but still accessing the same project file. Final Cut Pro X and Premiere Pro CC don’t work this way. You cannot share the exact same FCPX library or Premiere Pro project file between two editors at one time.

In Final Cut Pro X, the library file is the basic data file/container, so each reel would be in its own library with a separate master library that contains only the final edited sequence for each of the reels. Since FCPX editors can open multiple libraries, it’s possible to work across reels this way or to have different editors open and work on different libraries independent of each other.

With Premiere you can only have a single project file open at one time. When a film is broken into one reel per project, it becomes easy for editors and assistants to work collaboratively. Then a master project can be created to import the final version of each reel’s timeline to create the combined film timeline. Media Browser within Premiere Pro should be used to access sequences from within other project files and import them into a new project.

Show/hide, sifting and sorting. Each NLE has its own way of displaying or hiding clips and subclips. Learning how to use these controls will help you speed up the organization of the media. Final Cut Pro X has a sophisticated method of assigning “favorites” and “rejects” to clips and ranges within clips. You can also assign keywords. By selecting what to see and to hide, it’s easy to cull a mass of footage into the few, best options. Likewise with Media Composer and Premiere Pro, you can show and hide clips and also sort by custom column criteria. Media Composer includes a custom sift feature, which is a filtering solution within the bin. It is easy to sift a bin by specific data in certain columns. Doing so hides everything else and reveals only the matching set of media on a per-bin basis.

Stringouts. A stringout is a sequence of selected footage. Many editors use stringouts as the starting point and then whittle down the scene from there. For example, Kirk Baxter likes his assistants to create a stringout for a dialogue scene that is broken down by line and camera. For each line of dialogue, you would see every take and camera angle covering that line of dialogue from wide to tight. Then the next line of dialogue and so on. The result is a very long sequence for the scene, but he can quickly assess the performance and best angle for each portion of the scene. Then he goes through and picks his favorites by pushing the video clip up one track for quick identification. The assistant then cleans up the stringout by creating a second version containing only these selected clips. Now the real cutting can begin.

Julian Clarke has his assistants create a similar stringout for action scenes. All takes and angles are organized back-to-back matching the choreography of the action. So – every angle/take for each crash or blast or punch within the scene. From these he has a clear idea of coverage and how to proceed cutting the scene, which otherwise might have an overwhelming amount of footage at first glance.

I use stringouts a lot for interview-driven documentaries. One sequence per person with everything. The second and third stringouts are successive cutdowns from that initial all-inclusive stringout. At this stage I start combining portions of sequences based on topics for a second round of stringouts. These will get duplicated and then culled, trimmed and rearranged as I refine the story.

Pancakes and using sequences as sources. When you use stringouts, it’s common to have one sequence become the source for another sequence. There are ways to handle this depending on your NLE. Many will nest the source sequence as a single clip on the new timeline. I contend that nesting should be avoided. Media Composer only allows one sequence in the “record” window to be active at any one time (no tabbed timeline). However, you can also drag a sequence to the source window and its tracks and clips can be viewed by toggling the timeline display between source and record. At least this way you can mark ins and outs for sections. Both Final Cut Pro “legacy” and Premiere Pro enable several sequences to be loaded into the timeline window where they are accessible through tabs. Final Cut Pro X dropped this feature, replacing it with a timeline history button to step forward or backward through several loaded sequences. To go between these sequences in all three apps, using copy-and-paste functions are typically the best way to bring clips from one sequence into another.

One innovative approach is the so-called “pancake” timeline, popularized by editor/blogger Vashi Nedomansky. Premiere Pro permits you to stack two or more timelines into separate panels. The selected sequence becomes active in the viewer at any given time. By dragging between timeline panels, it is possible to edit from one sequence to another. This is a very quick and efficient way to edit from a longer stringout of selects to a shorting one with culled choices.

Scene wall. Walter Murch has become synonymous with the scene wall, but in fact, many editors use this technique. In a scene wall, a series of index cards for each scene is placed in story order on a wall or bulletin board. This provides a quick schematic of the story at any given time during the edit. As you remove or rearrange scenes, it’s easy to see what impact that will have. Simply move the cards first and review the wall before you ever commit to doing the actual edit. In addition, with the eliminated cards (representing scenes) moved off to the side, you never lose sight of what material has been cut out of the film. This is helpful to know, in case you want to go back and revisit those.

Skinning, i.e. self-contained files. Another technique Murch likes to use is what he calls adding a skin to the topmost track. The concept is simple. When you have a lot of mixed media and temp effects, system performance can be poor until rendered. Instead of rendering, the timeline is exported as a self-contained file. In turn, that is re-imported into the project and placed onto the topmost track, hiding everything below it. Now playback is smooth, because the system only has to play this self-contained file. It’s like a “skin” covering the “viscera” of the timeline clips below it.

As changes are made to add, remove, trim or replace shots and scenes, an edit is made in this self-contained clip and the ends are trimmed back to expose the area in which changes are being made. Only the part where “edit surgery” happens isn’t covered by the “skin”, i.e. self-contained file. Next a new export is done and the process is repeated. By seeing the several tracks where successive revisions have been made to the timeline, it’s possible to track the history of the changes that have been made to the story. Effectively this functions as a type of visual change list.

Visual organization of the bin. Most NLEs feature list and frame views of a bin’s contents. FCPX also features a filmstrip view in the event (bin), as well as a full strip for the selected clip at the top of the screen when in the list view. Unfortunately, the standard approach is for these to be arranged based on sorting criteria or computer defaults, not by manual methods. Typically the view is a tiled view for nice visual organization. But, of course, the decision-making process can be messy.

Premiere Pro at least lets you manually rearrange the order of the tiles, but none of the NLEs is as freeform as Media Composer. The bin’s frame view can be a completely messy affair, which editors use to their advantage. A common practice is to move all of the selected takes up to the top row of the bin and then have everything else pulled lower in the bin display, often with some empty space in between.

Multi-camera. It is common practice, even on smaller films, to shoot with two or more cameras for every scene. Assuming these are used for two angles of the same subject, like a tight and a wide shot on the person speaking, then it’s best to group these as multi-camera clips. This gives you the best way to pick among several options. Every NLE has good multi-camera workflow routines. However, there are times when you might not want to do that, such as in this blog post of mine.

Multi-channel source audio. Generally sound on a film shoot is recorded externally with several microphones being tracked separately. A multi-channel .wav file is recorded with eight or more tracks of materials. The location sound mixer will often mix a composite track of the microphones for reference onto channel one and/or two of the file. When bringing this into the edit, how you handle it will vary with each NLE.

Both Media Composer and Premiere Pro will enable you to merge audio and picture into synchronized clips and select which channels to include in the combined file. Since it’s cumbersome to drag along eight or more source channels for every edit in these track-based timelines, most editors will opt to only merge the clips using channel one (the mixed track) of the multi-channel .wav file. There will be times when you need to go to one of the isolated mics, in which case a match-frame will get you back to the source .wav, from which you can pull the clean channel containing the isolated microphone. If your project goes to a post-production mixer using Pro Tools, then the mixer normally imports and replaces all of the source audio with the multi-channel .wav files. This is common practice when the audio work done by the picture editor is only intended to be used as a temp mix.

With Final Cut Pro X, source clips always show up as combined a/v clips, with multi-channel audio hidden within this “container”. This is just as true with synchronized clips. To see all of the channels, expand the clip or select it and view the details in the inspector. This way the complexity doesn’t clog the timeline and you can still selectively turn on or off any given mic channel, as well as edit within each audio channel. No need to sync only one track or to match-frame back to the audio source for more involved audio clean-up.

Multi-channel mixing. Most films are completed as 5.1 surround mixes – left, center, right, left rear surround, right rear surround, and low-frequency emitter (subwoofer). Films are mixed so that the primary dialogue is mono and largely in the center channel. Music and effects are spread to the left and right channels with a little bit also in the surrounds. Only loud, low frequencies activate the subwoofer channel. Usually this means explosions or some loud music score with a lot of bottom. In order to better approximate the final mix, many editors advocate setting up their mixing rooms for 5.1 surround or at least an LCR speaker arrangement. If you’ve done that, then you need to mix the timeline accordingly. Typically this would mean mono dialogue into the center channel and effects and music to the left and right speakers. Each of these NLEs support sequence presets for 5.1, which would accommodate this edit configuration, assuming that your hardware is set up accordingly.

Audio – organizing temp sound. It’s key that you organize the sounds you use in the edit in such a way that it is logical for other editors with whom you may be collaborating. It should also make sense to the post-production mixer who might do the final mix. If you are using a track-based NLE, then structure your track organization on the timeline. For example, tracks 1-8 for dialogue, tracks 9-16 for sound effects, and tracks 17-24 for music.

If you are using Final Cut Pro X, then it’s important to spend time with the roles feature. If you correctly assign roles to all of your source audio, it doesn’t matter what your timeline looks like. Once properly assigned, the selection of roles on output – including when using X2Pro to send to Pro Tools – determines where these elements show up on an exported file or inside of a Pro Tools track sheet. The most basic roles assignment would be dialogue, effects and music. With multi-channel location recordings, you could even assign a role or subrole for each channel, mic or actor. Spending a little of this time on the front end will greatly improve efficiency at the back end.

For more ideas, click on the “tips and tricks” category or start at 12 Tips for Better Film Editing and follow the bread crumbs forward.

©2016 Oliver Peters

Gone Girl

df_gg_4David Fincher is back with another dark tale of modern life, Gone Girl – the film adaptation of Gillian Flynn’s 2012 novel. Flynn also penned the screenplay.  It is the story of Nick and Amy Dunne (Ben Affleck and Rosamund Pike) – writers who have been hit by the latest downturn in the economy and are living in America’s heartland. Except that Amy is now mysteriously missing under suspicious circumstances. The story is told from each of their subjective points of view. Nick’s angle is revealed through present events, while Amy’s story is told through her diary in a series of flashbacks. Through these we learn that theirs is less than the ideal marriage we see from the outside. But whose story tells the truth?

To pull the film together, Fincher turned to his trusted team of professionals including director of photography Jeff Cronenweth, editor Kirk Baxter and post production supervisor Peter Mavromates. Like Fincher’s previous films, Gone Girl has blazed new digital workflows and pushed new boundaries. It is the first major feature to use the RED EPIC Dragon camera, racking up 500 hours of raw footage. That’s the equivalent of 2,000,000 feet of 35mm film. Much of the post, including many of the visual effects, were handled in-house.

df_gg_1Kirk Baxter co-edited David Fincher’s The Curious Case of Benjamin Button, The Social Network and The Girl with the Dragon Tattoo with Angus Wall – films that earned the duo two best editing Oscars. Gone Girl was a solo effort for Baxter, who had also cut the first two episodes of House of Cards for Fincher. This film now becomes the first major feature to have been edited using Adobe Premiere Pro CC. Industry insiders consider this Adobe’s Cold Mountain moment. That refers to when Walter Murch used an early version of Apple Final Cut Pro to edit the film Cold Mountain, instantly raising the application’s awareness among the editing community as a viable tool for long-form post production. Now it’s Adobe’s turn.

In my conversation with Kirk Baxter, he revealed, “In between features, I edit commercials, like many other film editors. I had been cutting with Premiere Pro for about ten months before David invited me to edit Gone Girl. The production company made the decision to use Premiere Pro, because of its integration with After Effects, which was used extensively on the previous films. The Adobe suite works well for their goal to bring as much of the post in-house as possible. So, I was very comfortable with Premiere Pro when we started this film.”

It all starts with dailies

df_gg_3Tyler Nelson, assistant editor, explained the workflow, “The RED EPIC Dragon cameras shot 6K frames (6144 x 3072), but the shots were all framed for a 5K center extraction (5120 x 2133). This overshoot allowed reframing and stabilization. The .r3d files from the camera cards were ingested into a FotoKem nextLAB unit, which was used to transcode edit media, viewing dailies, archive the media to LTO data tape and transfer to shuttle drives. For offline editing, we created down-sampled ProRes 422 (LT) QuickTime media, sized at 2304 x 1152, which corresponded to the full 6K frame. The Premiere Pro sequences were set to 1920 x 800 for a 2.40:1 aspect. This size corresponded to the same 5K center extraction within the 6K camera files. By editing with the larger ProRes files inside of this timeline space, Kirk was only viewing the center extraction, but had the same relative overshoot area to enable easy repositioning in all four directions. In addition, we also uploaded dailies to the PIX system for everyone to review footage while on location. PIX also lets you include metadata for each shot, including lens choice and camera settings, such as color temperature and exposure index.”

Kirk Baxter has a very specific way that he likes to tackle dailies. He said, “I typically start in reverse order. David tends to hone in on the performance with each successive take until he feels he’s got it. He’s not like other directors that may ask for completely different deliveries from the actors with each take. With David, the last take might not be the best, but it’s the best starting point from which to judge the other takes. Once I go through a master shot, I’ll cut it up at the points where I feel the edits will be made. Then I’ll have the assistants repeat these edit points on all takes and string out the line readings back-to-back, so that the auditioning process is more accurate. David is very gifted at blocking and staging, so it’s rare that you don’t use an angle that was shot for a scene. I’ll then go through this sequence and lift my selected takes for each line reading up to a higher track on the timeline. My assistants take the selects and assemble a sequence of all the angles in scene order. Once it’s hyper-organized, I’ll send it to David via PIX and get his feedback. After that, I’ll cut the scene. David stays in close contact with me as he’s shooting. He wants to see a scene cut together before he strikes a set or releases an actor.”

Telling the story

df_gg_5The director’s cut is often where the story gets changed from what works on paper to what makes a better film. Baxter elaborated, “When David starts a film, the script has been thoroughly vetted, so typically there isn’t a lot of radical story re-arrangement in the cutting room. As editors, we got a lot of credit for the style of intercutting used in The Social Network, but truthfully that was largely in the script. The dialogue was tight and very integral to the flow, so we really couldn’t deviate a lot. I’ve always found the assembly the toughest part, due to the volume and the pressure of the ticking clock. Trying to stay on pace with the shoot involves some long days. The shooting schedule was 106 days and I had my first cut ready about two weeks after the production wrapped. A director gets around ten weeks for a director’s cut and with some directors, you are almost starting from scratch once the director arrives. With David, most of that ten week period involves adding finesse and polish, because we have done so much of the workload during the shoot.”

df_gg_9He continued, “The first act of Gone Girl uses a lot of flashbacks to tell Amy’s side of the story and with these, we deviated a touch from the script. We dropped a couple of scenes to help speed things along and reduced the back and forth of the two timelines by grouping flashbacks together, so that we didn’t keep interrupting the present day; but, it’s mostly executed as scripted. There was one scene towards the end that I didn’t feel was in the right place. I kept trying to move it, without success. I ended up taking another pass at the cut of the scene. Once we had the emotion right in the cut, the scene felt like it was in the right place, which is where it was written to be.”

“The hardest scenes to cut are the emotional scenes, because David simplifies the shooting. You can’t hide in dynamic motion. More complex scenes are actually easier to cut and certainly quite fun. About an hour into the film is the ‘cool girls’ scene, which rapidly answers lots of question marks that come before it. The scene runs about eight minutes long and is made up of about 200 set-ups. It’s a visual feast that should be hard to put together, but was actually dessert from start to finish, because David thought it through and supplied all the exact pieces to the puzzle.”

Music that builds tension

df_gg_6Composers Trent Reznor and Atticus Ross of Nine Inch Nails fame are another set of Fincher regulars. Reznor and Ross have typically supplied Baxter with an album of preliminary themes scored with key scenes in mind. These are used in the edit and then later enhanced by the composers with the final score at the time of the mix. Baxter explained, “On Gone Girl we received their music a bit later than usual, because they were touring at the time. When it did arrive, though, it was fabulous. Trent and Atticus are very good at nailing the feeling of a film like this. You start with a piece of music that has a vibe of ‘this is a safe, loving neighborhood’ and throughout three minutes it sours to something darker, which really works.”

“The final mix is usually the first time I can relax. We mixed at Skywalker Sound and that was the first chance I really had to enjoy the film, because now I was seeing it with all the right sound design and music added. This allows me to get swallowed up in the story and see beyond my role.”

Visual effects

df_gg_7The key factor to using Premiere Pro CC was its integration with After Effects CC via Adobe’s Dynamic Link feature. Kirk Baxter explained how he uses this feature, “Gone Girl doesn’t seem like a heavy visual effects film, but there are quite a lot of invisible effects. First of all, I tend to do a lot of invisible split screens. In a two-shot, I’ll often use a different performance for each actor. Roughly one-third of the timeline contains such shots. About two-thirds of the timeline has been stabilized or reframed. Normally, this type of in-house effects work is handled by the assistants who are using After Effects. Those shots are replaced in my sequence with an After Effects composition. As they make changes, my timeline is updated.”

“There are other types of visual effects, as well. David will take exteriors and do sky replacements, add flares, signage, trees, snow, breath, etc. The shot of Amy sinking in the water, which has been used in the trailers, is an effects composite. That’s better than trying to do multiple takes with the real actress by drowning her in cold water. Her hair and the water elements were created by Digital Domain. This is also a story about the media frenzy that grows around the mystery, which meant a lot of TV and computer screen comps. That content is as critical in the timing of a scene as the actors who are interacting with it.”

Tyler Nelson added his take on this, “A total of four assistants worked with Kirk on these in-house effects. We were using the same ProRes editing files to create the composites. In order to keep the system performance high, we would render these composites for Kirk’s timeline, instead of using unrendered After Effects composites. Once a shot was finalized, then we would go back to the 6K .r3d files and create the final composite at full resolution. The beauty of doing this all internally is that you have a team of people who really care about the quality of the project as much as everyone else. Plus the entire process becomes that much more interactive. We pushed each other to make everything as good as it could possibly be.”

Optimization and finishing

df_gg_2A custom pipeline was established to make the process efficient. This was spearheaded by post production consultant Jeff Brue, CTO of Open Drives. The front end storage for all active editorial files was a 36TB RAID-protected storage network built with SSDs. A second RAID built with standard HDDs was used for the .r3d camera files and visual effects elements. The hardware included a mix of HP and Apple workstations running with NVIDIA K6000 or K5200 GPU cards. Use of the NVIDIA cards was critical to permit as much real-time performance as possible doing the edit. GPU performance was also a key factor in the de-Bayering of .r3d files, since the team didn’t use any of the RED Rocket accelerator cards in their pipeline. The Macs were primarily used for the offline edit, while the PCs tackled the visual effects and media processing tasks.

In order to keep the Premiere Pro projects manageable, the team broke down the film into eight reels with a separate project file per reel. Each project contained roughly 1,500 to 2,000 files. In addition to Dynamic Linking of After Effects compositions, most of the clips were multi-camera clips, as Fincher typically shoots scenes with two or more cameras for simultaneous coverage. This massive amount of media could have potentially been a huge stumbling block, but Brue worked closely with Adobe to optimize system performance over the life of the project. For example, project load times dropped from about six to eight minutes at the start down to 90 seconds at best towards the end.

The final conform and color grading was handled by Light Iron on their Quantel Pablo Rio system run by colorist Ian Vertovec. The Rio was also configured with NVIDIA Tesla cards to facilitate this 6K pipeline. Nelson explained, “In order to track everything I used a custom Filemaker Pro database as the codebook for the film. This contained all the attributes for each and every shot. By using an EDL in conjunction with the codebook, it was possible to access any shot from the server. Since we were doing a lot of the effects in-house, we essentially ‘pre-conformed’ the reels and then turned those elements over to Light Iron for the final conform. All shots were sent over as 6K DPX frames, which were cropped to 5K during the DI in the Pablo. We also handled the color management of the RED files. Production shot these with the camera color metadata set to RedColor3, RedGamma3 and an exposure index of 800. That’s what we offlined with. These were then switched to RedLogFilm gamma when the DPX files were rendered for Light Iron. If, during the grade, it was decided that one of the raw settings needed to be adjusted for a few shots, then we would change the color settings and re-render a new version for them.” The final mastering was in 4K for theatrical distribution.

df_gg_8As with his previous films, director David Fincher has not only told a great story in Gone Girl, but set new standards in digital post production workflows. Seeking to retain creative control without breaking the bank, Fincher has pushed to handle as many services in-house as possible. His team has made effective use of After Effects for some time now, but the new Creative Cloud tools with Premiere Pro CC as the hub, bring the power of this suite to the forefront. Fortunately, team Fincher has been very eager to work with Adobe on product advances, many of which are evident in the new application versions previewed by Adobe at IBC in Amsterdam. With a film as complex as Gone Girl, it’s clear that Adobe Premiere Pro CC is ready for the big leagues.

Kirk Baxter closed our conversation with these final thoughts about the experience. He said, “It was a joy from start to finish making this film with David. Both he and Cean [Chaffin, producer and David Fincher’s wife] create such a tight knit post production team that you fall into an illusion that you’re making the film for yourselves. It’s almost a sad day when it’s released and belongs to everyone else.”

Originally written for Digital Video magazine / CreativePlanetNetwork.

_________________________________

Needless to say, Gone Girl has received quite a lot of press. Here are just a few additional discussions of the workflow:

Adobe panel discussion with the post team

PostPerspective

FxGuide

HDVideoPro

IndieWire

IndieWire blog

ICG Magazine

RedUser

Tony Zhou’s Vimeo take on Fincher 

©2014 Oliver Peters

The Girl with the Dragon Tattoo

The director who brought us Se7en has tapped into the dark side again with the Christmas-time release of The Girl with the Dragon Tattoo. Hot off of the success of The Social Network, director David Fincher dove straight into this cinematic adaptation of Swedish writer Steig Larsson’s worldwide publishing phenomena. Even though a Swedish film from the book had been released in 2009, Fincher took on the project, bringing his own special touch.

The Girl with the Dragon Tattoo is part of Larsson’s Millennium trilogy. The plot revolves around the disappearance of Harriet Vanger, a member of one of Sweden’s wealthiest families, forty years earlier. After these many years her uncle hires Mikael Blomkvist (Daniel Craig), a disgraced financial reporter, to investigate the disappearance. Blomkvist teams with punk computer hacker Lisbeth Salander (Rooney Mara). Together they start to unravel the truth that links Harriet’s disappearance to a string of grotesque murders that happened forty years before.

For this production, Fincher once again assembled the production and post team that proved successful on The Social Network, including director of photography Jeff Cronenweth, editors Kirk Baxter and Angus Wall and the music scoring team of Trent Reznor and Atticus Ross. Production started in August of last year and proceeded for 167 shooting days on location and in studios in Sweden and Los Angeles.

Like the previous film, The Girl with the Dragon Tattoo was shot completely with RED cameras – about three-quarters using the RED One with the M-X sensor and the remaining quarter with the RED EPIC, which was finally being released around that time. Since the EPIC cameras were in their very early stages, the decision was made to not use them on location in Sweden, because of the extreme cold. After the first phase in Sweden, the crew moved to soundstages in Los Angeles and continued with the RED Ones. The production started using the EPIC cameras during their second phase of photography in Sweden and during reshoots back in Los Angeles.

The editing team

I recently spoke with Kirk Baxter and Angus Wall, who as a team have cut Fincher’s last three films, earning them a best editing Oscar for The Social Network as well as a nomination The Curious Case of Benjamin Button. I was curious about tackling a film that had already been done a couple of years before. Kirk Baxter replied, “We were really reacting to David’s material above all, so the fact that there was another film about the same book didn’t really affect me. I hadn’t seen the film before and I purposefully waited until we were about halfway through the fine cut, before I sat down and watched the film. Then it was interesting to see how they had approached certain story elements, but only as a curiosity.”

As in the past, both Wall and Baxter split up editorial duties based on the workload at any given time. Baxter started cutting at the beginning of production, with Wall joining the project in April of this year. Baxter explained, “I was cutting during the production to keep up with camera, but sometimes priorities would shift. For example, if an actor had to leave the country or a set needed to be struck, David would need to see a cut quickly to be sure that he had the coverage he needed. So in these cases, we’d jump on those scenes to make sure he knew they were OK.” Wall continued, “This was a very labor intensive film. David shot 95% to 98% of everything with two cameras. On The Social Network they recorded 324 hours of footage and selected 281 hours for the edit. On Dragon Tattoo that count went up to 483 hours recorded and 443 hours selected!”

The Girl with the Dragon Tattoo has many invisible effects. According to Wall, “At last count there were over 1,000 visual effects shots throughout the film. Most of these are shot stabilizations or visual enhancements, such as adding matte painting elements, lens flares or re-creating split screens from the offline.  Snow and other seasonal elements were added to a number of shots, helping the overall tone, as well as reinforcing the chronology of the film. I think viewers will be hard pressed to tell which shots are real and which are enhanced.” Baxter added, “In a lot of cases the exterior locations were shot in Sweden and elaborate sets were built on sound stages in LA for the interiors. There’s one sequence that takes place in a cabin. All of the exteriors seen through the windows and doors are green screen shots. And those were bright green! I’ve been seeing the composited shots come back and it’s amazing how perfect they are. The door is opened and there’s a bright exterior there now.”

A winning workflow solution

The key to efficient post on a RED project is the workflow. Assistant editor Tyler Nelson explained the process to me. “We used essentially the same procedures as for The Social Network. Of course, we learned things on that, which we refined for this film. Since they used both the RED M-X and the EPIC cameras, there were two different frame sizes to deal with – 4352 x 2176 for the RED One and 5120 x 2560 for the EPIC. Plus each of these cameras uses a different color science to process the data from the sensor. The file handling was done through Datalab, a company that Angus owns. A custom piece of software called Wrangler automates the handling of the RED files. It takes care of copying, verifying and archiving the .r3d files to LTO and transcoding the media for the editors, as well as for review on the secured PIX system. The larger RED files were scaled down to 1920 x 1080 ProRes LT with a center-cut extraction for the editors, as well as 720p H.264 for PIX. The ‘look’ was established on set, so none of the RED color metadata was changed during this process.”

“When the cut was locked, I used an EDL [edit decision list] and my own database to conform the .r3d files back into reels of conformed DPX image sequences. This part was done in After Effects, which also allowed me to reposition and stabilize shots as needed. Most of the repositioning was generally a north-south adjustment to move a shot up or down for better head room. The final output frame size was 3600 x 1500 pixels. Since I was using After Effects, I could make any last minute fixes if needed. For instance, I saw one shot that had a monitor reflection within the shot. It was easy to quickly paint that out in After Effects. The RED files were set to the RedColor2 / RedLogFilm color space and gamma settings. Then I rendered out extracted DPX image sequences of the edited reels to be sent Light Iron Digital who did the DI again on this film.”

On the musical trail

The Girl with the Dragon Tattoo leans heavily on a score by Trent Reznor and Atticus Ross. An early peak came from a teaser cut for the film by Kirk Baxter to a driving Reznor cover of Led Zeppelin’s “Immigrant Song”. Unlike the typical editor and composer interaction – where library temp tracks are used for the edit and then a new score is done at the end of the line – Reznor and Ross were feeding tracks to the editors during the edit.

Baxter explained, “At first Trent and Atticus score to the story rather than to specific scenes. The main difference with their approach to scoring a picture is that they first provide us with a library of original score, removing the need for needledrops. It’s then a collaborative process of finding homes for the tracks. Ren Klyce [sound designer/re-recording mixer] also plays an integral part in this.” Wall added, “David initially reviewed the tracks and made suggestions as to which scenes they might work best in.  We started with these suggestions and refined placement as the edit evolved.  The huge benefit of working this way was that we had a very refined temp score very early in the process.” Baxter concluded, “Then Trent’s and Atticus’s second phase is scoring to picture. They re-sculpt their existing tracks to perfectly fit picture and the needs of the movie. Trent’s got a great work ethic. He’s very precise and a real perfectionist.”

The cutting experience

I definitely enjoyed the Oscar-winning treatment these two editors applied to intercutting dialogue scenes in The Social Network, but Baxter was quick to interject, “I’d have to say Dragon Tattoo was more complicated than The Social Network. It was a more complex narrative, so there were more opportunities to play with scene order. In the first act you are following the two main characters on separate paths. We played with how their scenes were intercut so that their stories were as interconnected as possible, giving promise to the audience of their inevitable union.”

“The first assembly was about three hours long. That hovered at around 2:50 for a while and got a bit longer as additional material was shot, but then shorter again as we trimmed. Eventually some scenes were lost to bring the locked cut in at two-and-a-half hours. Even though scenes were lost, those still have to be fine cut. You don’t know what can be lost unless you finish everything out and consider the film in its full form. A lot of work was put into the back half of the film to speed it up. Most of those changes were a matter of tightening the pace by losing the lead-in and lead-outs of scenes and often losing some detail within the scenes.”

Wall expanded on this, “Fans of any popular book series want a filmed adaptation to be faithful to the original story. In this case, we’re really dealing with a ‘five act’ structure. [laughs]. Obviously, not everything in the book can make it into the movie. Some of the investigative dead ends have to be excised, but you can’t remove every red herring.  So it was a challenging film to cut. Not only was it very labor intensive, with many disturbing scenes to put together, it was also a tricky storytelling exercise. But when you’re done and it’s all put together, it’s very rewarding to see. The teaser calls it the ‘feel-bad film of Christmas’ but it’s a really engaging story about these characters’ human experience. We hope audiences will find it entertaining.”

Some additional coverage from Post magazine.

Written for DV magazine (NewBay Media, LLC)

©2011 Oliver Peters