LUTs or color look-up tables are a method of converting images from one color space or gamma profile into another. LUTs are usually a mathematically correct transform of one set of color and level values into another. For most editors and colorists, LUTs are commonly associated with log profiles that are increasingly used with various digital cameras, like an ARRI ALEXA, RED One, RED Epic or Blackmagic Design Cinema Camera. (Click on the images in this article for an expanded view.)
The concept gets confusing, because there are various types of LUTs and they can be inserted into different stages of the pipeline. There are display LUTs, used to convert the viewing color space, such as from Rec. 709 (video) into P3 (digital cinema projection). These can be installed into hardware conversion boxes, monitors and within software grading applications. There are camera LUTs, which are used to convert gamma profiles, such as from log-C to Rec. 709. And finally, there are creative LUTs used for aesthetic purposes, like film stock emulation.
 One of the really sweet parts of Apple Final Cut Pro X is that it offers a vastly improved color pipeline that ties in closely to underpinnings of the OS, such as ColorSync. This offers developers opportunities over FCP “legacy” and quite frankly over many other competitors. Built into the code is the ability to recognize certain camera metadata if the camera manufacturer chooses to take advantage of Apple’s SDK. ARRI, Sony and RED are among those that have done so. For example, when you import ARRI ALEXA footage that was recorded with a log-C gamma profile, a metadata flag in the file toggles on log processing automatically within FCP X. Instead of seeing the flat log-C image, you see one that has already been converted, on-the-fly into Rec. 709 color space.
This built-in log processing comes with some caveats, though. The capability is only enabled with files recorded on ALEXA cameras with more recent firmware. It cannot be manually applied to older log-C footage, nor to any other log-encoded video file. It can only be toggled on or off without any adjustments. Finally, because this is done via under-the-hood ColorSync profile changes, it happens prior to the point any filters or color correction can be applied within FCP X itself.
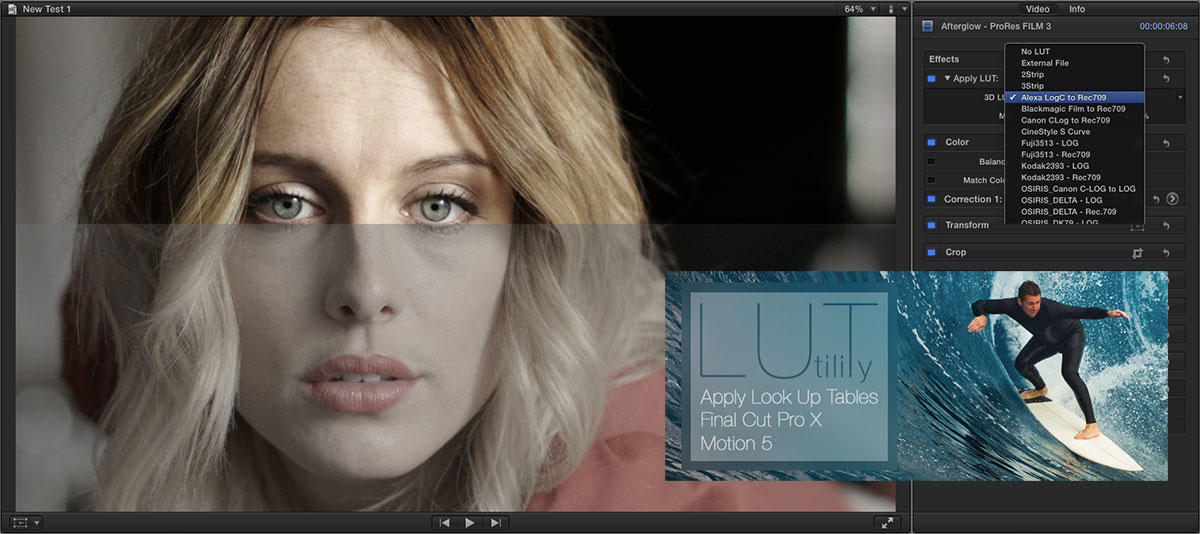
 A different approach has been developed by colorist Denver Riddle, known for his Color Grading Central website, products and tutorials. His new product, LUT Utility, is designed to provide FCP X editors with a better way of using LUTs for both corrective and creative color transforms. The plug-in installs into both Final Cut Pro X and Motion 5 and comes with a number of built-in LUTs for various cameras, such as the ALEXA, Blackmagic and even the Cinestyle profiles used with the Canon HDSLRs. Simply drop the filter onto a clip and select the LUT from the pulldown menu in the FCP X inspector pane. As a filter, you can freely apply any LUT selection, regardless of camera – plus, you can adjust the strength of the LUT via a slider. It can work within a series of filters applied to the same clip and can be placed upstream or downstream of any other filters, as well as within an adjustment layer (blank title effect). You can also stack multiple instances of the LUT with different settings on the same clip for creative effect.
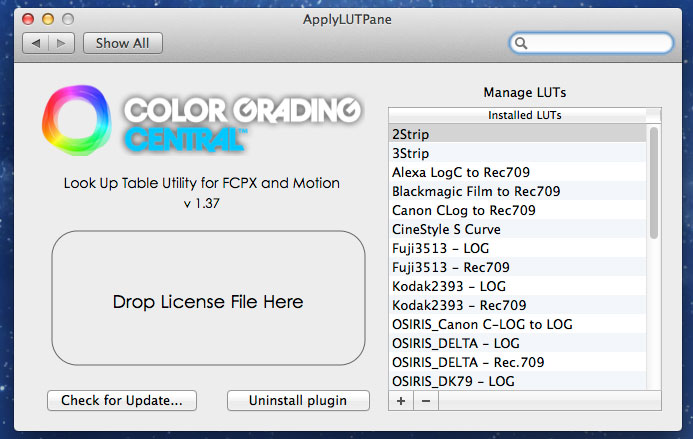
 The best part of LUT Utility is that you aren’t limited to the built-in LUTs. When you install the plug-in, a LUT Utility pane is added to System Preferences. In that pane, you can add additional LUTs sold by Color Grading Central or that you have created yourself. (External LUT files can be directly accessed within the filter when working in Motion 5.) One such package is the set of Osiris Digital Film Emulation LUTs developed jointly by Riddle and visionCOLOR. These are a set of nine film LUTs designed to mimic the looks of various film stocks. Each has two settings designed for either log or Rec. 709 video. For example, you can take an ALEXA log-C file and apply two instances of LUT Utility. Set the first filter to use the log-C-to-Rec.709 LUT. Then in the second filter, pick one of the film LUTs, but use the Rec. 709 version of it. Or, you could apply one instance of the LUT Utility filter and simply pick the same film LUT, but instead, select its log version. Both work, but will give you slightly different looks. Using the filter’s amount slider, it’s easy to fine tune the intensity of the effect.
 LUT Utility is applied as a filter, which means you can still add other color correction filters before or after it. Applying a filter, like Hawaiki Color, prior to a log conversion LUT, means that you would be adjusting color values of the log image, before converting it into Rec. 709. If you add such a filter after the LUT, then you are grading the already-converted image. Each position will give you different results, but most of this is handled gracefully, thanks to FCP X’s floating-point processing. Finally, you can also apply the LUT as a filter and then do additional corrections downstream of the filter by using the built-in Color Board tools.
I found these LUTs easy to install and use. They appear to be pretty lightweight in how they affect FCP X playback performance. I’m running a 2009 Mac Pro with a new Mavericks installation. I can apply one or more instances of the LUT Utility filter and my unrendered ProRes media plays in real-time. With the widespread use of log and log-style gamma profiles, this is one of the handiest filter sets to have if you are a heavy FCP X user. Not only are most of the common cameras covered, but the Osiris LUTs add a nice creative edge that you won’t find at this price point in competitive products. If you use FCP X for color correction and finishing, then it’s really an essential tool.
©2014 Oliver Peters
