After Effects artists who are called upon to design a lot of shots that involve sci-fi effects, particles, user interface overlays, as well as shots with sparks, light rays, and sparkles have come to rely on Trapcode as their go-to plug-in set. The newest version, available from Red Giant, is Trapcode Suite 13. This package includes 11 different effects, which encompass a range of particle and volumetric lighting effects.
If you install the suite, all 11 Trapcode effects will show up in After Effects CC. These include Particular, Form, Tao, Mir, Shine, Lux, 3D Stroke, Echospace, Starglow, Sound Keys and Horizon. Of these, 3D Stroke, Shine and Starglow will also be available within Premiere Pro CC. Together these effects form a comprehensive toolkit for After Effects designers who really do have to create magic from scratch.
 Trapcode Particular is typically the effect that most folks associate with Trapcode effects. In this new version, you can use its built-in Effects Builder to select from certain presets and design custom effects. Although other Trapcode models include presets for certain styles, only Particular includes this separate Effects Builder to browse, preview and apply effects. Particular now includes certain organic 3D effects, like smoke, fire, water and more.
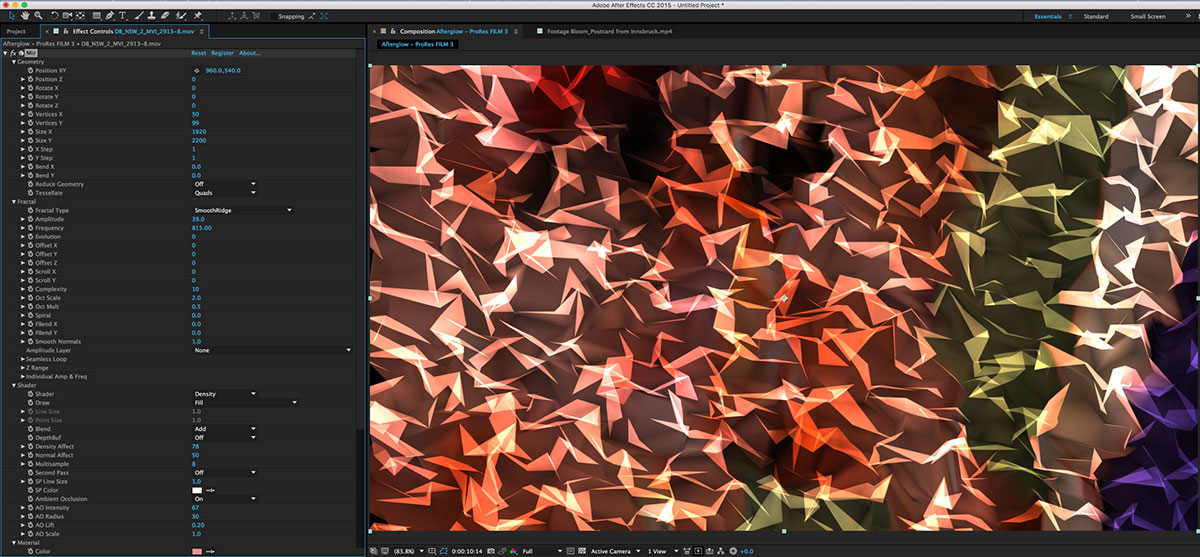 Trapcode Form lets you design particle grids, spheres and objects that evolve over time. Trapcode Tao lets you build 3D geometries with fractal math for shapes, facets, etc. Tao is a simplified 3D object design tool, that enables metallic textures and the ability to incorporate the image maps from lower After Effects layers as surface textures. You can create animated objects, shapes and ribbons and all are GPU-accelerated. Trapcode Mir is designed to create 3D surfaces, terrains and wireframes. These can be used for tunnel effects and land topographies. Both Tao and Mir can display these designs as wireframes, shaded polygons or rendered surfaces.
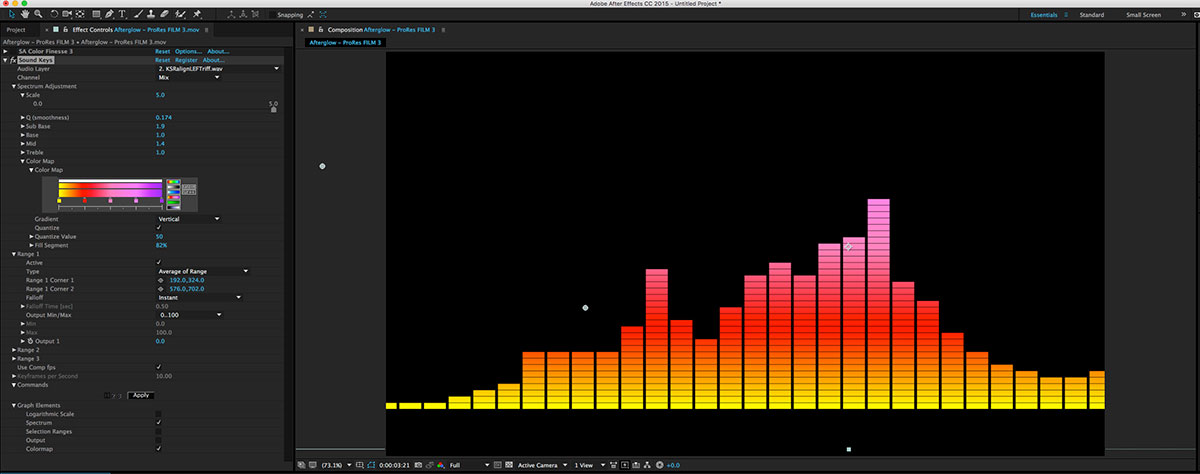 Trapcode Sound Keys links to an imported audio file. It analyzes the file and creates animation keyframes, which can drive a colorized volume bar display to that sound. These keyframes can also be used to drive other effects, such as scaling to the beat. Trapcode 3D Stroke enables 3D lines, paths and overlays. Trapcode Lux turns After Effects lights into visible sources with volumetric properties. Trapcode Horizon is there to create infinite backgrounds in After Effects. Trapcode Echospace enables repeated effects like trails and 3D offsets.
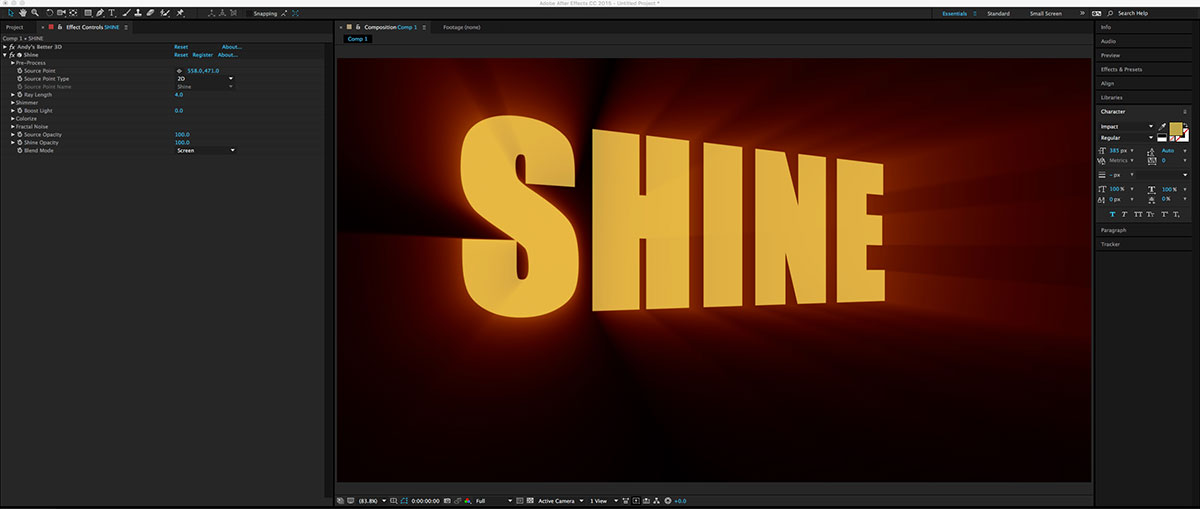
Last but not least, there’s Trapcode Shine and Trapcode Starglow. Both are lighting effects. Shine generates 3D light rays that you can use with text or to mimic real-world lighting, like shafts of light through the forest. Shine can be linked to After Effects 3D lights for volumetric-aware effects. Starglow is more stylized with glints and glimmers, similar to adding a star filter to your lens.
Working with the suite
The suite as a whole is intended for serious After Effects artists who have to create shots, not merely enhance them. As such, it’s not like suites from other plug-in developers that offer a whole toolkit of image manipulation effects, color correction, titling and more. If that’s what you want, then the Trapcode Suite isn’t for you. However, each of these plug-ins is available separately, so if you only want Trapcode Particular or Shine, for example, then it’s best to buy just the one effect that you really need.
 Each of these effects is quite deep. I have never seen any other plug-in with as many modifier controls as those from Trapcode. Unfortunately, these tools are very sparse on presets compared to competing plug-ins. Nevertheless, Particular has over 180 presets, while Shine, 3D Stroke and Starglow have 30, 40 and 49 presets respectively. Some, like Shine, Starglow and Sound Keys are pretty easy to figure out. Others, like Mir or Tao, really do require that you spend some time with tutorials. The investment in time is certainly worth it, if these are the type of effects that you need to do on a regular basis.
Although I use After Effects, I’m a novice at building such particle effects and find myself more comfortable with tools like Shine. Building a flying title with rays that emanate from the text was a piece of cake with Shine. Trapcode has worked hard to take advantage of GPU and CPU power. Mir and Tao are GPU-accelerated and others, like Particular, were optimized for better CPU performance in this release. Adding and adjusting these effects was pretty quick on a 2009 Mac Pro 8-core tower with a Sapphire 7950 card. No slouch, but certainly pretty average by today’s standards. I’m sure these effects would really scream on a top-of-the-line HP with a smokin’ NVIDIA card.
 Trapcode Particular was also fun, because of the Effects Builder. Essentially it’s a presets browser, with different effects options. When you select an option, it becomes part of your effects chain in the Builder window. This lets you design a custom effect, starting with the emitter type and then adding modifiers within the chain, such as turbulence, gravity and so on. Each of the segments of this chain have parameters that can be tweaked. Once done, you apply the effect that you’ve built to the clip on the timeline and close the Builder window. Then make timing and other adjustments in the standard After Effects control panel.
 There are many similar effects to Trapcode Shine offered by other plug-in developers. One unique attribute of Shine is the feature of adding fractal noise. So, in addition to light rays you can add the appearance of haze or smoke to the effect. Depending on how you set the controls, it can also look like a water reflection shimmering onto the objective in the image or other similar styles. All of this can be internally masked from within the plug-in. Applying the mask means that if you want the light rays to just emanate from a window in the corner of the set, you can adjust the mask accordingly. Light rays would only appear to come from the window and not other bright objects within the rest of the shot. Another unique aspect to Shine is that its light rays are 3D camera-aware, based on After Effects light and camera positions.
Overall, the Trapcode Suite tools are a wonderful addition to any visual effects artist’s collection of plug-ins. The quality is outstanding, the visual appearance quite organic, and performance with a moderately powerful GPU is fast. Editors will likely want to limit themselves to Shine and Starglow to make the best investment for how they use plug-ins. But if you are a power After Effects user who also cuts in Premiere Pro CC, then the suite has you covered either way.
Originally written for Digital Video magazine / Creative Planet Network.
©2016 Oliver Peters

