Many have opined that there’s no longer a need for large trade shows. Clearly the folks running the Las Vegas Convention Center don’t buy into that view. They are in the middle of a multi-year project to expand and renovate their facilities. That was the backdrop for this month’s National Association of Broadcasters annual exhibition. Aside from meetings and presentations to official NAB members, this show is best known as one of two major international showcases for new technology in the areas of radio, film, television, streaming, production, post-production, and distribution. The other is the International Broadcasting Convention (IBC) in Amsterdam, to be held later this year.
The tally this year clocked in at over 61,000 attendees of which more that half were first-timers and over a fourth from outside of the US. Some might suggest that you can get all the info you want about gear by watching YouTube. If you’ve ever been to CES, NAMM, IBC, NAB, InfoComm, or similar shows, then you know that there’s nothing like the in-person experience. That most certainly was part of the draw for these first-time attendees.
A show like NAB gives you a way to kick the tires and compare. Not only do you experience the look and feel of actual products, but the manufacturers are often presenting them in actual use. Want to see how the various Canon lenses perform? Simply walk down the line in their booth’s camera set-up and see for yourself. Want to compare the features of manufacturer A’s product against those from manufacturer B? Just walk from one booth to the other and check it out for yourself. That’s the value NAB presents. Add to this the opportunity to meet and chat in person with some of the online friends and mentors you’ve had – then, that’s just icing on the cake.
Whether you’re a guitar nerd or just into rock ‘n roll history, learning what makes our music heroes tick is always entertaining. Music journalist and TV presenter Kylie Olsson started a YouTube channel during the pandemic lockdown, teaching herself how to play guitar and reaching out to famous guitarists that she knew. This became the concept for a TV series called “Life in Six Strings with Kylie Olsson” that airs on AXS TV. The show is in the style of “Comedians in Cars getting Coffee.” Olsson explores the passions behind these guitarists, plus gets a few guitar pointers along the way.
I spoke with James Tonkin and Leigh Brooks about the post workflow for these episodes. Tonkin is founder of Hangman in London, which handled the post on the eight-part series. He was also the director of photography for the first two episodes and has handled the online edit and color grading for all of the episodes. Leigh Brooks (Firebelly Films) was the offline (i.e. creative) editor on the series, starting with episode three. Together they have pioneered an offline-to-online post workflow based entirely around Blackmagic Design DaVinci Resolve.
James, how did you get started on this project?
James Tonkin: Kylie approached us about shooting a pilot for the series. We filmed that in Nashville with Joe Bonamassa and it formed the creative style for the show. We didn’t want to just fixate on the technical side of the guitar and tone of these players, but their geographical base – explore the city a little bit. We had to shoot it very documentary style, but wrap it up into a 20-25 minute episode. No pre-lighting, just a tiny team following her around, interacting with with these people.
Then we did a second one with Nuno Bettencourt and that solidified the look of the show during those two initial episodes. She eventually got distribution through AXS TV in the States for the eight-part series. I shot the first two episodes and the rest were shot by a US-based crew, which followed the production workflow that we had set up. Not only the look and retaining the documentary format, but also maintaining the highest production value we could give it in the time and budget that we’re working with.
We chose to shoot anamorphic with a cinematic aspect ratio, because it’s slightly different from the usual off-the-cuff reality TV look. Also whenever possible, record in a raw codec, because we (Hangman) were doing all of the post on it and me specifically being the colorist. I always advocate for a raw workflow, especially something in a documentary style. People are walking from daylight into somebody’s house and then down to a basement, basically following them around. And Kylie wants to keep interacting with whomever she’s interviewing without needing to wait for cameras to stop and re-balance. She wants to keep it flowing. So when it comes to posting that, you’ve got a much more robust digital negative to work with [if it was shot as camera raw].
What was the workflow for the shows and were there any challenges?
Leigh Brooks: The series was shot mainly with Red and Canon cameras as 6K anamorphic files. Usually the drive came to me and I would transcode the rushes or create proxy files and then send the drive to James. The program is quite straightforward and narrative-based, without much scope for doing crazy things with it. It’s about the nuts and bolts of guitars and the players that use them. But that being said, each episode definitely had its own little flavor and style. Once we locked the show, James took the sequence, got hold of the rushes, and then got to work on the grade and the sound.
What Kylie’s pulled off on her own is no small feat. She’s a great producer, knows her stuff, and really does the research. She’s so passionate about the music and the people that she’s interviewing and that really comes across. The Steve Vai episode was awesome. He’s very holistic. These people dictate the narrative and tell you where the edit is going to go. Mick Mars was also really good fun. That was the trickiest show to do, because the A and B-side camera set-up wasn’t quite working for us. We had to really get clever in the edit.
DaVinci Resolve gets a lot of press when it’s used for finishing and color grading. But on this project it was used for the offline cut as well. TV series post is usually dominated by Avid Media Composer. Why do you feel that Resolve is a good choice for offline editing?
Tonkin: I’ve been a longtime advocate of working inside of Resolve, not just from a grading perspective, but editorial. As soon as the Edit page started to offer me the feature set that we needed, it became a no-brainer that we should do all of our offline in Resolve, whenever possible. On a show like this, I’ve got about six hours of online time and I want to spend the majority being as creative as I can. So, focusing on color correction, looking at anything I need to stabilize, resize, any tracking, any kind of corrective work – rather than spending two or three hours conforming from one timeline into another.
The offline on this series was done in DaVinci Resolve, with the exception of the first episode, which was cut in Final Cut Pro X. I’m trying to leave editors open to the choice of the application they like to use. My gentlemen’s agreement with Matt [Cronin], who cut the first pilot, was that he could cut it in whatever he liked, as long as he gave me back a .drp (DaVinci Resolve project) file. He loves Final Cut Pro X, because that’s what he’s quickest at. But he also knows the pain that conforms can be. So he handled that on his side and just gave me back a .drp file. So it was quick and easy.
From episode three onwards, I was delighted to know that Leigh was based in Resolve, as well, as his primary workflow. Everything just transfers and translates really quickly. Knowing that we had six more episodes to work through together, I suggested things that would help us a lot, both for picture for me and for audio as well, which was also being done here in our studio. We’re generating the 5.1 mix.
Brooks: I come from an Avid background. I was an engineer initially before ever starting to edit. When I started editing, I moved from Avid to Final Cut Pro 7 and then back to Avid, after which I made the push to go to Resolve. It’s a joy to edit on and does so many things really well. It’s become my absolute workhorse. Avid is fine in a multi-user operation, but now that doesn’t really matter. Resolve does it so well with the cloud management. I even bought the two editor keyboards. The jog wheel is fantastic! The scrolling on that is amazing.
You mentioned cloud. Was any of that a factor in the post on “Life in Six Strings?”
Tonkin: Initially, when Leigh was reversioning the first two episodes for AXS TV, we were using his Blackmagic Cloud account. But for the rest of the episodes we were just exchanging files. Rushes either came to me or would go straight to Leigh. He makes his offline cut and then the files come to me for finishing, so it was a linear progression.
However, I worked on a pilot for another project where every version was effectively a finished online version. And so we used [the Blackmagic] Cloud for that all the way through. The editor worked offline with proxies in Resolve. We worked from the same cloud project and every time he had finished, I would log in and switch the files from proxy to camera originals with a single click. That was literally all we had to do in terms of an offline-to-online workflow.
Brooks: I’m working on delivering a feature length documentary for [the band] Nickelback that’s coming out in cinemas later in March. I directed it, cut it in Avid, and then finished in Resolve. My grader is in Portsmouth and I can sit here and watch that grade being done live, thanks to the cloud management. It definitely still has a few snags, but they’re on it. I can phone up Blackmagic and get a voice – an actual person to talk to that really wants to fix my problem.
Were there any particular tools in Resolve that benefitted these shows?
Tonkin: The Blackmagic team are really good at introducing new tools to Resolve all the time. I’ve used trackers for years and that’s one of my favorite things about Resolve. Their AI-based subtitling is invaluable. These are around 20-minute episodes and 99% of it is talking. Without that tool, we would have to do a lot of extra work.
Resolve is also good for the more complex things. For example, a driving sequence in the bright California sun that wasn’t shot as camera raw. The only way I could get around the blown-out sky was with corrections specifically for the sky portion of the shot. Obviously, you want to track the subject so that the sky is not going over his head. All of those types of tools are just built in. When I’ve effectively got six hours to work on an episode and I might have about 20 shots like that, then having these tools inside are invaluable from a finishing perspective.
You’ve both worked with a variety of other nonlinear editing applications. How do you see the industry changing?
Tonkin: Being in post for a couple of decades now and using Final Cut Studio, Final Cut Pro X, and a bit of Premiere Pro throughout the years, I find that the transition from offline to online starts to blur more and more these days. Clients watching their first pass want to get a good sense of what it should look like with a lot of finishing elements in place already. So, you’re effectively doing these finishing things right at the beginning.
It’s really advantageous when you’re doing both in Resolve. When you offline in a different NLE, not all of that data is transferred or correctly converted between applications. By both of us working in Resolve, even simple things you wouldn’t think of, like timeline markers, come through. Maybe he’s had some clips that need extra work. He can leave a marker for me and that will translate through. You can fudge your way through one episode using different systems, but if you’re going to do at least six or eight of them – and we’re hopefully looking at a season two this year – then you want to really establish your workflow upfront just to make things more straightforward.
Brooks: Editing has changed so much over the years. When I became an engineer, it was linear and nonlinear, right? I was working on “The World Is Not Enough” – the James Bond film around 1998. One side of the room was conventional – Steenbeck’s, bins, numbering machines. The other side was Avid. We were viewing 2K rushes on film, because that’s what you can see on the screen. On Avid it was AVR 77. It’s really interesting to see it come full circle. Now with Resolve, you’re seeing what you need to see rather than something that’s subpar.
I’d say there are a lot of editors who are ‘Resolve curious.’ If you’re in Premiere Pro you’re not moving, because you’re too tied into the way Adobe’s apps work. If you know Premiere, you know After Effects and are not going to move to Resolve and relearn Fusion. I think more people would move from Avid to Resolve, because simple things in Resolve are very complicated in Avid – the effects tab, the 3D warp, and so on.
Editors often have quite strange egos. I find the incessant arguing between platforms is just insane. It’s this playground kind of argument about bloody software! [laugh] After all, these tools are all there to tell stories. There are a lot of enthusiastic people on YouTube that make really good videos about Resolve, as well. It’s nice to be in that ecosystem. I’d implore any Avid editor to look at Resolve. If you’re frustrated and you want to try something else, then this might open your eyes to a new way of working. And the Title Tool works! [smile]
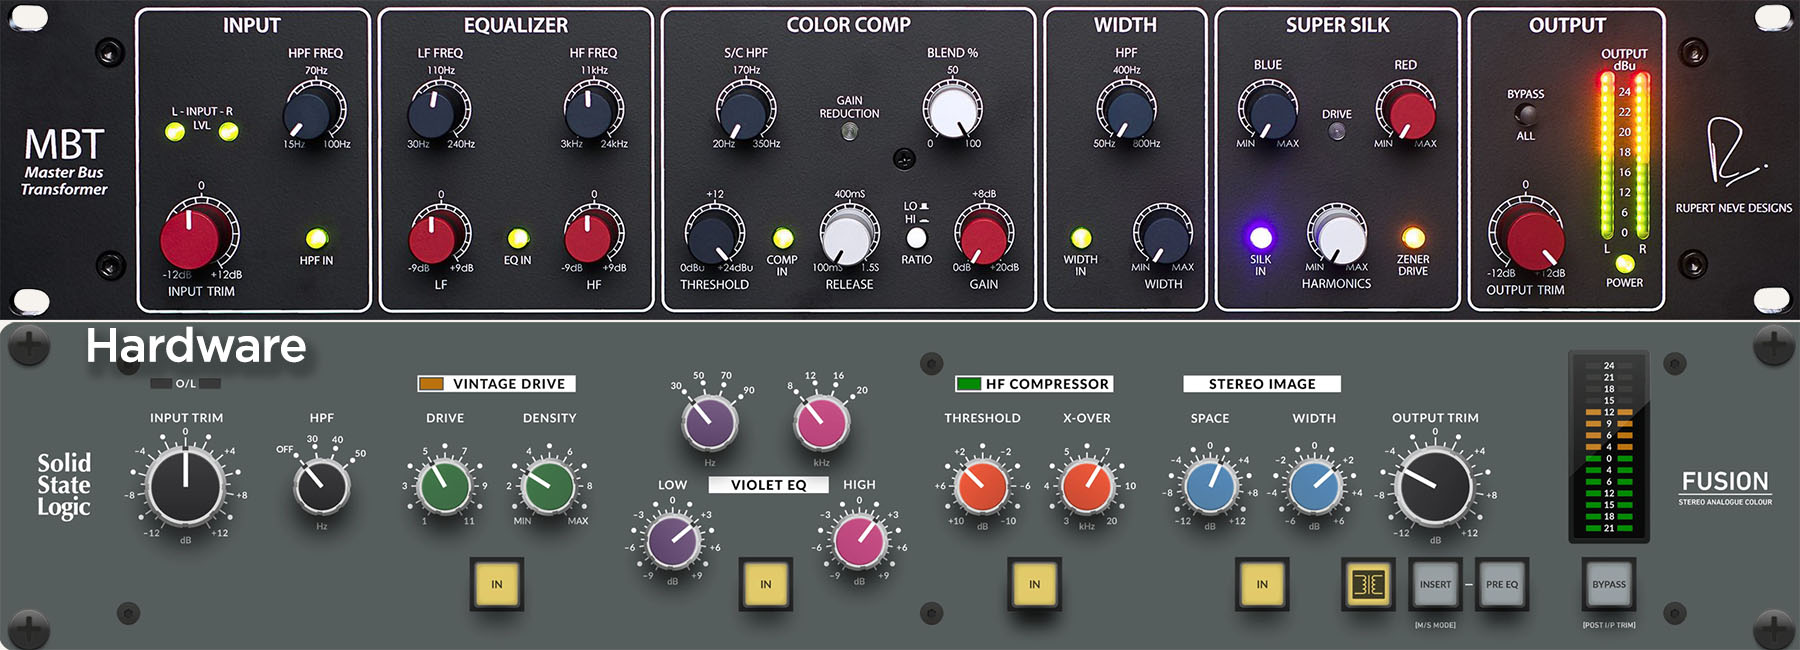
In the audio world there are frequent discussions around classic mixing desks – SSL, Neve, API, MCI, Harrison, etc. Most often the debate centers around Neve versus Solid Sate Logic (SSL). But modern mixes are more often than not done “in the box” using only DAW software and plugins. Many professional mixers augment this with outboard processing gear to impart that “warmth” and “color” of analog circuitry.
To service this market, both Neve and SSL offer stereo bus processors that combine EQ, compression, saturation, and stereo width components. That’s the Rupert Neve Designs MBT (Master Bus Transformer) and the SSL Fusion. Both offer more or less the same set of controls, but with their own, unique approach to curves, ratios, harmonics, etc. However, this comes at a steep price. The Neve MBT retails for $3,999 and the SSL Fusion for $2,199.
NFuse offers both in one plugin
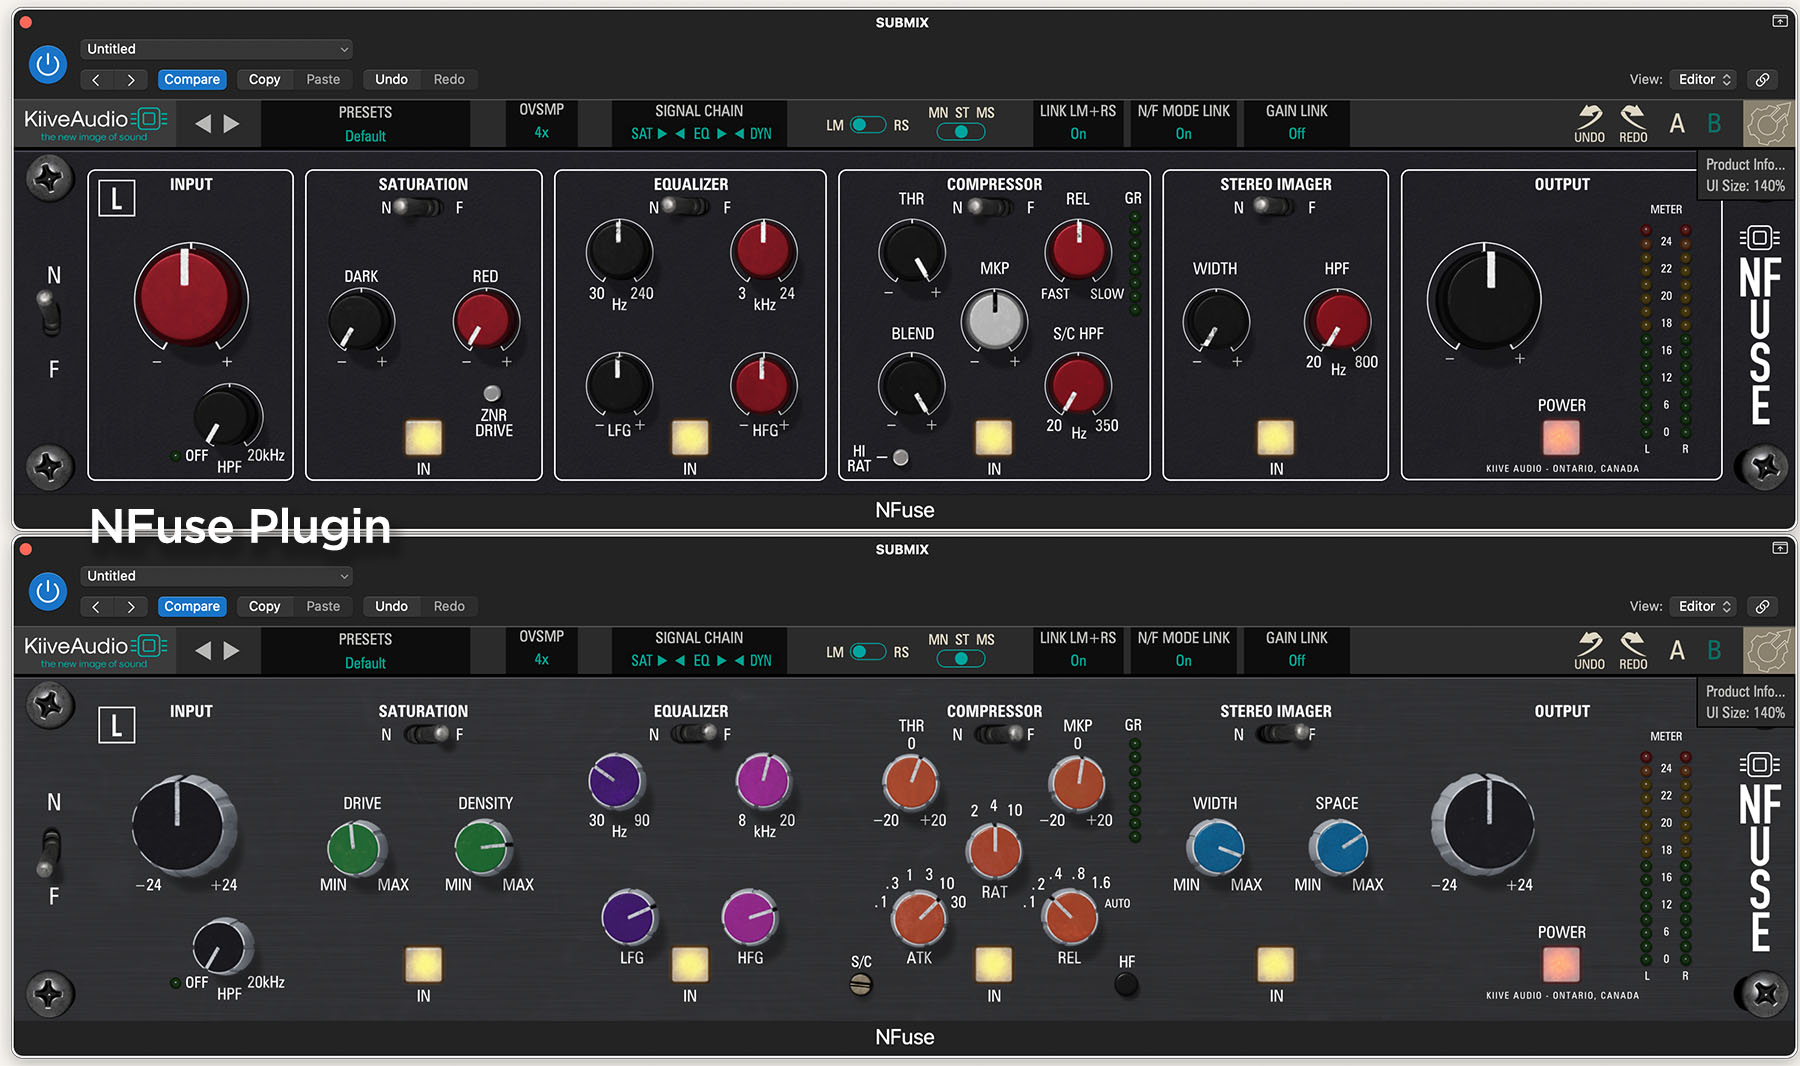
Unless you are earn a solid income from mixing, then buying one of these, let alone both, doesn’t make a lot of sense. That’s where plugins enter the discussion. One of the newest is the NFuse bus processor from Kiive Audio. As the name implies, this plugin combines both the Neve MBT (“N”) and the SSL Fusion (“Fuse”) into a single unit. It features N/F toggles for the whole plugin, as well as each section, in order to easily switch between modes. If you like the Neve sound for several of these modules, but prefer SSL compression, simply toggle the compression module to the F setting. Of course, this would be impossible with the real hardware. Furthermore, since this is a plugin, you can add it to any and all channels, groups, and the master bus. With hardware you’d need to own multiple units in order to do that.
The basic components of NFuse are saturation, equalization, compression, and stereo imaging. Plus input and output levels. The small windows at the top of the interface let you set the oversampling amount, linking functions, as well as the processing order: sat>eq>comp, eq>com>sat, comp>eq>sat, etc. Stereo imaging is always the last module in this chain.
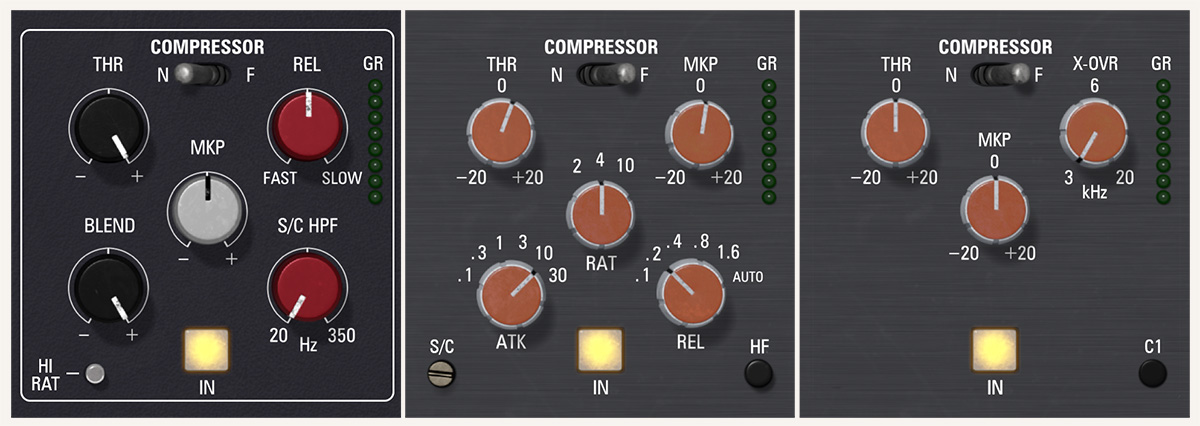
The Neve (N) and SSL (F) controls include slightly different features, just like the hardware. Since Kiive Audio has modeled these based upon the characteristics of each of these two hardware units, there are really two different “circuits” within the design of this plugin. For example, the high and low EQ ranges differ between the two, as do the compression ratios. Kiive recently added a new HF mode to the Fusion Compressor for a total of three compression types in all. Rounding things out, you’ve got a variety of factory presets, plus A and B saved states to easily compare two different settings.
Using NFuse for your mix
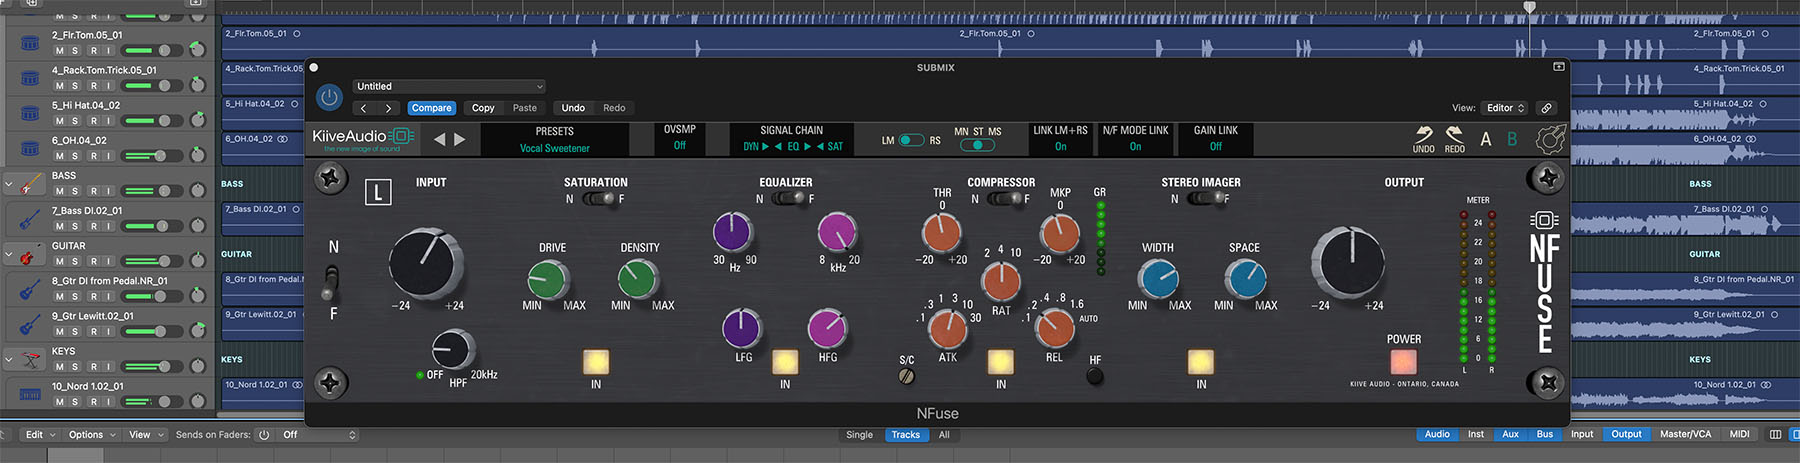
You can apply NFuse in various ways. For example, I mix music in Logic Pro, but video projects mostly in Premiere Pro. When working in Logic, I will group similar instruments into track stacks (summed groups), which are then routed to the main mix bus. Thus, combined groups for drums, bass, guitar, keys, and vocals are summed into the final mix. I usually apply a variety of processing effects to each instrument group, as well as the stereo mix bus. These are often third-party plugins, but could be a stack of native effects. The individual tracks get a smattering of native Logic plugins, as needed. Lastly, the master bus gets the final analog color and some compression.
With this approach, I could easily apply NFuse to each of the groups, along with the mix bus. After all, I can turn off some of the modules within the plugin if I don’t need them. However, a plugin that also works well for the groups is Filkchannel, another Kiive Audio plugin. That’s what I did in the test mix and then I applied NFuse to only the mix bus for the final “glue” to shape the mix. I like this approach, because all of the tools I need are in a single plugin interface, as opposed to stacking three or four different plugins when using native tools.
When it comes to my video mixes in Premiere, there’s little need for groups, since my timeline generally has fewer individual tracks. However, Premiere Pro doesn’t have a good multi-effect processor plugin that I feel like using. So instead, I’ll apply a combination of native effects. In this scenario, NFuse is also a good tool for a video editor.
The results
Naturally, the first question to ask is, “How does it sound?” Honestly, I’ve never worked with any of the hardware that this plugin was inspired by, so I can’t tell you how close it sounds to the hardware itself. However, there are plenty of YouTubers doing that, so you can make up your own mind. In most of the comparisons, hardware usually has a slight edge, especially when pushed. But given the price of the hardware, that slight difference is meaningless to most. Ultimately it’s all subjective.
In my mix, the plugin sounds very good. I realize the many people love the SSL sound, but to my ears, I find the various third-party SSL emulations, including NFuse’s “F” settings, to be on the aggressive side and can sound a bit harsh. Instead, I find myself gravitating to the Neve emulations, like 1073-style EQ plugins and so on. At least for my test mix, which was a jazz ensemble, the “N” modes of NFuse sounded smoother and more pleasing to me.
NFuse is a pretty close emulation to the hardware, however, because of that, there’s no limiter. Kiive Audio does market other plugins that do that, like the ADC1, which emulates hardware from Abbey Road Studios. In my case, I will typically apply a native Logic Pro or Premiere Pro limiter or sometimes Fabfilter’s Pro-L2 at the end of my mix bus chain. It would have been nice to include brick wall limiting as part of NFuse, even though that would have deviated from the original hardware.
Final thoughts
Kiive Audio retails NFuse for $199.99 (currently on sale as I post this) with a 14-day free trial. The price is attractive, but like any plugin, it’s worth checking out the trial before committing. The developer also offers licensing that’s easy to deal with. No iLok or cloud authorization required. My one quibble about NFuse is that the PDF manual needs to be a bit more detailed. It also doesn’t explain the newly-added HF Compressor mode. Maybe an update is just around the corner.
Overall, I liked the smooth sound NFuse delivered, especially in how it added character and glue to my final mix. That’s the sweet spot for me. Although you can use it on groups, I feel that other plugins like Filkchannel are better suited for those. NFuse offers a nice range of smooth to aggressive between the Neve and SSL-style emulations. This makes it ideal for various musical genres – especially when you just need that little something extra to enhance your mix.
Blackmagic Design has been building cameras for over a decade – many with a DSLR form factor. The latest of these is the Blackmagic Cinema Camera 6K, launched at IBC 2023. This camera is designed as a serious filmmaking tool that offers some similarities to an ARRI Alexa Mini LF or a RED Komodo, but with change to spare. This makes it a good fit for an owner-operator.
The Blackmagic Cinema Camera 6K uses an 36mm x 24mm full frame (FF) sensor with OLPF. That’s equivalent to the size of a 35mm photo frame. The maximum frame size you can record is 6048 x 4032 pixels (3:2 aspect). While cinematic settings like 6K DCI 17:9 and 6K 2.4:1 capture the full 6K width, other options capture a smaller, windowed section of the sensor. For example, if you select 1080 HD, then you get a 1920 x 1080 crop from the larger sensor area. The advantage comes when you want to record with higher frame rates. Shoot 6K Open Gate 3:2 and the maximum frame rate is 36fps. Take a 1080 slice instead and that goes up to 120fps.
This 6K full frame version offers a different feature set than its Pocket Cinema Camera 4K, 6K G2, and 6K Pro cousins. It uses a Leica format lens mount (L-mount) and records Blackmagic RAW files (no ProRes option). The camera body is built with a multi-button grip and features a tilting rear touchscreen LCD viewer with overlays. Optional Blackmagic accessories include a battery power grip and a top-mounting electronic viewfinder (EVF).
The BMCC 6K is comparable in size to a Canon EOS-1D X and is built with a lightweight carbon fiber polycarbonate composite body. However, I wouldn’t consider this a “run & gun” type of camera. It feels solid enough, but it’s not a tank like some of the aforementioned competitors. Plus, with open vents for cooling, you’d want to be careful in inclement weather. Add a zoom lens, batteries, and accessories, and you’ve got a camera that’s at home on a Movi, tripod, dolly, or other support system. Mount it on rails and you’ll want to add a separate external viewfinder, connected via the HDMI port. There’s a built-in stereo mic along with two mini-XLR connectors with optional phantom power for external mics. My purely handheld rig of camera, power grip, and zoom lens weighed in at a manageable five pounds.
Things to know before filming
I’m a video/film editor, so camera reviews aren’t usually my thing. But, I do know my way around cameras. The Blackmagic Cinema Camera 6K and the associated post workflow piqued my interest. Blackmagic Design loaned me the camera, power grip with two additional batteries, and EVF for a couple of weeks. To round out the package, a friend loaned me his Lumix 24-105mm zoom lens (wide angle to short telephoto). The standard retail package includes the camera body, one battery, a 12-volt AC charger, strap, and a license for DaVinci Resolve Studio. A nice touch is that the charger comes with several interchangeable adapter plugs to fit different worldwide electrical outlets.
Each battery is good for about an hour. Attach the power grip for a total of nearly three hours of operation. Or, you can operate on AC power via the charger. The camera records to a CFexpress card (not included) or an external USB-C drive. I opted to use a Samsung T7 SSD formatted as ExFAT. Of course, attaching an external drive would require getting creative with Velcro. Since this was all loaned gear, I just taped the drive to the camera strap and set out for an afternoon of filming.
There are two compression schemes for the Blackmagic RAW codec – constant bitrate (3:1, 5:1, 8:1, 12:1) or constant quality (four levels). Constant bitrate recording yields more predictable file sizes. Constant quality means the bitrate is variable, which allows a higher bitrate (less highly compressed) for more complex images. The uncorrected camera raw file is displayed as a low contrast, log image. A video LUT can be applied to the display, EVF, and any external monitor. This LUT can also be embedded into the file or used separately as a sidecar file (more on that in a minute). A corresponding 1920 x 1080 H.264 MP4 proxy file is also recorded with every Blackmagic RAW file.
A day in the park with the BMCC 6K
I opted to keep things simple and record at a constant bitrate (3:1), filming in the “open gate” resolution (6K, full frame, 3:2 aspect ratio). My clips were filmed off-speed with a project setting of 23.98fps and an off-speed record setting of 30fps. This results in moderate slomo during playback. That’s better for handheld operation when you don’t need sync sound, because it smooths out camera movement. In addition, the Lumix lens includes optical image stabilization, which I used instead of stabilizing in post using camera metadata. The LUT was embedded into these files. Rounding out the picture is a 180-degree shutter angle for proper, filmic motion blur.
DSLR-style video rigs are often unwieldy in handheld situations. However, this is a very nice camera to operate, with numerous functions accessible via buttons and a dial on the grip. These and more are also available on the touchscreen. The optional EVF comes with several eyepiece cups for left and right-eye operation and is activated when you place your eye over it. It’s also got a diopter focus dial if you wear glasses. After a bit of familiarization, it becomes second nature to make adjustments on-the-fly for iris, focus, and color temperature. I quickly appreciated its ergonomics over a cube-style camera body for handheld shooting.
The Blackmagic Cinema Camera 6K uses auto-focus, but it’s not self-adjusting. If your lens supports it, hit the focus button to automatically focus the image at the center of the frame. Reposition the guide in the touchscreen with your finger to focus on something along the edge of the frame. Likewise, there’s a button to adjust iris level, along with a manual iris control dial on the grip.
I was outside filming in shaded and sunny areas. As I moved the camera around, I would reframe or zoom, and then quickly tap the buttons with my thumb to adjust for the changes in light or focal plane. Sometimes the auto-focus will hunt for a second or two until it locks in, so doing this during an active shot isn’t a good idea. At the settings I was using, 30 minutes of content consumed a bit over 500GB of storage space. As expected, 30 minutes of continuous operation drew down the battery charge of a single battery by about 50%. Luckily, the camera didn’t exhibit any heating issues after lengthy recordings on a warm Florida day.
Blackmagic RAW in post
The Blackmagic RAW codec works natively in DaVinci Resolve, as well as with other NLEs using the Blackmagic RAW installer or third-party plug-ins. There have been changes in this codec over time, so install the latest version of Resolve or these plug-ins. The .braw file container carries camera raw video, multiple audio channels, timecode, and an embedded LUT. Long clips are continuous and not spanned like RED camera recordings. The drive or card also uses a simple file/folder structure without the tiered folders created by Sony camera recordings.
There was no need to copy or transcode files from the Samsung T7 drive. I simply plugged the drive into my iMac via USB and was ready to start editing in Resolve or Premiere Pro. The camera does record simultaneous proxy files, but I didn’t really need them. (These also don’t support the embedded LUT and require the sidecar LUT files.) The full quality 6K Blackmagic RAW media played fluidly and I could scrub through the timeline without any stuttering. (Blackmagic’s reps informed me that there’s an upcoming Blackmagic Cloud workflow, as well.)
Because I recorded embedded LUTs, the clips popped up with standard Rec 709 color applied. No need for the sidecar files. That’s helpful for fast turnaround edits. The LUT is not “baked” into the clip, so the camera raw data has been preserved. You can adjust the camera raw settings and grade the shot as needed from the raw data, with or without the LUT. For me, this worked perfectly well in both Resolve and Premiere Pro.
By default these full frame 3:2 aspect ratio clips will be pillarboxed (black bars on the sides) in a 16:9 HD or UHD 4K timeline. Changing the scaling in the inspector to “fill” will match the width of the frame, thus leaving room to move the shot up or down. “Crop” gives you a 1:1 pixel display. Then resize and reposition the shot within the full 6K resolution.
A word about stills
Although it’s not primarily a stills camera, the BMCC 6K does shoot nice 24MP (6K 3:2) stills in the Blackmagic RAW codec (no option for JPEG, TIFF, etc). You can fire off a still while you are recording a motion shot. Or you can change your settings to photography-based nomenclature (such as shutter speed versus shutter angle) and shoot a session of photos.
Unfortunately, the common photo apps like Photoshop don’t support the .braw codec. The workaround is to either stay completely within DaVinci Resolve or use it only as a camera raw processing tool. I simply created a 6K 3:2 timeline with one frame edits and the embedded LUT. Then I batch-exported the sequence as individual clips at native resolution in a TIFF format. This literally took a few minutes and then the stills were ready to bring into any common photo app for further work.
Final thoughts
I’ve only touched on the highlights, but there are many more features. You can shoot with anamorphic lenses, as well as in a vertical mode. There’s a timelapse mode. Work with the built-in LUTs or import your own custom LUTs. There’s a lot of visual information that can be displayed on the viewer and EVF, including guides, false color, focus peaking, and more. You can connect to a network (using a USB-C to ethernet adapter). You can also control the camera wirelessly through Bluetooth with the Blackmagic Camera Control app, as well as other third-party apps, like BlueConnect or Bluetooth+ on an iPhone or iPad. Network connection is useful if you want to transfer files directly from the camera to other storage.
Suffice it to say that the Blackmagic Cinema Camera 6K offers a lot of value with a great-looking, natural image. My total package (camera, lens, accessories, SSD, batteries) would run you at or under $5,000. If anything, with an hour of record time per battery, I’d probably skip the battery power grip and just swap out batteries as needed. The power grip also didn’t feel quite as robust to me as the camera body itself.
What the Blackmagic Cinema Camera 6K does well may not be the perfect fit for some. It’s not an all-in-one camera. But if you compete for high-end work, then its image compares well to the big name cameras, like ARRI, RED, Canon, and Sony. From my point of view as an editor and colorist, I’m happy that the files are graceful to work with and look good to boot. Pair the camera with the right lenses and you’ve got a winning combination.
A decade ago I wrote about the wider collection of apps that you might need as part of a broader Final Cut Pro-centric ecosystem. But it’s time for an updated look. In the waning years of Final Cut Pro “legacy” the Apple pro applications were bundled as Final Cut Studio. With the introduction of Final Cut Pro X, you had a lower cost app, but had to augment it with the missing pieces that were appropriate for more involved workflows.
Some are fans of Final Cut Pro as their main NLE. Others use it because it’s an alternative to subscription plans. Adobe Creative Cloud is the most comprehensive of these, so let’s look at what it would take to replace that level of functionality in a modern Final Cut Pro bundle.
Core Applications
To start, combine all of the Apple pro applications, including Final Cut Pro, Motion, Compressor, and Logic Pro. This covers you for editing, motion graphics, compression/encoding, and audio recording and mixing. Granted, the last one is optional for most video editors, but this lines up as an alternative to Adobe Audition – and a much better one at that. Since Compressor will not encode certain formats, I would also suggest adding Shutter Encoder (donation requested) to your video toolkit.
Photo / graphics
Apple has conceded graphic design applications to Adobe and others. But if you want to avoid subscriptions, then Pixelmator and Affinity (now owned by Canva) are the two best options for graphics and design. Affinity Photo, Designer, and Publisher form equivalents to Adobe Photoshop, Illustrator, and In Design. Pixelmator Pro isn’t as broad; however, it supports both raster and vector graphics.
Unfortunately, Apple dropped its popular Aperture application in favor of Photos. This is a lightweight mashup of Aperture and iPhoto. While it’s deceptively more full-featured than you might think at first glance, a good upgrade is Photomator from the folks at Pixelmator. There are certainly other options, but these two companies fit well into the Apple ecosystem.
Interoperability / augmentation
Speech-to-text is an exciting and valuable new area for editors and a must-have for many editorial workflows. Final Cut Pro lags behind Premiere Pro and Resolve in this area, so – third-party apps to the rescue. A good option is the free Jojo Transcribe. Use this to generate text, which can then be brought into Final Cut Pro for captioning.
If you need to interchange editorial files with other shops that use different applications, then you will need to translate the editorial files from and into list formats not supported by Final Cut Pro. This includes interchange between FCP and Premiere Pro, as well as sending to Pro Tools. While you might only need some of these, the following interchange apps cover the bases: XtoCC, SendToX, EDL-X, Worx4 X, X2Pro Audio Convert, and Xsend Motion. The latter sends an FCP timeline to Motion as a Motion timeline and is available via FxFactory. The others can be bought from the Mac App Store.
Plugins
You can go crazy with plugins, so be judicious with your selections. FCP includes a lot of useful video effects and transitions from the get-go. If you own Motion, you can export Motion’s stock effects or your own, unique creations as Motion template effects and transitions. These will then augment the standard FCP load. For outside options, I like to stick with the same company for consistency, like CoreMelt, Boris FX, MotionVFX, or FxFactory. The free FxFactory installation comes with a few effects, or bump that up to Pro for more. This also operates as a plugin manager where you can purchase any additional FxFactory effects that fit your needs or that of a new project.
Aside from these selections, I would also recommend the free Boris FX BCC+ Looks filter. Boris FX offers many great tools, but BCC+ Looks a good starting point. If you need more color correction horsepower, then my choice would be Color Finale 2. It’s designed specifically for Final Cut Pro and operates as a high-end grading tool. Another useful add-on for film stock looks and effects in FilmConvert Nitrate.
As far as audio plugins are concerned, there are many great options for Logic Pro if you need more than the comprehensive selection that it comes with. However, be careful in using these within Final Cut Pro. They will show up, but many either don’t work correctly or not at all. Plus FCP does not use a track-based timeline, so it’s not really conducive for advanced mixing with a multitude of tracks. On the other hand, FxFactory offers three audio clean-up/restoration effects from Accentize, which are better than FCP’s stock enhancement and work well within this video application.
To wrap it up, you could dive in deep and get everything on this list. If you do, then you’ll have a toolkit that’s comparable to Adobe Creative Cloud in most aspects. Many of these are available through the Mac App Store. Some are even free. It will cost more on the front end than simply purchasing Final Cut Pro alone. However, over the course of one or two years, it will prove to be the cheaper option than the cumulative subscription fees of other companies, like Adobe. This is even more true if you own multiple machines on the same Apple ID. Last but not least, don’t forget DaVinci Resolve. While it’s certainly a viable option to much of this list on its own, the free version is a good item for the kit to augment FCP. Even if you don’t edit with it, Resolve is useful for batch transcoding, and of course, color correction. It’s available from the Blackmagic Design website or the Mac App Store.