Apple told us at WWDC that more Intel Macs were on the way. The latest iMac refresh is the first fulfillment of that promise. In the Mac desktop line-up, iMac covers a span from two to ten CPU cores and up to 128GB of RAM. iMac Pro covers 10 to 18 cores and up to 256GB of RAM. This makes the 10-core configuration a bridge where the two branches overlap. It offers cost-effective performance and poses a great value for consumer power users along with professional editors, designers, photographers, engineers, and others. The recent refresh includes changes to the 21.5-inch iMac model, as well as the iMac Pro line. But I’m going focus on the 27-inch 5K iMac, since that model will most interest video professionals.
More power, faster storage, and nano-texture glass
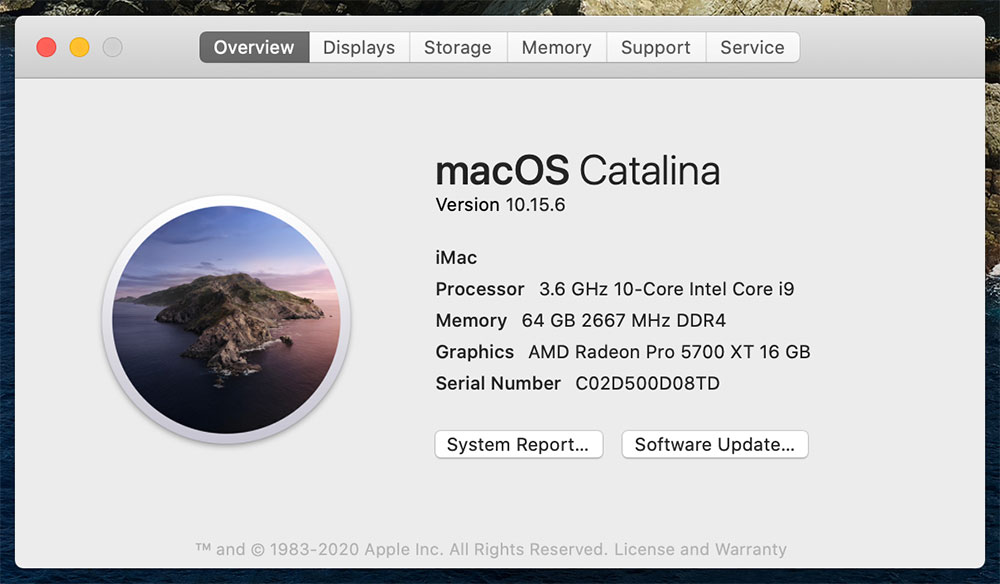
 The 5K iMac supplied by Apple for this review was configured with the Intel “Comet Lake” Core i9 10-core CPU (3.6GHz, Turbo Boost up to 5GHz), 64GB of DDR4 RAM, the Radeon Pro 5700 XT GPU (16GB of GDDR6 VRAM), and a 4TB SSD. It also came with the optional nano-texture glass display, keyboard with numeric keypad, trackpad, mouse, and 10Gb Ethernet. As tested, this would cost $6,158 USD (without AppleCare or tax). However, if you opted for a 1TB SSD, that retail cost would drop significantly. Fusion Drives are gone and replaced by all-flash storage options ranging from 256GB up to 8TB. The Blackmagic Disk Speed Test application clocked the internal 4TB SSD read/write speeds at around 2500-2900 MB/s respectively.
Before talking performance, let’s look at the rest of the iMac. It’s still the familiar silver form factor, but with a cooling system optimized for the 125W CPU. Four USB-A ports, two Thunderbolt 3/USB-C ports, 1Gb Ethernet, headphone jack, and a faster SDXC (UHS-II) card reader. Plus Wi-Fi and Bluetooth 5.0. If you need to connect to NAS storage (LumaForge Jellyfish, QNAS, Synology, etc.), then you’ll want to order your iMac with the optional 10GbE upgrade.
Recognizing that we are all spending more time at home, Apple improved the webcam to 1080p with an updated image sensor, enhanced the speakers with a variable EQ, added a three-point, “studio quality” mic system, and enabled “Hey Siri.”
 The Retina 5K display sports 500 nits of brightness, one billion colors, and support for P3 wide color. True Tone color technology has been added. It’s a nice feature for the non-pro user. Turn it off if you are doing anything color-critical, since it warms or cools the color temperature of the display depending on the lighting environment.
The biggest buzz will be around the nano-texture glass option, first introduced as an option for the Pro Display XDR. Traditional matte finishes use a coating that reduces glare and reflections, but with a loss of contrast. Nano-texture is a method to etch the glass at the nanometer level so that it redirects light. The objective is to reduce glare while maintaining contrast on par with that of the standard finish. It achieves that goal, although at a close viewing distance, text will look crisper on a display with standard glass.
At $500, it’s a reasonable option and less costly compared with the XDR. However, if your room doesn’t have a lot of direct light hitting the screen anyway, then you may not appreciate as large of a benefit from the nano-texture finish. In theory, heavy-handed cleaning could scuff the display. Apple claims that if you use the supplied cleaning cloth and occasional water (if needed), then screen damage is highly unlikely. Be gentle, don’t scrub, and you’ll be fine.
How does it stand up to an iMac Pro?
 I have access to several similarly-configured 10-core 2017 iMac Pros, so it seemed like a great opportunity for some head-to-head testing. The iMac Pro’s Xeon/Vega combo versus the new iMac’s Core i9/5700 XT combo. Both have 10-core CPUs, 64GB RAM, and a GPU with 16GB VRAM. The iMac Pro is designed as a workstation with appropriate parts and thermal cooling system. Until the 2019 Mac Pro was released, the iMac Pro was Apple’s most powerful Mac. On the other hand, the iMacs use components designed for general computing and gaming. That’s not to say they aren’t powerful. In fact by the numbers, the 10-core iMac features faster components than the equivalent iMac Pro model.
As a generality, you can say that the iMac should deliver better burst performance, whereas the iMac Pro is designed for lengthy, taxing performance, like constant use, extended rendering/encoding, and so on. But it really depends on the applications you are using and how much demand you place on the machine. When it comes to value, if we were to spec a 2020 27-inch iMac to closely match the 2017 iMac Pro I am using, then the iMac Pro currently runs about $1400 more (standard glass, no AppleCare, no tax). Is that added $1400 worth it? That’s where performance testing comes in.
Benchmark performance testing
 I ran both machines through a series of identical benchmarks, including BruceX 5K for Final Cut Pro X, Puget Systems’ Premiere Pro and After Effects benchmarks, as well as custom projects in Final Cut Pro X, Motion, and DaVinci Resolve. These tests covered a range of media formats and codecs, such as DNG image sequences, ProRes, H.264, REDCODE raw, ProRes RAW, and BRAW. Media sizes ranged from HD to 8K and my sequences and exports were 4K. These projects tested scaling, camera raw decodes, color correction, effects, synthetic media, and so on. I stuck to the internal drive for all media locations and export destinations, since both the iMac and iMac Pro disk speed tests came in with very similar numbers.
The export results for the new iMac and the iMac Pro were neck-and-neck when using Apple’s applications – a few seconds faster from FCPX for the iMac and the same for both with Motion. The one exception was a 4K HEVC export of my 11-layer FCPX timeline. In that case the iMac clocked in a couple of minutes faster.
 The Puget Systems’ Premiere Pro and After Effects benchmarks are designed around an overall target score of 1,000 possible points. Most Macs score in the 500 to 750-point range, while custom-built PCs often achieve 1,000 or better. Both the iMac and iMac Pro fell into the expected range, with the new iMac still beating out the iMac Pro. What really surprised me was that the iMac hit 1,027 in the After Effects benchmark! That so amazed me that I had to run the test again. Same result. I can only surmise that After Effects or the testing parameters favor the architecture of the Core-series CPUs and 5700 XT GPU over that of the Xeon/Vega combo used in the iMac Pro.
The Resolve test was the only instance in which the 2017 iMac Pro beat the 2020 iMac, with export times about one minute faster for a complex 7 minute, 4K color corrected sequence. During all of this testing, the cooling fans kicked into higher speeds for roughly the same amount of time and at the same places on both machines. For example, when exporting a Resolve clip that used temporal/spatial video noise reduction.
Should you buy one?
 Clearly the new 27-inch iMac is a powerful performer equipped with one of the best-looking computer displays available anywhere. If you are an editor, designer, audio engineer, or similar creative professional, then you really can’t go wrong with one. A facility owner may skew towards the pricier iMac Pro, because it’s a workstation-class machine or they need more cores, more RAM, or additional Thunderbolt 3 ports. Customer upgradeability is limited – essentially none for the iMac Pro and only RAM for the iMac.
Of course, the “elephant in the room” question is: Should you buy an Intel Mac now, with Apple silicon presumably coming within a few months? If you need a machine now and can’t wait, then the answer is yes. Maybe you want to wait until second-generation Apple silicon hardware is out before taking the plunge into new technology. Or you need something that requires Intel, such as running Windows via Boot Camp. All good reasons for staying with an Intel hardware investment a while longer.
 In reality, the transition to Apple silicon will take two years according to Apple. It may well be towards the end of that two-year period before we see comparable machines to today’s higher-end MacBook Pro, iMac, iMac Pro, or Mac Pro. We’ll know better once the first Apple silicon machines hit the market. In any case, Apple intends to support its Intel-based lines well after the transition is complete. Therefore, purchasing an Intel-based Mac today is likely to be less of a risk than people make it out to be.
The bottom line is that the mid-2020 27-inch 5K iMac in the 10-core configuration that I tested for this review is ideal for nearly any HD and 4K editing, color correction, graphics, and mixing. You can certainly go bigger with an iMac Pro or Mac Pro, but this configuration offers a tremendous value for these iconic, all-in-one desktop Macs. The 10-core model is that “sweet spot” where nearly every application can take full advantage of the available horsepower. If you need a desktop Mac now, then it should certainly be at the top of the list.
Check out the Stalman Podcast discussion about this iMac versus PCs.
Originally written for FCP.co.
©2020 Oliver Peters
 You may know him as a speaker, trainer, or web presenter. Or from the long-running Digital Production Buzz podcast series. Or his 2 Reel Guys series with the late Norman Hollyn. Regardless of how, Larry Jordan is well-known by most working and aspiring video professionals. But Jordan is also an accomplished author, with several books to his credit. The latest is Techniques of Visual Persuasion + Create powerful images that motivate.
 Techniques of Visual Persuasion is arranged into three sections. The first covers the fundamentals of persuasion. The second is about developing persuasive still images and the last section is about persuasive motion images. This book is arranged like a text book, which is a good thing. It’s well-researched and detailed. Each chapter starts with the goals to be covered and ends with a recap. Each is also capped off with an anecdote (like Larry starting a fire in a TV studio) or a guest contributor’s point-of-view. The pages are illustrated nicely with sidebars, images, and charts that help make the point of how and why one example is more inviting or persuasive than another.
 Jordan covers a wide range of theoretical and practical advice, such as the 180-degree rule, the rule of thirds, three-point lighting, sans serif vs. serif fonts, and much more. But it’s not all just concepts. Jordan has a lengthy background in software training, including several books around Final Cut Pro and Adobe products, as well as his PowerUp series of videos.
 Section two includes two chapters on the basics of Photoshop with practical examples of how to use its tools to enhance and repair still images and create layered composites. Section three goes even deeper into real-world experience. Jordan covers topics, such as suggested camera and audio equipment, interviewing techniques, how to properly record audio, and how to properly plan and produce a video shoot. This section also goes deepest into software basics, including a detailed look at Adobe Audition, Apple Final Cut Pro X, and Apple Motion.