The Zero Theorem

df_tzt_1Few filmmakers are as gifted as Terry Gilliam when it comes to setting a story inside a dystopian future. The Monty Python alum, who brought us Brazil and Twelve Monkeys, to name just a few, is back with his newest, The Zero Theorem. It’s the story of Qohen Leth – played by Christoph Walz (Django Unchained, Water for Elephants, Inglorious Basterds) – an eccentric computer programmer who has been tasked by his corporate employer to solve the Zero Theorem. This is a calculation, that if solved, might prove that the meaning of life is nothingness.

The story is set in a futuristic London, but carries many of Gilliam’s hallmarks, like a retro approach to the design of technology. Qohen works out of his home, which is much like a rundown church. Part of the story takes Qohen into worlds of virtual reality, where he frequently interacts with Bainsley (Melanie Thierry), a webcam stripper that he met at a party, but who may have been sent by his employer, Mancom, to distract him. The Zero Theorem is very reminiscent of Brazil, but in concept, also of The Prisoner, a 1960s-era television series. Gilliam explores themes of isolation versus loneliness, the pointlessness of mathematical modeling to derive meaning and privacy issues.

I recently had a Skype chat with Mick Audsley, who edited the film last year. Audsley is London-based, but is currently nearing completion of a director’s cut of the feature film Everest in Iceland. This was his third Gilliam film, having previously edited Twelve Monkeys and The Imaginarium of Doctor Parnassus. Audsley explained, “I knew Terry before Twelve Monkeys and have always had a lot of admiration for him. This is my third film with Terry, as well as a short, and he’s an extraordinarily interesting director to work with. He still thinks in a graphic way, since he is both literally and figuratively an artist. He can do all of our jobs better than we can, but really values the input from other collaborators. It’s a bit like playing in a band, where everyone feeds off of the input of the other band members.”df_tzt_5

The long path to production

The film’s screenplay writer Pat Rushin teaches creative writing at the University of Central Florida in Orlando, Florida. He originally submitted the script for The Zero Theorem to the television series Project Greenlight, where it made the top 250. The script ended up with the Zanuck Company. It was offered to Gilliam in 2008, but initially other projects got in the way. It was revived in June 2012 with Gilliam at the helm. The script was very ambitious for a limited budget of under $10 million, so production took place in Romania over a 37-day period. In spite of the cost challenges, it was shot on 35mm film and includes 250 visual effects.

df_tzt_6Audsley continued, “Nicola [Pecorini, director of photography] shot a number of tests with film, RED and ARRI ALEXA cameras . The decision was made to use film. It allowed him the latitude to place lights outside of the chapel set – Qohen’s home – and have light coming in through the windows to light up the interior. Kodak’s lab in Bucharest handled the processing and transfer and then sent Avid MXF files to London, where I was editing. Terry and the crew were able to view dailies in Romania and then we discussed these over the phone. Viewing dailies is a rarity these days with digitally-shot films and something I really miss. Seeing the dailies with the full company provides clarity, but I’m afraid it’s dying out as part of the filmmaking process.”df_tzt_7

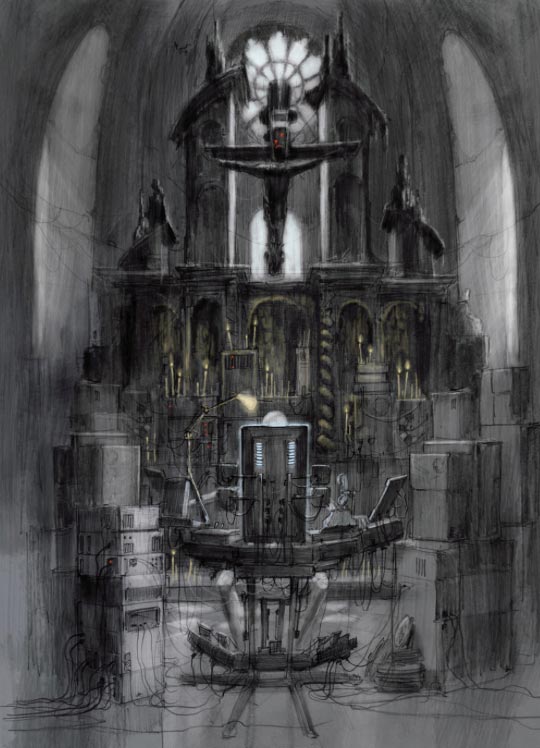
While editing in parallel to the production, Audsley didn’t upload any in-progress cuts for Gilliam to review. He said, “It’s hard for the director to concentrate on the edit, while he’s still in production. As long as the coverage is there, it’s fine. Certainly Terry and Nicola have a supreme understanding of film grammar, so that’s not a problem. Terry knows to get those extra little shots that will make the edit better. So, I was editing largely on my own and had a first cut within about ten days of the time that the production wrapped. When Terry arrived in London, we first went over the film in twenty-minute reels. That took us about two to three weeks. Then we went through the whole film as one piece to get a sense for how it worked as a film.”

Making a cinematic story

df_tzt_4As with most films, the “final draft” of the script occurs in the cutting room. Audsley continued, “The film as a written screenplay was very fluid, but when we viewed it as a completed film, it felt too linear and needed to be more cinematic – more out of order. We thought that it might be best to move the sentences around in a more interesting way. We did that quite easily and quickly. Thus, we took the strength of the writing and realized it in cinematic language. That’s one of the big benefits of the modern digital editing tools. The real film is about the relationship between Bainsley and Qohen and less about the world they inhabit. The challenge as filmmakers in the cutting room is to find that truth.”

df_tzt_8Working with visual effects presents its own editorial challenge. “As an editor, you have to evaluate the weight and importance of the plate – the base element for a visual effect – before committing to the effect. From the point-of-view of cost, you can’t keep undoing shots that have teams of artists working on them. You have to ensure that the timing is exactly right before turning over the elements for visual effects development. The biggest, single visual challenge is making Terry’s world, which is visually very rich. In the first reel, we see a futuristic London, with moving billboards. These shots were very complex and required a lot of temp effects that I layered up in the timeline. It’s one of the more complex sequences I’ve built in the Avid, with both visual and audio elements interacting. You have to decide how much can you digest and that’s an open conversation with the director and effects artists.”

The post schedule lasted about twenty weeks ending with a mix in June 2013. Part of that time was tied up in waiting for the completion of visual effects. Since there was no budget for official audience screenings, the editorial team was not tasked with creating temp mixes and preview versions before finishing the film. Audsley said, “The first cut was not overly long. Terry is good in his planning. One big change that we made during the edit was to the film’s ending. As written, Qohen ends up in the real world for a nice, tidy ending. We opted to end the film earlier for a more ambiguous ending that would be better. In the final cut the film ends while he’s still in a virtual reality world. It provides a more cerebral versus practical ending for the viewer.”

Cutting style 

df_tzt_9Audsley characterizes his cutting style as “old school”. He explained, “I come from a Moviola background, so I like to leave my cut as bare as possible, with few temp sound effects or music cues. I’ll only add what’s needed to help you understand the story. Since we weren’t obliged on this film to do temp mixes for screenings, I was able to keep the cut sparse. This lets you really focus on the cut and know if the film is working or not. If it does, then sound effects and music will only make it better. Often a rough cut will have temp music and people have trouble figuring out why a film isn’t working. The music may mask an issue or, in fact, it might simply be that the wrong temp music was used. On The Zero Theorem, George Fenton, our composer, gave us representative pieces late in the  process that he’d written for scenes.” Andre Jacquemin was the sound designer who worked in parallel to Audsley’s cut and the two developed an interactive process. Audsley explained, “Sometimes sound would need to breath more, so I’d open a scene up a bit. We had a nice back-and-forth in how we worked.”

df_tzt_3Audsley edited the film using Avid Media Composer version 5 connected to an Avid Unity shared storage system. This linked him to another Avid workstation run by his first assistant editor, Pani Ahmadi-Moore. He’s since upgraded to version 7 software and Avid ISIS shared storage. Audsley said, “I work the Avid pretty much like I worked when I used the Moviola and cut on film. Footage is grouped into bins for each scene. As I edit, I cut the film into reels and then use version numbers as I duplicate sequences to make changes. I keep a daily handwritten log about what’s done each day. The trick is to be fastidious and organized. Pani handles the preparation and asset management so that I can concentrate on the edit.”

df_tzt_2Audsley continued, “Terry’s films are very much a family type of business. It’s a family of people who know each other. Terry is supremely in control of his films, but he’s also secure in sharing with his filmmaking family. We are open to discuss all aspects of the film. The cutting room has to be a safe place for a director, but it’s the hub of all the post activity, so everyone has to feel free about voicing their opinions.”

Much of what the editor does, proceeds in isolation. The Zero Theorem provided a certain ironic resonance for Audsley, who commented, “At the start, we see a guy sitting naked in front of a computer. His life is harnessed in manipulating something on screen, and that is something I can relate to as a film editor! I think it’s very much a document of our time, about the notion that in this world of communication, there’s a strong aspect of isolation. All the communication in the world does not necessarily connect you spiritually.” The Zero Theorem is scheduled to open for limited US distribution in September.

For more thoughts from Mick Audsley, read this post at Avid Blogs.

Originally written for DV magazine / CreativePlanetNetwork.

©2014 Oliver Peters

More Life for your Mac Pro

df_life_macproI work a lot with a local college’s film production technology program as an advisor, editing instructor and occasionally as an editor on some of their professional productions. It’s a unique program designed to teach hands-on, below-the-line filmmaking skills. The gear has to be current and competitive, because they frequently partner with outside producers to turn out actual (not student) products with a combination of professional and student crews. The department has five Mac Pros that are used for editing, which I’ve recently upgraded to current standards, as they get ready for a new incoming class. The process has given me some thoughts about how to get more life out of your aging Apple Mac Pro towers, which I’ll share here.

To upgrade or not

Most Apple fans drool at the new Mac Pro “tube” computers, but for many, such a purchase simply isn’t viable. Maybe it’s the cost or the need for existing peripherals or other concerns, but many editors are still opting to get as much life as possible out of their existing Mac Pro towers.

In the case of the department, four of the machines are fast 2010 quad-cores and the fifth is a late 2008 eight-core. As long as your machine is an Intel of late 2008 or newer vintage, then generally it’s upgradeable to the most current software. Early 2008 and older is really pushing it. Anything before 2009 probably shouldn’t be used as a primary workhorse system. At 2009, you are on the cusp of whether it’s worth upgrading or not. 2010 and newer would be definitely solid enough to get a few more productive years out of the machine.

The four 2010 Mac Pros are installed in rooms designated as cutting rooms. The 2008 Mac was actually set aside and largely unused, so it had the oldest configuration and software. I decided it needed an upgrade, too, although mainly as an overflow unit. This incoming class is larger than normal, so I felt that having a fifth machine might be useful, since it still could be upgraded.

Software

All five machines have largely been given the same complement of software, which means Mavericks (10.9.4) and various editing tools. The first trick is getting the OS updated, since the oldest machines were running on versions that cannot be updated via the Mac App Store. Secondly, this kind of update really works best when you do a clean install. To get the Mavericks installer, you have to download it to a machine that can access the App Store. Once you’ve done the download, but BEFORE you actually start the installation, quit out of the installer. This leaves you with the Install Mavericks application in your applications folder. This is a 4GB installer file that you can now copy to other drives.

In doing the updates, I found it best to move drives around in the drive bays, putting a blank drive in bay 1 and moving the existing boot drive to bay 2. Format the bay 1 drive and copy the Mavericks installer to it. Run the installer, but select the correct target drive, which should be your new, empty bay 1 drive and NOT the current boot drive that’s running. Once the installation is complete, set up a new user account and migrate your applications from the old boot drive to the new boot drive. I do this without the rest (no documents or preferences). Since these systems didn’t have purchased third-party plug-ins, there weren’t any authorization issues after the migration. My reason for migrating the existing apps was that some of the software, like volume-licensed versions of Microsoft Office and Apple Final Cut Studio were there and I didn’t want to track down the installers again from IT. Naturally before doing this I had already uninstalled junk, like old trial versions or other software a student might have installed in the past. Any needed documents had already been separately backed up.

Once I’m running 10.9.4 on the new boot drive, I access the App Store, sign in with the proper ID and install all the App Store purchases. Since the school has a new volume license for Adobe Creative Cloud, I also have an installer from IT to cover the Adobe apps. Once the software dance is done, my complement includes:

Apple Final Cut Pro Studio “legacy” (FCP 7, DVD Studio Pro, Cinema Tools, Soundtrack Pro, Compressor, Motion, Color)

Apple Final Cut Pro X  “new” applications and utilities (FCP X, Motion, Compressor, Xto7, 7toX, Sync-N-Link X, EDL-X, X2Pro)

Adobe Creative Cloud 2014 (Prelude, Premiere Pro, SpeedGrade, Adobe Media Encoder, Illustrator, Photoshop, After Effects, Audition)

Avid Media Composer and Sorenson Squeeze (2 machines only)

Blackmagic Design DaVinci Resolve 11

Miscellaneous applications (Titanium Toast, Handbrake, MPEG Streamclip, Pages, Numbers, Keynote, Word, Excel, Redcine-X Pro)

Internal hard drives

All Mac Pro towers support four internal drives. Last year I had upgraded two of these machines with 500GB Crucial SSDs as their boot drive. While these are nice and fast, I opted to stick with spinning drives for everything else. The performance demand on these systems is not such that there’s really a major advantage over a good mechanical drive. For the most part, all machines now have four internal 1TB Western Digital Black 7200 RPM drives. The exceptions are the two machines with 500GB SSD boot drives and the 2008 Mac, which has two 500GB drives that it came supplied with.

After rearranging the drives, the configuration is: bay 1 – boot drive, bay 2 – “Media A”, bay 3 – “Media B” and bay 4 – Time Machine back-up. The Media A and B drives are used for project files, short term media storage and stock sound effects and music. When these systems were first purchased, I had configured the three drives in the 2, 3 and 4 slots as a single 3TB volume by RAIDing them as a RAID-0 software stripe. This was used as a common drive for media on each of the computers. However, over this last year, one of the machines appeared to have an underperforming drive within the stripe, which was causing all sorts of media problems on this machine. Since this posed the risk of potentially losing 3TB worth of media in the future on any of the Macs, I decided to rethink the approach and split all the drives back to single volumes. I replaced the underperforming drive and changed all the machines to this four volume configuration, without any internal stripes.

RAM and video cards

The 2010 machines originally came with ATI 5870 video cards and the 2008 an older NVIDIA card. In the course of the past year, one of the 5870 cards died and was replaced with a Sapphire 7950. In revitalizing the 2008 Mac, I decided to put one of the other 5870s into it and then replace it in the 2010 machine with another Sapphire. While the NVIDIA GTX 680 card is also a highly-regarded option, I decided to stick with the ATI/AMD card family for consistency throughout the units. One unit also includes a RED Rocket card for accelerated transcoding of RED .r3d files.

The 2010 machines have all been bumped up to 32GB of RAM (Crucial or Other Word Computing). The 2008 uses an earlier vintage of RAM and originally only had 2GB installed. The App Store won’t even let you download FCP X with 2GB. It’s been bumped up the 16GB, which will be more than enough for an overflow unit.

Of these cutting rooms, only one is designed as “higher end” and that’s where most of the professional projects are cut, when the department is directly involved in post. It includes Panasonic HD plasma and Sony SD CRT monitors that are fed by an AJA KONA LHi card. This room was originally configured as an Avid Xpress Meridien-based room back in the SD days, so there are also Digibeta, DVCAM and DAT decks. These still work fine, but are largely unused, as most of the workflow now is file-based (usually RED or Canon).

In order to run Resolve on any external monitor, you need a Blackmagic Design Decklink card. I had temporarily installed a loaner in place of the KONA, but it died, so the KONA went back in. Unfortunately with the KONA and FCP X, I cannot see video on both the Panasonic and Sony at the same time with 1080p/23.98 projects. That’s because of the limitations of what the Panasonic will accept over HDMI, coupled with the secondary processing options of the KONA. The HDMI signal wants P and not PsF and this results in the conflict. In the future, we’ll probably revisit the Decklink card issue, budget permitting, possibly moving the KONA to another bay.

All four 2010 units are equipped with two 27” Apple Cinema Displays, so the rooms without external monitoring simply use one of the screens to display a large viewer in most of the software. This is more than adequate in a small cutting room. The fifth 2008 Mac has dual 20” ACDs. Although my personal preference is to work with something smaller that dual 27” screens – as the lateral distance is too great – a lot of the modern software feels very crowded on smaller screens, such as the 20” ACDs. This is especially true of Resolve 11, which feels best with two 27” screens. Personally I would have opted for dual 23” or 24” HPs or Dells, but these systems were all purchased this way and there’s no real reason to change.

External storage

Storage on these units has always been local, so in addition to the internal drives, they are also equipped with external storage. Typically users are encouraged to supply their own external drives for short edits, but storage is made available for extended projects. The main room is equipped with a large MAXX Digital array connected via an ATTO card. All four 2010 rooms each gained a LaCie 4Big 12TB array last year. These were connected on one of the FireWire 800 ports and initially configured as RAID-1 (mirror), so only half the capacity was available.

This year I reconfigured/reformatted them as RAID-5, which nets a bit over 8TB of actual capacity. To increase the data throughput, I also added CalDigit FASTA-6GU3 cards to each. This is a PCIe combo host adapter card that provides two USB 3.0 and two SATA ports. By connecting the LaCie to each of the Macs via USB 3.0, it improves the read/write speeds compared to FireWire 800. While it’s not as fast Thunderbolt or even the MAXX array, the LaCies on USB 3.0 easily handle ProRes 1080p files and even limited use of native RED files within projects.

Other

A few other enhancements were made to round out the rooms as cutting bays. First audio. The main room uses the KONA’s analog audio outputs routed through a small Mackie mixer to supply volume to the speakers. To provide similar capabilities in the other rooms, I added a PreSonus AudioBox USB audio interface and a small Mackie mixer to each. The speakers are a mix of Behringer Truth, KRK Rokit 5 and Rokit 6 powered speaker pairs, mounted on speaker pedestals behind the Apple Cinema Displays. Signal flow is from the computer to the AudioBox via USB (or KONA in one room), the channel 1 and 2 analog outputs from the AudioBox (or KONA) into the Mackie and then the main mixer outputs to the left and right speakers. In this way, the master fader volume on the mixer is essentially the volume control for the system. This is used mainly for monitoring, but this combination does allow the connection of a microphone for input back into the Mac for scratch recordings. Of course, having a small mixer also lets you plug in another device just to preview audio.

The fifth Mac Pro isn’t installed in a room that’s designated as a cutting room, so it simply got the repurposed Roland powered near field speakers from an older Avid system. These were connected directly to the computer output.

Last, but not least, it’s the little things. When I started this upgrade round, one of the machines was considered a basket case, because it froze a lot and, therefore, was generally not used. That turned out to simply be a bad Apple Magic Mouse. The mouse would mess up, leaving the cursor frozen. Users assumed the Mac had frozen up, when in fact, it was fine. To fix this and any other potential future mouse issues, I dumped all the Apple Bluetooth mice and replaced them with Logitech wireless mice. Much better feel and the problem was solved!

©2014 Oliver Peters

Avid Everywhere

df_avid_ev_1It’s interesting to see that in spite of a lot of press, the Avid Everywhere concept still results in confusion. They’ve certainly been enunciating it since last year, with a full roll-out at NAB this past April. For whatever reason, Avid Everywhere seems to be lumped together with Adobe Anywhere in the minds of many. Maybe it’s the similarity of names or it’s that they both have a cloud component, but they aren’t the same thing. Avid Everywhere is a corporate vision, while Adobe Anywhere is a specific product (more on that later).

Vision and strategy

Avid Technology is a company with a diverse range of hardware and software products, covering content creation (video, audio, graphics, news), asset management, audio/video hardware i/o, consoles and control surfaces, storage and servers. In an effort to consolidate and rebrand a wide-ranging set of offerings, Avid has repackaged these existing (and future) products under the banner of Avid Everywhere. This is a marketing strategy designed to convey the message that whatever your media needs might be, Avid has a product or service to satisfy that need. This is coupled to a community of users that can benefit from their common use of Avid products.

This vision positions Avid’s products as a “platform”, in the same way that Windows, Mac OS X, iOS, Android, Apple hardware and PC hardware are all platforms. Within this platform concept, the products become stratified into product tiers or “suites”. Bear in mind that “suite” really refers to a group of products and not specifically a collection of hardware or software that you purchase as a single unit. The base layer of this platform contains the various software hooks that tie the products together – for example, APIs required to use Media Composer software with Interplay asset management or in an ISIS SAN environment. This is called the Avid MediaCentral Platform.

df_avid_ev_2On top of this sits the Storage Suite, which consists of the various Avid storage solutions, such as ISIS, along with news play-out servers. The next tier is the Media Suite, which encompasses the Interplay asset management and iNews newsroom products. In the transition to the Avid Everywhere strategy, you’ll see a lot of references on Avid’s website and in their marketing literature to “formerly Interplay ___”. That’s because Avid is in the process of rebranding these products into something with a “Media ___” name.

Most users who are editing and audio professionals will mainly associate Avid with the Artist Suite tier. This is the layer of content creation tools, including Media Composer, Pro Tools, Sibelius and the control surfaces that came out of Digidesign and Euphonix, including the Artist panels. If you are a single user of Media Composer, Pro Tools or Sibelius and own no other Avid infrastructure, like ISIS or Interplay, then the entire Avid Everywhere media platform doesn’t touch you very much for now.

The top layer of the platform chart is MediaCentral | UX, which was formerly known as Interplay Central. This is a web front-end that allows you to browse, log and notate Interplay assets from a desktop computer, laptop or mobile device. Although the current iteration is targeted at news production, the concept is story-centric and could provide functionality in other arenas, such as drama and reality series production.

Surrounding the entire structure are support services (tech support and professional integration services) plus a private and public marketplace. Media Composer software has included a Marketplace menu item for a few versions. Until now, this has been a web portal to buy plug-ins and stock footage. The updated vision for this is more along the lines of services like SoundCloud, Adobe’s Behance service or the files section of Creative Cloud. For example, let’s say you are a composer that uses Pro Tools. You create licensable music tracks and post them to the Marketplace. Other users can browse the Marketplace and find your tracks, complete with licensing and payment arrangements. To make this work, the Avid MediaCentral Platform includes things like proper security to enable such transactions.

All clouds are not the same

df_avid_ev_3I started this post with the comment that I feel many editors confuse Adobe Anywhere and Avid Everywhere. I believe that’s because they mistakenly interpret Avid Everywhere as the specific version of the Media Composer product that enables remote-access editing. As I’ve explained above, Everywhere is a concept and vision, not a product. That specific Media Composer product (formerly Interplay Sphere) is now branded as Media Composer | Cloud. As a product, it most closely approximates Adobe Anywhere, but there are key differences.

Adobe Anywhere is a system that requires a centralized server and storage. Any computer with Premiere Pro CC or CC 2014 can remotely access the assets on this system, which streams proxy media back to that computer. All the “heavy lifting” is done at the central site and the editor’s Premiere Pro is effectively working only as a local front-end. The operation does not allow hybrid editing with a combination of local and remote assets. All local assets have to be uploaded to the server and then streamed back to the editor. That’s because Anywhere manages the assets for multiple editors during collaborative workflows and handles project versioning. If you are working on an Anywhere production, you always have to be connected to the network.

df_avid_ev_4In contrast, Media Composer | Cloud is primarily a plug-in that works with an otherwise standard version of the Media Composer software. In order for it to function, the “home base” facility must have an appropriate Interplay/ISIS infrastructure so that Media Composer | Cloud can talk to it. In Avid marketing parlance “you’ve got to get on the platform” for some of these things to work.

Media Composer | Cloud permits hybrid editing. For example, a news videographer in the field can be editing at the proverbial Starbucks using local assets. Maybe part of the story requires access to past b-roll footage that lives back at the station on its newsroom storage. Through Media Composer | Cloud and Interplay, the videographer can access those files as proxies and integrate them into the piece. Meanwhile, local assets can be uploaded back to the station. When the piece is cut, a “publish” command (an AAF of the sequence) goes back to the station for quick turnaround to air. Media Composer | Cloud, by its nature, doesn’t require continuous connection, so editing can continue during transit, such as in a vehicle.

While not everything about Avid Everywhere has been fully implemented, yet, it certainly is an aggressive strategy. It is an attempt to move the company as a whole into areas beyond just editing software, while still allowing users and owners to leverage their Avid assets into other opportunities.

©2014 Oliver Peters

Red Giant Universe

df_rgsu_1

Red Giant Software, developers of such popular effects and editing tools as Trapcode and Magic Bullet, recently announced Red Giant Universe. Red Giant has adopted a hybrid free/subscription model. Once you sign into Universe for a Red Giant account, you have access to all the free filters and transitions that are part of this package. Initially this includes 31 free plug-ins (22 effects, 9 transitions) and 19 premium plug-ins (12 effects, 7 transitions). Universe users have a 30-day trial period before the premium effects become watermarked. Premium membership pricing will be $10/month, $99/year or $399/lifetime. Lifetime members will receive routine updates without any further cost.

A new approach to a fresh and growing library of effects

The general mood among content creators has been against subscription models; however, when I polled thoughts about the Universe model on one of the Creative COW forums, the comments were very positive. I originally looked at Red Giant’s early press on Universe and I had gotten the impression that Universe would be an environment in which users could create their own custom effects. In fact, this isn’t the case at all. The Universe concept is built on Supernova, an internal development tool that Red Giant’s designers use to create new effects and transitions. Supernova draws from a library of building block filters that can be combined to create new plug-in effects. This is somewhat the same as Apple’s Quartz Composer development tool; however, it is not part of the package that members can access.

df_rgsu_3Red Giant plans to build a community around the Universe members, who will have some input into the types of new plug-ins created. These plug-ins will only be generated by Red Giant designers and partner developers. Currently they are working with Crumplepop, with whom they created Retrograde – one of the premium plug-ins. The point of being a paid premium member is to continue receiving routine updates that add to the repertoire of Universe effects that you own. In addition, some of the existing Red Giant products will be ported to Universe in the future as new premium effects.

df_rgsu_2This model is similar to what GenArts had done with Sapphire Edge, which was based on an upfront purchase, plus a subscription for updated effects “collections” (essentially new preset versions of an Edge plug-in). These were created by approved designers and added to the library each month. (Note: Sapphire Edge – or at least the FX Central subscription – appears to have been discontinued this year.) Unlike the Sapphire Edge “collections”, the Universe updates are not limited to presets, but will include brand new plug-ins. Red Giant tells me they currently have several dozen in the development pipeline already.

Red Giant Universe supports both Mac and Windows and runs in recent versions of Adobe After Effects, Premiere Pro, Apple Final Cut Pro X and Motion. At least for now, Universe doesn’t support Avid, Sony Vegas, DaVinci Resolve, EDIUS or Nuke hosts. Members will be able to install the software on two computers and a single installation of Universe will install these effects into all applicable hosts, so only one purchase is necessary for all.

Free and premium effects with GPU acceleration

In this initial release, the range of effects includes many standards as free effects, including blurs, glows, distortion effects, generators and transitions. The premium effects include some that have been ported over from other Red Giant products, including Knoll Light Factory EZ, Holomatrix, Retrograde, ToonIt and others. In case you are concerned about duplication if you’ve already purchased some of these effects, Red Giant answers this in their FAQ: “We’ve retooled the tools. Premium tools are faster, sleeker versions of the Red Giant products that you already know and love. ToonIt is 10x faster. Knoll Light Factory is 5x faster. We’ve streamlined [them]with fewer controls so you can work faster. All of the tools work seamlessly with [all of the] host apps, unlike some tools in the Effects Suite.”

df_rgsu_4The big selling point is that these are high-quality, GPU-accelerated effects, which use 32-bit float processing for trillions of colors. Red Giant is using OpenGL rather than OpenCL or NVIDIA’s CUDA technology, because it is easier to provide support across various graphics cards and operating systems. The recommendation is to have one of the newer, faster NVIDIA or AMD cards or mobile GPUs. The minimum GPU is an Intel HD 3000 integrated graphics chip. According to Red Giant, “Everything is rendered on the GPU, which makes Universe up to 10 times faster than CPU-based graphics. Many tools use advanced render technology that’s typically used in game development and simulation.”

In actual use

After Universe is installed, the updates are managed through the Red Giant Link utility. This will now keep track of all Red Giant products that you have installed (along with Universe) and lets you update as needed. The effects themselves are nice and the quality is high, but these are largely standard effects, so far. There’s nothing major yet, that isn’t already represented with a similar effect within the built-in filters and transitions that come as part of FCP X, Motion or After Effects. Obviously, there are subjective differences in one company’s “bad TV” or “cartoon” look versus that of another, so whether or not you need any additional plug-ins becomes a personal decision.

As far as GPU-acceleration is concerned, I do find the effects to be responsive when I adjust them and preview the video. This is especially true in a host like Final Cut Pro X, which is really tuned for the GPU. For example, adding and adjusting a Knoll lens flare from the Universe package performs better on my 2009 Mac Pro (8-core with an NVIDIA Quadro 4000), than do the other third-party flare filters I have available on this unit.

df_rgsu_5The field is pretty crowded when you stack up Universe against such established competitors as GenArts Sapphire, Boris Continuum Complete, Noise Industries FxFactory Pro and others. As yet, Universe does not offer any tools that fill in workflow gaps, like tracking, masking or even keyers. I’m not sure the monthly subscription makes sense for too many customers. It would seem that free will be attractive to many, while an annual or lifetime subscription will be the way most users will purchase Universe. The lifetime price lines up well when you compare it to the others, in terms of purchasing a filter package.

Red Giant Universe is an ideal package of effects for editors. While Apple has developed a system with Motion where any user can created new FCP X effects based on templates, the reality is that few working editors have the time or interest to do that. They want effects that can be quickly applied with a minimum amount of tweaking and that perform well on a timeline. This is what impresses clients and what wins over editors to your product. With that target in mind, Red Giant definitely will do well with Universe if it holds to its promise. Ultimately the success of Universe will hang on how prolific the developers are and how quickly new effects come through the subscription pipeline.

Originally written for Digital Video magazine/Creative Planet Network

©2014 Oliver Peters